Creating tables in MySQL is essential for organizing and managing data within a database. Tables store data in rows and columns, similar to a spreadsheet structure.
- Tables can be created using the Command Line Interface (CLI) by executing the CREATE TABLE SQL statement.
- Tables can also be created using the MySQL Workbench graphical interface (GUI).
- Tables allow defining columns, data types, and constraints for structured data storage.
Using Command Line Client
The MySQL Command Line Client allows you to create a table using the CREATE TABLE statement. This method requires specifying the table name, column names, and their data types.
Syntax:
CREATE TABLE table_name (
    column1_name datatype constraints,
    column2_name datatype constraints,
    ...
    columnN_name datatype constraints
);- column_name: This is the name of each column in the table.
- datatype: This is the data type of the column (e.g., INT, VARCHAR, DATE, etc.).
- constraints: These are optional and define rules for the data in the column, such as NOT NULL, UNIQUE, PRIMARY KEY, FOREIGN KEY, etc.
Follow these steps to create a table using the MySQL Command Line Client.
Step 1: Open MySQL Command Line Client
Run the following command to log in to MySQL:
mysql -u your_username -pReplace your_username with your MySQL username. After running the command, you will be asked to enter your password.
Step 2: Create a Table
Once logged in, run the following query to create an employees table.
Query:
CREATE TABLE employees (
    id INT AUTO_INCREMENT PRIMARY KEY,
    name VARCHAR(100),
    age INT,
    department VARCHAR(100),
    salary DECIMAL(10, 2)
);
This table stores employee information such as id, name, age, department, and salary.
Step 3: Verify the Table Structure
To verify that the table was created successfully, you can use the DESCRIBE statement to view the structure of the employees table:
Query:
DESCRIBE employees;Output:
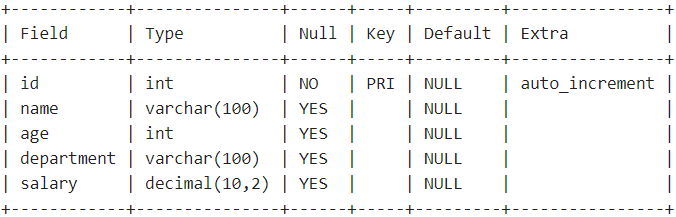
- Displays the structure of the employees table, including all defined columns.
- Shows details for each column such as data type and constraints specified in the CREATE TABLE statement.
By following these steps, you have successfully created a table using the MySQL Command Line Client. The table is now ready to store data in your database.
Using MySQL Workbench
For users who prefer a graphical interface, MySQL Workbench provides a simple way to create tables visually. It allows users to design tables without writing SQL commands.
Follow the steps below to create a table using MySQL Workbench.
Step 1: Open MySQL Workbench and Connect to Server
Launch MySQL Workbench and establish a connection to your MySQL server.
Step 2: Create a Database (If Necessary)
Create a database or schema if you have not already created one.
Step 3: Select the Database
Select the database where the table will be created.
- Click on the "Schemas" panel on the left-hand side of the screen.
- From the list of databases, select the one you want to work with.

Step 4: Create the Table
Enter the table details and create the table.
- Click on the Create a New Table icon in the toolbar.
- Enter the table name, column names, data types, and constraints.
For example, create a table named information.

Hence, the information table is successfully created using MySQL Workbench.
Step 5: Verify the Table
Once the table is created, you can verify it by using the "DESCRIBE" command in the MySQL Command Line Client.
- Open MySQL Command Line Client and connect to your server.
- Run the following command to view the table structure.
Query:
DESCRIBE information;Output:
.png)
By following these steps, you can create a table using MySQL Workbench and verify its structure using the MySQL Command Line Client.