The ActivityIndicator component in React Native is used to display a loading spinner to indicate that a task is in progress. It is commonly shown while fetching data from an API, loading content, or performing background operations. This helps improve user experience by providing visual feedback that the app is working.
- Displays a circular loading spinner to indicate ongoing processes.
- Supports customization using props like size, color, and animating.
- Commonly used during API calls, screen loading, or processing operations.
import React, { useState, useEffect } from 'react';
import { View, Text, ActivityIndicator, StyleSheet } from 'react-native';

export default function App() {
  const [loading, setLoading] = useState(true);

  // simulate loading for 3 seconds
  useEffect(() => {
    setTimeout(() => {
      setLoading(false);
    }, 3000);
  }, []);

  return (
    <View style={styles.container}>
      {loading ? (
        <ActivityIndicator size="large" color="blue" />
      ) : (
        <Text>Content Loaded Successfully!</Text>
      )}
    </View>
  );
}

const styles = StyleSheet.create({
  container: {
    flex: 1,
    justifyContent: 'center',
    alignItems: 'center',
  },
});
- ActivityIndicator shows a loading spinner.
- size="large" makes the spinner bigger.
- color="blue" sets the spinner color.
- useState controls whether loading is shown or not.
- After 3 seconds, the spinner disappears and text appears.
Syntax:
<ActivityIndicator />Props for ActivityIndicator Component
These props are used to control the appearance and behavior of the ActivityIndicator spinner, such as its size, color, and visibility.
- animating – Controls whether the spinner is shown or hidden.
- color – Sets the color of the loading spinner.
- size – Specifies the size of the spinner (small or large).
- hidesWhenStopped (iOS) – Hides the spinner when animation stops.
- style – Applies custom styles to the ActivityIndicator container.
Now let’s start with the implementation.
Step-by-Step Implementation
Step 1: Create a React Native Project
Now, create a project with the following command.
npx create-expo-app app-name --templateNote: Replace the app-name with your app name for example : react-native-demo-app.
Next, you might be asked to choose a template. Select one based on your preference as shown in the image below. I am selecting the blank template because it will generate a minimal app, as clean as an empty canvas in JavaScript.

It completes the project creation and displays a message: "Your Project is ready!" as shown in the image below.

Now go into your project folder, i.e., react-native-demo.
cd app-nameProject Structure:

Step 2: Run Application
Start the server by using the following command.
npx expo startThen, the application will display a QR code.
1. For the Android users,
- For the Android Emulator, press "a" as mentioned in the image below.
- For Physical Device, Download the "Expo Go" app from the Play Store. Open the app, and you will see a button labeled "Scan QR Code." Click that button and scan the QR code; it will automatically build the Android app on your device.
2. For iOS users, simply scan the QR code using the Camera app.
3. If you're using a web browser, it will provide a local host link that you can use as mentioned in the image below.

Step 3: Edit Code
App.js:
import React from 'react';
import {View, StyleSheet, Text ,
        ActivityIndicator} from 'react-native';

function App() {
  return (
    <View style={styles.container}>
      <ActivityIndicator
       size="large"
       color="lightgreen"/>
      <Text style={styles.text}>Loading...</Text>
    </View>
  );
}

const styles = StyleSheet.create({
  container: {
    flex: 1,
    justifyContent: 'center',
    alignItems: 'center',
  },
  text : {
    marginTop : 10,
  }

});
export default App;
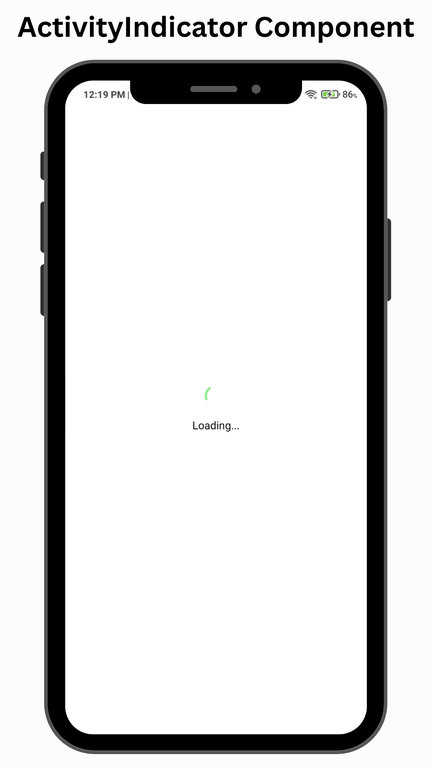
Output: