The Cucumber Framework is a popular BDD automation framework used to write and execute test scenarios in a simple and understandable format. It helps teams automate application testing while improving collaboration and test maintainability.
- Uses Gherkin syntax to write readable test scenarios.
- Integrates with Selenium, TestNG, and JUnit for automation testing.
- Supports collaboration between developers, testers, and business teams.
Cucumber Testing Architecture
Cucumber Testing Architecture is a layered structure that separates test scenarios from automation code to enable efficient execution of BDD test cases. It uses Feature Files, Step Definitions, and Core Implementation to execute automated tests efficiently.
Components of Cucumber Testing
1. Feature File: Contains test scenarios written in simple English using Gherkin language and describes application behavior from the user’s perspective.
File Extension:
.feature
Example:
- Feature: Login Functionality
- Scenario: Successful Login
Given User is on login page. When User enters valid username and password Then User should login successfully
2. Step Definition: Contains automation code for each step written in the Feature File and connects Gherkin steps with executable scripts.
File Extension:.java
Example:
@Given("User is on login page")
public void openLoginPage() {
driver.get("https://example.com");
}
3. Runner File: Executes Cucumber test cases and manages feature file and step definition configuration.
File Extension:.java
Example:
@RunWith(Cucumber.class)
@CucumberOptions(
features = "src/test/resources/features",
glue = "stepDefinitions"
)
public class TestRunner {
}
4. Gherkin Language: A business-readable language used to write test scenarios using keywords like Given, When, and Then.
5. Cucumber Framework: The core tool that supports BDD and enables execution of feature files.
Workflow of Cucumber Framework
Cucumber Framework workflow defines the step-by-step process of executing test scenarios using Feature Files, Step Definitions, and automation code to validate application behavior in BDD style.
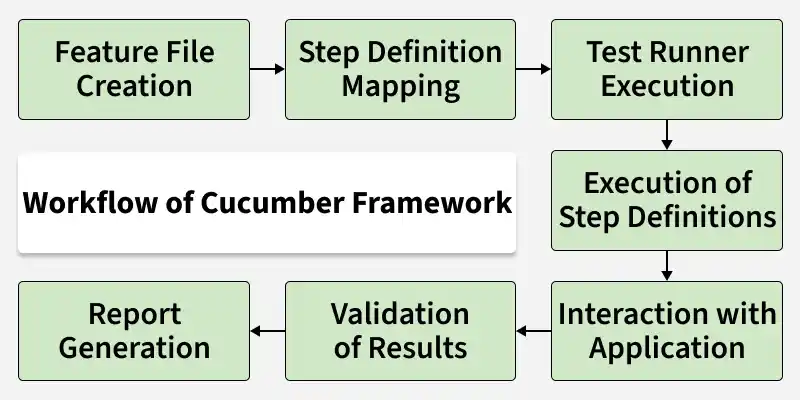
- Feature File Creation: Test scenarios are written in a
.featurefile using Gherkin language (Given, When, Then). - Step Definition Mapping: Each step in the feature file is connected to automation code written in Step Definition files.
- Test Runner Execution: A Test Runner (JUnit/TestNG) starts the execution and links feature files with step definitions.
- Execution of Step Definitions: Cucumber reads each step and runs the matching automation code.
- Interaction with Application: Automation code interacts with the application using tools like Selenium WebDriver.
- Validation of Results: Actual results are compared with expected results using assertions.
- Report Generation: Cucumber generates a final report showing passed, failed, and skipped test cases.
Creating and Running your first Cucumber Test
Setting up your first Cucumber test with Selenium for automated browser testing to implement Behavior-Driven Development (BDD).
Here are the steps to create and run the first Cucumber test:
1. Set Up a Maven Project
Create a Maven Project and add dependencies for Cucumber, Selenium, and TestNG in the pom.xml file:
pom.xml
<!-- Cucumber Dependencies -->
<dependency>
    <groupId>io.cucumber</groupId>
    <artifactId>cucumber-java</artifactId>
    <version>7.18.0</version>
    <scope>test</scope>
</dependency>

<dependency>
    <groupId>io.cucumber</groupId>
    <artifactId>cucumber-testng</artifactId>
    <version>7.18.0</version>
    <scope>test</scope>
</dependency>

<!-- TestNG Dependency -->
<dependency>
    <groupId>org.testng</groupId>
    <artifactId>testng</artifactId>
    <version>7.10.2</version>
    <scope>test</scope>
</dependency>

<!-- Selenium WebDriver Dependency -->
<dependency>
    <groupId>org.seleniumhq.selenium</groupId>
    <artifactId>selenium-java</artifactId>
    <version>4.21.0</version>
    <scope>test</scope>
</dependency>
2. Create a Feature File
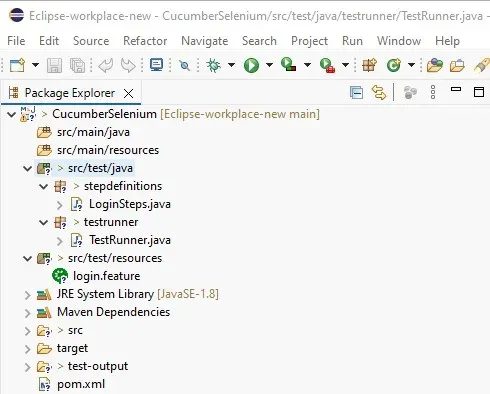
Create a Feature File to define test scenarios using Gherkin syntax. The login.feature file contains a simple login scenario and is stored in the src/test/resources directory.
login.feature
Feature: User Login

  Scenario: Successful login with valid credentials
    Given the user is on the login page
    When the user enters valid username and password
    Then the user should be redirected to the homepage
3. Create a Step Definitions File
Create Step Definitions file these Java methods in the LoginSteps class map to the steps in the feature file. The LoginSteps class uses Selenium WebDriver to interact with the web application during the test:
LoginSteps.java
package stepdefinitions;

import org.openqa.selenium.By;
import org.openqa.selenium.WebDriver;
import org.openqa.selenium.WebElement;
import org.openqa.selenium.chrome.ChromeDriver;

import io.cucumber.java.After;
import io.cucumber.java.Before;
import io.cucumber.java.en.Given;
import io.cucumber.java.en.Then;
import io.cucumber.java.en.When;

public class LoginSteps {

    private WebDriver driver;
    private String url = "https://www.saucedemo.com/";

    // Initialize WebDriver and open the browser
    @Before
    public void setup() {
        driver = new ChromeDriver();
    }

    // Step definition for "Given the user is on the login page"
    @Given("the user is on the login page")
    public void userOnLoginPage() {
        if (!this.driver.getCurrentUrl().equals(this.url)) {
            this.driver.get(this.url);
        }
    }

    // Step definition for "When the user enters valid username and password"
    @When("the user enters valid username and password")
    public void userEntersValidCredentials() {
        WebElement userName = this.driver.findElement(By.id("user-name"));
        userName.sendKeys("standard_user");

        WebElement passWord = this.driver.findElement(By.id("password"));
        passWord.sendKeys("secret_sauce");

        WebElement loginBtn = this.driver.findElement(By.id("login-button"));
        loginBtn.click();
    }

    // Step definition for "Then the user should be redirected to the homepage"
    @Then("the user should be redirected to the homepage")
    public void userRedirectedToHomepage() {
        String currentUrl = driver.getCurrentUrl();
        assert currentUrl.equals("https://www.saucedemo.com/inventory.html");
    }

    // Cleanup after each test
    @After
    public void tearDown() {
        if (driver != null) {
            driver.quit();
        }
    }
}
4. Create a TestRunner Class.
Create the TestRunner class connects the feature file and step definitions using Cucumber's @CucumberOptions annotation. It also generates HTML reports after running the tests.
TestRunner.java
package testrunner;

import io.cucumber.testng.AbstractTestNGCucumberTests;
import io.cucumber.testng.CucumberOptions;

@CucumberOptions(
    features = "C:\\path_to_feature\\login.feature", // Correct path to the feature file
    glue = "stepdefinitions", // Path to step definitions
    plugin = {"pretty", "html:target/cucumber-reports"} // Generate HTML report
)
public class TestRunner extends AbstractTestNGCucumberTests {
}
5. Run the Test
After setting up the feature files, step definitions, and test runner, you can run the tests using TestNG. Right-click on the TestRunner class and select Run As TestNG Test.
Output:
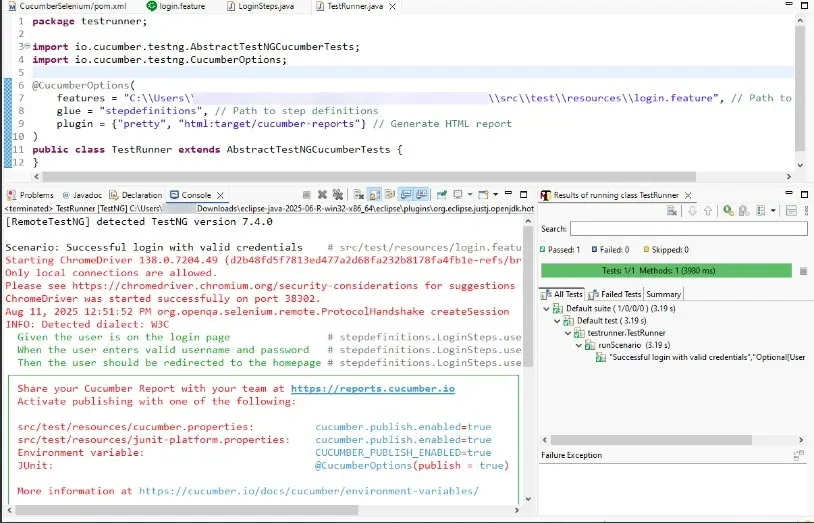
Creating and running your first Cucumber test is an important step in implementing BDD in your development process. As you become more comfortable with Cucumber, you'll be able to create more complex scenarios and leverage its full potential for improving your software quality and team communication.
Advantages
The Cucumber Framework improves test automation by making test cases more readable, reusable, and easier to maintain while enhancing collaboration among team members.
- Readability and Understandability: Gherkin syntax makes test scenarios easy to read and understand for all stakeholders.
- Collaboration: Encourages collaboration between developers, testers, and business analysts, ensuring everyone is aligned on requirements and expected application behavior.
- Documentation: Test cases written in Gherkin act as living documentation that stays updated with application changes and helps teams track requirements effectively.
- Reusability: Allows reusing test steps across different scenarios, reducing redundancy and minimizing maintenance efforts.