Neural Style Transfer (NST) is a fascinating deep learning technique that blends two images a content image and a style image to create a new, synthesized image that maintains the structure of the content image but adopts the stylistic features of the style image.

Key components
- Content Loss: The purpose of the content loss is to ensure that the generated image maintains the structural elements or the content of the original content image. Deep convolutional neural networks learn to extract hierarchical features at different layers where early layers detect basic edges and textures while deeper layers capture complex shapes and overall layout. In neural style transfer, one typically selects a deeper convolutional layer to represent content. The feature maps at this layer contain rich structural information about the image.
- Style Loss: The style loss captures the texture, patterns, colors and overall artistic style from the style image. Unlike content style is not represented simply by feature activations but by the relationships and correlations between different feature maps at multiple layers in the CNN. These correlations are summarized using the Gram matrix which computes the inner product between the vectorized feature maps effectively measuring how different features occur again in the image.
- Total Loss: The total loss used in neural style transfer is a weighted sum of the content loss and the style loss. The weights allow tuning the balance between preserving the content and transferring the style.
Step by step Working
Step 1: Import Necessary Libraries
- This step imports all necessary libraries like tensorflow and vgg19 are used for building and loading the neural style transfer model, load_img and img_to_array help with image pre processing, numpy handles numerical operations and matplotlib.pyplot is used to display images.
import tensorflow as tf
from tensorflow.keras.applications import vgg19
from tensorflow.keras.preprocessing.image import load_img, img_to_array
import numpy as np
import matplotlib.pyplot as plt
Step 2: Preprocessing and Deprocessing Functions
- preprocess_image(): loads and resizes the image, converts it to a NumPy array, and prepares it for VGG19 by applying specific preprocessing like mean subtraction.
- deprocess_image(): reverses the VGG19 pre processing by adding back the mean values and converting the image from BGR to RGB format for proper display.
def preprocess_image(image_path, target_size=(224, 224)):
    img = load_img(image_path, target_size=target_size)
    img = img_to_array(img)
    img = np.expand_dims(img, axis=0)
    return vgg19.preprocess_input(img)

def deprocess_image(x):
    x = x.reshape((224, 224, 3))
    x[:, :, 0] += 103.939
    x[:, :, 1] += 116.779
    x[:, :, 2] += 123.68
    x = x[:, :, ::-1]  # BGR to RGB
    x = np.clip(x, 0, 255).astype('uint8')
    return x
Step 3: Load and Preprocess Input Images
- The content and style image paths are defined then both images are loaded and preprocessed using the preprocess_image() function to make them compatible with the VGG19 model.
content_path = 'Dog.jpg'  # replace with your content image path
style_path = 'style1.jpg'      # replace with your style image path

content_image = preprocess_image(content_path)
style_image = preprocess_image(style_path)
Step 4: Load Pre trained VGG16 Model
- This function loads the pretrained VGG19 model without the top classification layer and freezes its weights. It extracts outputs from specific layers for style and content returning a new model that outputs both style and content feature maps.
#Define Model
content_layer = 'block5_conv2'
style_layers = [
    'block1_conv1',
    'block2_conv1',
    'block3_conv1',
    'block4_conv1',
    'block5_conv1'
]

num_style_layers = len(style_layers)

def get_model():
    vgg = vgg19.VGG19(include_top=False, weights='imagenet')
    vgg.trainable = False
    content_output = vgg.get_layer(content_layer).output
    style_outputs = [vgg.get_layer(name).output for name in style_layers]
    model_outputs = style_outputs + [content_output]
    return tf.keras.Model(vgg.input, model_outputs)
Step 5: Extract Style and Content Features
- gram_matrix(): calculates the style representation by computing the correlations between feature maps.
- get_features(): uses the model to extract both style and content features from the input images; style features are converted to Gram matrices for comparison.
#Style and Content Representation
def gram_matrix(tensor):
    result = tf.linalg.einsum('bijc,bijd->bcd', tensor, tensor)
    input_shape = tf.shape(tensor)
    num_locations = tf.cast(input_shape[1] * input_shape[2], tf.float32)
    return result / num_locations

def get_features(model, content, style):
    content_outputs = model(content)
    style_outputs = model(style)
    style_features = [gram_matrix(output) for output in style_outputs[:num_style_layers]]
    content_features = content_outputs[num_style_layers:]
    return style_features, content_features
Step 6: Compute Total Loss
- This function computes the total loss used for optimization by combining style loss and content loss. It weights each part according to
style_weightandcontent_weightreturning the total and individual losses.
#Loss Functions
def compute_loss(model, loss_weights, init_image, gram_style_features, content_features):
    style_weight, content_weight = loss_weights
    model_outputs = model(init_image)

    style_output_features = model_outputs[:num_style_layers]
    content_output_features = model_outputs[num_style_layers:]

    style_score = 0
    content_score = 0

    for target_style, comb_style in zip(gram_style_features, style_output_features):
        gram_comb_style = gram_matrix(comb_style)
        style_score += tf.reduce_mean((gram_comb_style - target_style) ** 2)

    for target_content, comb_content in zip(content_features, content_output_features):
        content_score += tf.reduce_mean((comb_content - target_content) ** 2)

    style_score *= style_weight
    content_score *= content_weight

    total_loss = style_score + content_score
    return total_loss, style_score, content_score
Step 7: Optimization
- This function calculates gradients of the total loss with respect to the generated image using TensorFlow's automatic differentiation. These gradients are then used to update the image during optimization to blend style and content.
@tf.function()
def compute_grads(cfg):
    with tf.GradientTape() as tape:
        all_loss = compute_loss(**cfg)
    total_loss = all_loss[0]
    return tape.gradient(total_loss, cfg['init_image']), all_loss
Step 8: Style Transfer Training Loop
- This function performs the neural style transfer. It initializes the model and input image, computes target features and iteratively updates the image using gradients to minimize style and content loss. The best image with lowest loss is saved and returned after training.
#Training Loop
def run_style_transfer(content_path, style_path,
                       num_iterations=1000, content_weight=1e3, style_weight=1e-2):

    model = get_model()
    for layer in model.layers:
        layer.trainable = False

    content_image = preprocess_image(content_path)
    style_image = preprocess_image(style_path)

    gram_style_features, content_features = get_features(model, content_image, style_image)

    init_image = tf.Variable(content_image, dtype=tf.float32)
    optimizer = tf.optimizers.Adam(learning_rate=5.0)

    best_loss, best_img = float('inf'), None

    loss_weights = (style_weight, content_weight)
    cfg = {
        'model': model,
        'loss_weights': loss_weights,
        'init_image': init_image,
        'gram_style_features': gram_style_features,
        'content_features': content_features
    }

    for i in range(num_iterations):
        grads, all_loss = compute_grads(cfg)
        total_loss, style_score, content_score = all_loss
        optimizer.apply_gradients([(grads, init_image)])
        init_image.assign(tf.clip_by_value(init_image, -103.939, 255.0 - 103.939))

        if total_loss < best_loss:
            best_loss = total_loss
            best_img = deprocess_image(init_image.numpy())

        if i % 100 == 0:
            print(f"Iteration {i}: Total loss: {total_loss.numpy():.4f}")

    return best_img
Step 9: Display and Save the Resulted Image
- This step runs the style transfer, displays the final stylized image using matplotlib and saves it with a timestamped filename using plt.imsave() for easy identification.
result = run_style_transfer(content_path, style_path)

plt.imshow(result)
plt.axis('off')
plt.show()

# Save the generated image
from datetime import datetime
output_path = f"generated_{datetime.now().strftime('%Y%m%d_%H%M%S')}.jpg"
plt.imsave(output_path, result)
print(f"Image saved as {output_path}")
Output:
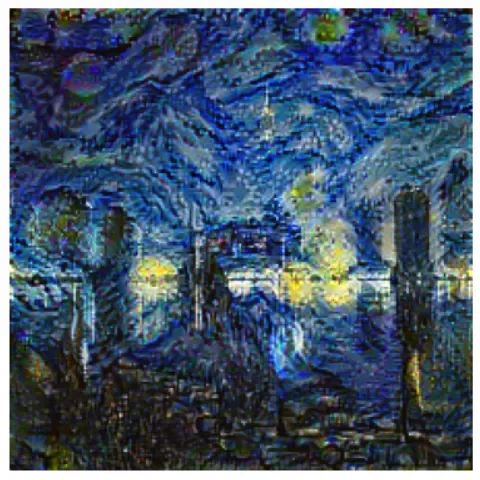
Here, we have transferred the content and style of two images and generated this image as an output for Neural style transfer in Keras.
You can download the source code from here- Neural Style Transfer in Keras