In React, forms are used to take input from users, like text, numbers, or selections. They work just like HTML forms but are often controlled by React state, so you can easily track and update the input values. Forms in React can be easily added and used as a simple react element.
- Inputs in React can be either controlled or uncontrolled, with controlled being the more common approach.
- Form submission is handled using an
onSubmitevent handler, whereevent.preventDefault()is called to stop the browser from reloading the page.
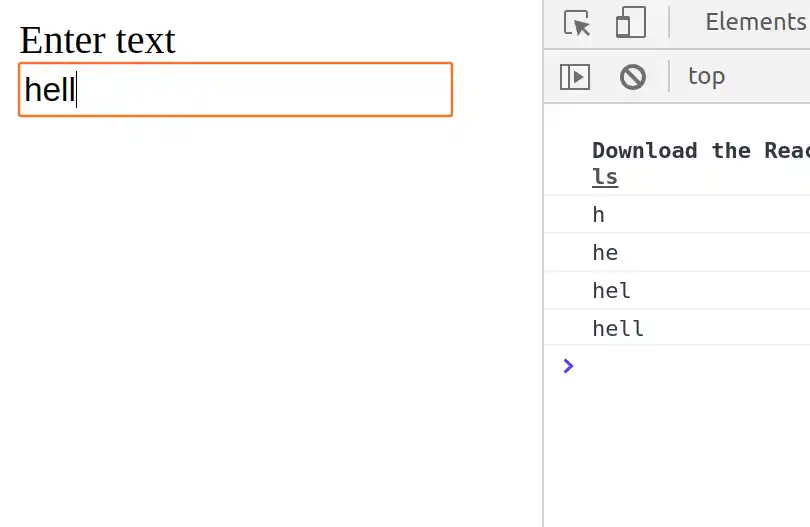
Example: This example displays the text input value on the console window when the React onChange event triggers.
import React from "react";
import ReactDOM from "react-dom";

function App() {

    function onInputChange(event) {
        console.log(event.target.value);
    }

    return (
        <div>
            <form>
                <label>Enter text</label>
                <input
                    type="text"
                    onChange={onInputChange}
                />
            </form>
        </div>
    );
}

ReactDOM.render(<App />, document.querySelector("#root"));
Output:
Handling React Forms
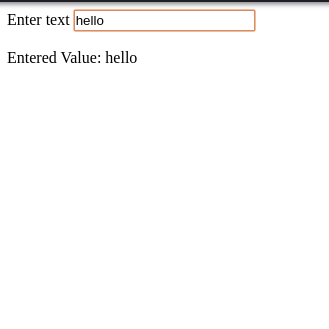
In HTML the HTML DOM handles the input data but in react the values are stored in state variable and form data is handled by the components.
Example: This example shows updating the value of inputValue each time user changes the value in the input field by calling the setState() function.
// Filename - index.js

import React, { useState } from "react";
import ReactDOM from "react-dom";

function App() {

    const [inputValue, setInputValue] = useState("");

    return (
        <div>
            <form>
                <label>Enter text</label>
                <input
                    type="text"
                    value={inputValue}
                    onChange={(e) => setInputValue(e.target.value)}
                />
            </form>

            <br />

            <div>
                Entered Value: {inputValue}
            </div>
        </div>
    );
}

ReactDOM.render(<App />, document.querySelector("#root"));
Output
Submitting React Forms
The submit action in React form is done by using the event handler onSubmit which accepts the submit function.
Example: Here we just added the React onSubmit event handler which calls the function onFormSubmit and it prevents the browser from submitting the form and reloading the page and changing the input and output value to 'Hello World!'.
// Filename - index.js

import React, { useState } from "react";
import ReactDOM from "react-dom";

function App() {

    const [inputValue, setInputValue] = useState("");

    const onFormSubmit = (event) => {
        event.preventDefault();
        setInputValue("Hello World!");
    };

    return (
        <div>
            <form onSubmit={onFormSubmit}>
                <label>Enter text</label>
                <input
                    type="text"
                    value={inputValue}
                    onChange={(e) =>
                        setInputValue(e.target.value)
                    }
                />
            </form>

            <br />

            <div>
                Entered Value: {inputValue}
            </div>
        </div>
    );
}

ReactDOM.render(<App />, document.querySelector("#root"));
Output
Other Input Fields
Apart from the regular <input> tag, React forms also support other input elements like <textarea> and <select>. Both use the value prop and an onChange handler to track and update their values through state.
Textarea Tag
In HTML, <textarea> defines its content by wrapping text between opening and closing tags. In React, this is replaced with a value prop instead.
Example:
function MyForm() {
  const [bio, setBio] = useState('');

  return (
    <textarea
      value={bio}
      onChange={(e) => setBio(e.target.value)}
      placeholder="Write something..."
    />
  );
}
Select Tag
In HTML, the selected option is marked using the selected attribute on an <option> tag. In React, you put the value prop directly on the <select> tag instead.
Example:
function MyForm() {
  const [role, setRole] = useState('developer');

  return (
    <select value={role} onChange={(e) => setRole(e.target.value)}>
      <option value="developer">Developer</option>
      <option value="designer">Designer</option>
      <option value="manager">Manager</option>
    </select>
  );
}
Multiple Input Fields
When a form has multiple inputs, managing separate state variables becomes messy. Instead, store all values in one state object and use a single onChange handler that updates fields using e.target.name and e.target.value.
Syntax:
const handleChange = (e) => {
  const { name, value } = e.target;
  setFormData((prev) => ({ ...prev, [name]: value }));
};
Where,
name— matches the field's key in the state objectvalue— the new value typed by the user...prev— spreads the existing state so other fields aren't overwritten[name]: value— dynamically updates only the field that changed
Example:
function MyForm() {
  const [formData, setFormData] = useState({
    username: '',
    email: '',
    age: '',
    city: '',
    bio: '',
    role: 'developer',
  });

  const handleChange = (e) => {
    const { name, value } = e.target;
    setFormData((prev) => ({ ...prev, [name]: value }));
  };

  const handleSubmit = (e) => {
    e.preventDefault();
    console.log(formData);
  };

  return (
    <form onSubmit={handleSubmit}>
      <input name="username" value={formData.username} onChange={handleChange} placeholder="Username" />
      <input name="email"    value={formData.email}    onChange={handleChange} placeholder="Email" />
      <input name="age"      value={formData.age}      onChange={handleChange} placeholder="Age" />
      <input name="city"     value={formData.city}     onChange={handleChange} placeholder="City" />
      <textarea name="bio"   value={formData.bio}      onChange={handleChange} placeholder="Bio" />
      <select name="role"    value={formData.role}     onChange={handleChange}>
        <option value="developer">Developer</option>
        <option value="designer">Designer</option>
        <option value="manager">Manager</option>
      </select>
      <button type="submit">Submit</button>
    </form>
  );
}