Deep Convolutional GAN (DCGAN) is a GAN architecture proposed by researchers from MIT and Facebook AI Research to improve the stability of GAN training using convolutional neural networks.
- Uses convolutional layers for image generation tasks
- Introduces architectural changes for stable GAN training
- Widely used in computer vision and image synthesis
- Effective for generating realistic images
- Can be applied to datasets such as Fashion MNIST for clothing image generation
Architecture
Deep Convolutional GAN consists of two neural networks, a generator and a discriminator. The generator creates realistic images from random noise, while the discriminator identifies whether an image is real or generated.
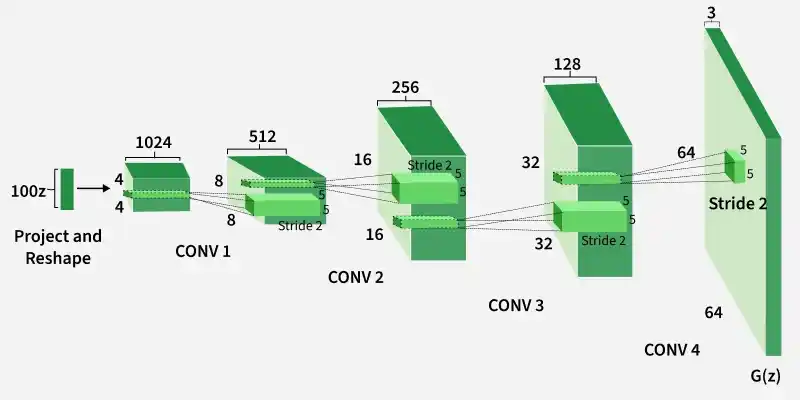
Generator
The generator converts a 100-dimensional noise vector into a 64×64×3 image using fractionally strided convolution layers. It uses Batch Normalization and ReLU activations for stable training and removes fully connected layers.
- Converts noise into images
- Uses fractionally strided convolutions
- Applies Batch Normalization and ReLU
- Gradually increases image dimensions
Discriminator
The discriminator acts as a convolutional classifier that determines whether an image is real or generated. It uses strided convolutions and LeakyReLU activations for improved feature learning.
- Classifies images as real or fake
- Uses strided convolution layers
- Applies LeakyReLU activations
- Removes fully connected layers
Implementation
In this implementation, DCGAN is built using Keras and TensorFlow on the Fashion MNIST dataset. Since Fashion MNIST contains grayscale images of size 28×28, the original DCGAN architecture is slightly modified from the standard 64×64×3 image setup.
Step1: Importing Required Libraries
- tensorflow and keras are used for creating and training neural networks
- numpy is used for numerical operations and array handling
- matplotlib.pyplot is used for image visualization
- tqdm displays training progress bars
- IPython.display helps display generated images during training
import tensorflow as tf
from tensorflow import keras
import numpy as np
import matplotlib.pyplot as plt
from tqdm import tqdm
from IPython import display
Step 2: Loading the Fashion-MNIST Dataset
The Fashion-MNIST dataset is loaded using tf.keras.datasets, which provides direct access to the dataset without manual downloading. The dataset contains 28×28 grayscale images for training and testing.
- Contains 60,000 training images and 10,000 test images
- Each image has dimensions 28×28×1
- Pixel values range from 0 to 255
- Values are divided by 255 for normalization
(x_train, y_train), (x_test, y_test) = tf.keras.datasets.fashion_mnist.load_data()
x_train = x_train.astype(np.float32) / 255.0
x_test = x_test.astype(np.float32) / 255.0
x_train.shape, x_test.shape
Output:
((60000, 28, 28), (10000, 28, 28))
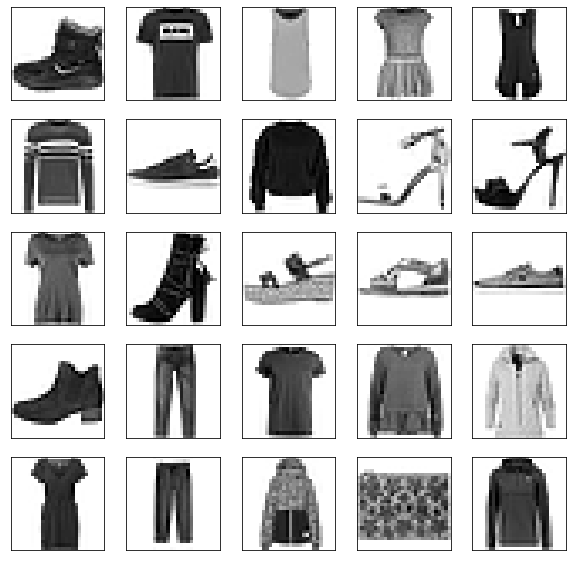
Step 3: Visualizing the Dataset
In this step, some images from the Fashion-MNIST dataset are visualized using the Matplotlib library.
- Uses Matplotlib for image visualization
- Displays sample Fashion-MNIST images
- Helps understand the dataset before training
plt.figure(figsize =(10, 10))
for i in range(25):
    plt.subplot(5, 5, i + 1)
    plt.xticks([])
    plt.yticks([])
    plt.grid(False)
    plt.imshow(x_train[i], cmap = plt.cm.binary)
plt.show()
Output:
Step 4: Defining Training Parameters
In this step, training parameters such as batch size are defined and the dataset is divided into smaller batches for training.
- Defines batch size for training
- Splits dataset into batches
- Randomly samples training data for each batch
- Improves training efficiency and stability
batch_size = 32
def create_batch(x_train):
    dataset = tf.data.Dataset.from_tensor_slices(x_train).shuffle(1000)
    dataset = dataset.batch(batch_size, drop_remainder=True).prefetch(1)
    return dataset
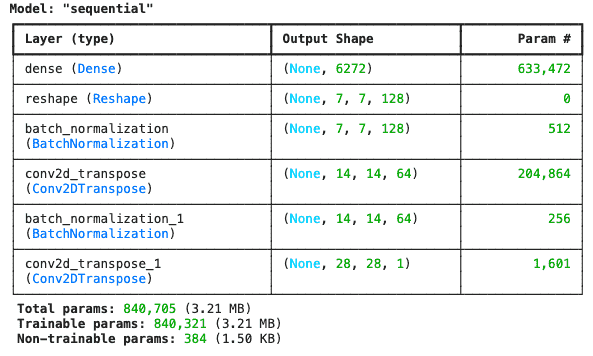
Step 5: Defining the Generator
The generator converts a 100-dimensional noise vector into a (28,28,1) image using transpose convolution layers and Batch Normalization.
- Reshapes input to (7,7,128)
- Uses transpose convolutions for upsampling
- Applies Batch Normalization
- Generates grayscale images
num_features = 100

generator = keras.models.Sequential([
    keras.layers.Dense(7 * 7 * 128, input_shape=[num_features]),
    keras.layers.Reshape([7, 7, 128]),
    keras.layers.BatchNormalization(),

    keras.layers.Conv2DTranspose(
        64, (5, 5), (2, 2),
        padding="same",
        activation="selu"
    ),

    keras.layers.BatchNormalization(),

    keras.layers.Conv2DTranspose(
        1, (5, 5), (2, 2),
        padding="same",
        activation="tanh"
    ),
])

generator.summary()
Output:
Step 6: Defining the Discriminator
The discriminator takes a (28×28×1) image as input and outputs a scalar value indicating whether the image is real or generated.
- Accepts grayscale images as input
- Uses convolution layers for feature extraction
- Classifies images as real or fake
- Outputs a single prediction value
discriminator = keras.models.Sequential([
    keras.layers.Conv2D(
        64, (5, 5), (2, 2),
        padding="same",
        input_shape=[28, 28, 1]
    ),

    keras.layers.LeakyReLU(0.2),
    keras.layers.Dropout(0.3),

    keras.layers.Conv2D(
        128, (5, 5), (2, 2),
        padding="same"
    ),

    keras.layers.LeakyReLU(0.2),
    keras.layers.Dropout(0.3),

    keras.layers.Flatten(),

    keras.layers.Dense(1, activation='sigmoid')
])

discriminator.summary()
Output:

Step 7: Compiling the DCGAN Model
In this step, the discriminator is compiled first and its training is temporarily disabled while training the generator in the combined DCGAN model.
- Compiles the discriminator model
- Freezes discriminator weights during generator training
- Combines generator and discriminator into DCGAN
- Helps train generator to produce realistic images
discriminator.compile(
    loss="binary_crossentropy",
    optimizer="adam"
)

discriminator.trainable = False

gan = keras.models.Sequential([
    generator,
    discriminator
])

gan.compile(
    loss="binary_crossentropy",
    optimizer="adam"
)
Step 8: Defining the Training Procedure
In this step, the training process for the DCGAN model is defined. The tqdm package is used to visualize training progress during each epoch.
- Defines GAN training loop
- Trains generator and discriminator iteratively
- Uses tqdm for progress visualization
- Monitors training efficiently
seed = tf.random.normal(shape=[batch_size, 100])

def train_dcgan(gan, dataset, batch_size, num_features, epochs=5):

    generator, discriminator = gan.layers

    for epoch in tqdm(range(epochs)):

        print()
        print("Epoch {}/{}".format(epoch + 1, epochs))

        for X_batch in dataset:

            noise = tf.random.normal(
                shape=[batch_size, num_features]
            )

            generated_images = generator(noise)

            X_fake_and_real = tf.concat(
                [generated_images, X_batch],
                axis=0
            )

            y1 = tf.constant(
                [[0.]] * batch_size +
                [[1.]] * batch_size
            )

            discriminator.trainable = True
            discriminator.train_on_batch(
                X_fake_and_real,
                y1
            )

            noise = tf.random.normal(
                shape=[batch_size, num_features]
            )

            y2 = tf.constant([[1.]] * batch_size)

            discriminator.trainable = False

            gan.train_on_batch(
                noise,
                y2
            )

            generate_and_save_images(
                generator,
                epoch + 1,
                seed
            )

    generate_and_save_images(
        generator,
        epochs,
        seed
    )
Step 9: Generating and Saving Images
In this step, a function is created to generate and save images during training. These generated images can later be used to create a GIF showing the training progress.
def generate_and_save_images(model, epoch, test_input):

    predictions = model(
        test_input,
        training=False
    )

    fig = plt.figure(figsize=(10, 10))

    for i in range(25):

        plt.subplot(5, 5, i + 1)

        plt.imshow(
            predictions[i, :, :, 0] * 127.5 + 127.5,
            cmap='binary'
        )

        plt.axis('off')

    plt.savefig(
        'image_epoch_{:04d}.png'.format(epoch)
    )
Step 10: Training the DCGAN Model
Before training, the dataset is reshaped to include the color channel dimension and divided into batches. The DCGAN model is then trained for multiple epochs.
x_train_dcgan = x_train.reshape(
    -1, 28, 28, 1
) * 2. - 1.

dataset = create_batch(x_train_dcgan)

train_dcgan(
    gan,
    dataset,
    batch_size,
    num_features,
    epochs=10
)
Output:

Step 11: Creating GIF from Generated Images
In this step, a function is created to convert the saved generated images into a GIF for visualizing the training progress of the DCGAN model.
- Uses saved images from each epoch
- Combines images into an animated GIF
- Helps visualize image generation improvements during training
import imageio
import glob

anim_file = 'dcgan_results.gif'

with imageio.get_writer(anim_file, mode='I') as writer:

    filenames = glob.glob('image*.png')
    filenames = sorted(filenames)

    last = -1

    for i, filename in enumerate(filenames):

        frame = 2 * (i)

        if round(frame) > round(last):
            last = frame
        else:
            continue

        image = imageio.imread(filename)
        writer.append_data(image)

    image = imageio.imread(filename)
    writer.append_data(image)

display.Image(filename=anim_file)
Download full code from here
Applications
DCGANs are widely used in image generation and computer vision tasks due to their ability to learn meaningful visual features.
- Image generation and synthesis
- Fashion and face image creation
- Data augmentation for deep learning models
- Image super-resolution and enhancement
- Feature extraction for classification tasks
- Art, animation, and creative content generation