Helm Chart is widely regarded as the package manager for Kubernetes. While it may appear to be just another package manager, it extends a great deal more. Helm makes managing application components easy by grouping those parts into charts, which can then be easily installed and upgraded.
What is Helm Charts?
Helm charts leverage a packaging format. A chart is a collection of files that define a related set of Kubernetes resources. A single chart might be used to deploy something as simple as a Memcached pod, or it could be used to deploy something as complex as a full web app stack, complete with HTTP servers, databases, and caches. Charts are developed as files laid out in a particular directory structure. They can be made into versioned archives to be deployed.
How Do Helm Charts Work?
- The Helm application library uses charts to define, build, install, and upgrade Kubernetes applications.
- You may manage Kubernetes manifests using Helm charts instead of the Kubernetes command-line interface (CLI).
- You don't have to remember complex Kubernetes commands to manage the cluster.
- Consider a practical scenario in which Helm can be useful, you intend to deploy your application in a production environment with ten replicas.
- Now, test the same application in a staging environment. environment. Using Helm, you can customize the fields based on the surroundings.
How To Pull Environment Variables With Helm Charts?
Here is the step-by-step implementation to pull environment variables with Helm Charts:
Step 1: Create a Helm Chart
First, Use the helm create command to start a new Helm chart.
helm create my-chartOutput:

Step 2: Create Directory Structure
Below is the generated directory structure and files created by the helm create command.
my-chart/
├── .helmignore
├── Chart.yaml
├── values.yaml
├── charts/
└── templates/
    ├── deployment.yaml
    ├── service.yaml
    ├── hpa.yaml
    ├── ingress.yaml
    ├── serviceaccount.yaml
    ├── tests/
    │   └── test-connection.yaml
    └── _helpers.tpl
Step 3: Add Environment Variables
Values will have added to your environment variables.yam. For example.
env:
  - name: DATABASE_URL
    value: "mysql://user:password@host:port/db"
  - name: SECRET_KEY
    valueFrom:
      secretKeyRef:
        name: my-secret
        key: secret-key
Step 4: Review and Update
You can get metadata for your chart in the Chart. yaml.
apiVersion: v2
name: webapp
description: A Helm chart for deploying a basic Nginx web application
type: application
version: 0.1.1
appVersion: 1.22.0
Step 5: Modify the Deployment Template
Next, open the file templates/deployment.yaml and fill in the container specification with the environment variables.
apiVersion: apps/v1
kind: Deployment
metadata:
  name: my-app
spec:
  replicas: 1
  selector:
    matchLabels:
      app: my-app
  template:
    metadata:
      labels:
        app: my-app
    spec:
      containers:
        - name: my-app-container
          image: my-app-image:latest
          env:
            {{- with .Values.env }}
            {{- toYaml . | nindent 12 }}
            {{- end }}
Step 6: Deploy the Helm Chart
Now, The install option must be a chart reference, a path to a packaged chart, a route to an unpacked chart directory, or a URL.
helm install my-release ./my-chartOutput:

Step 7: Check Deployment
Then you can find out how your deployment is progressing.
kubectl get deploymentsOutput:

Step 8: Update the Helm Chart with Personalized Values
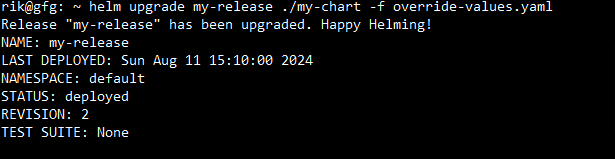
Now you can also update with personalized values to enhance the process.
helm upgrade my-release ./my-chart -f override-values.yamlOutput:
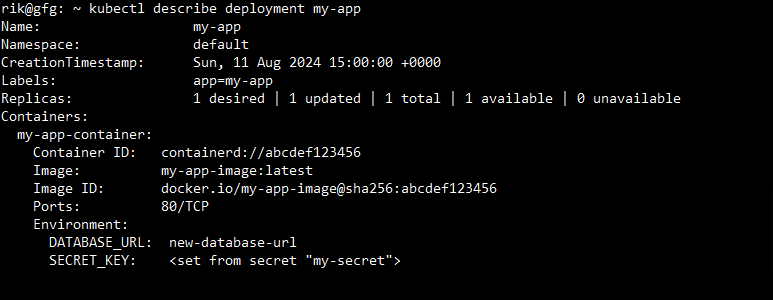
Step 9: Verify Updated Deployment
Lastly, running the below command may show an extensive overview of the deployment's settings, status, and other pertinent information.
kubectl describe deployment my-appOutput:
Best Practices of Helm charts
- Use Templates Effectively: You need to break large, complicated templates into smaller, more manageable ones. For common templates and functions, use _helpers. tpl.
- Package/push, then deploy: This is the recommended method for utilizing Helm. First, you should package and submit the Helm chart to a repository, after which you deploy it to your cluster.
- Deploy from an unpackaged chart: This is the simplest Helm pipeline. The Helm chart and the application's source code are in the same Git repository.
- Manage Dependencies Properly: To manage chart dependencies, use Chart. yaml or the charts/ directory. This guarantees that all necessary charts are present and accessible.
Conclusion
In this article, we have learned about how to pull environment variables with Helm charts. A Helm chart combines YAML files with templates to generate configuration files based on specified criteria.