An Ansible inventory is simply a list of managed hosts (servers, network devices, etc.) that your control node communicates with to run automation tasks. Inventory defines who Ansible will manage. It can be static or dynamically generated.
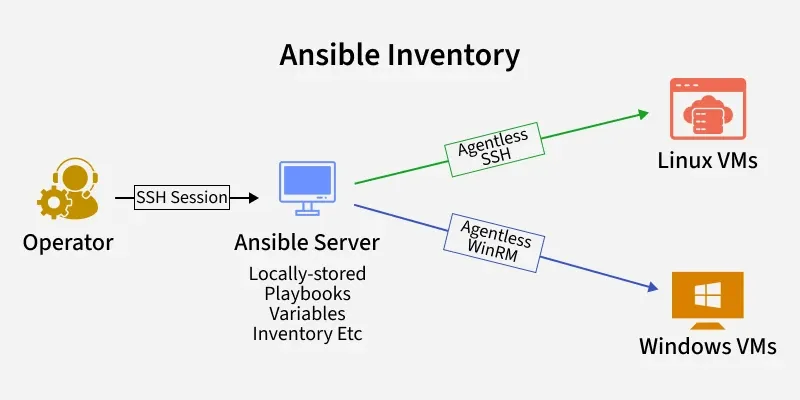
By default, Ansible looks for an inventory file at /etc/ansible/hosts, but you can override this using the -iflag or by setting inventory in ansible.cfg.
Key Terminologies
Inventory
An inventory is a file or script that specifies the hosts and group of hosts which are amend by the Ansible. It could be either established or changed over a period of time.
Host
A host is a node that is managed within an inventory. The mentioned entity can be a physical server, virtual machine, or any device connected to a network.
Group
A group is a mechanism by which you can define a set of hosts in an inventory. Working with groups you can handle several hosts at a time.
Variables
Variables are most referenced as the host and group values of a system’s inventory with defined configurations.
Static Inventory
Static inventory is a file that is uploaded in advance and contains lists of the hosts and groups. It is mainly documented in INI or YAML type of syntax.
Dynamic Inventory
Since the inventory is built on the fly, you have to issue query to the external data source, like a cloud provider’s API, to get the list of hosts.
Types of Ansible Inventories
Ansible supports two main types of inventories:
1. Static Inventory
A static inventory is a file that contains a fixed list of hosts and groups. It is usually written in INI or YAML syntax and is ideal for small or relatively stable environments.
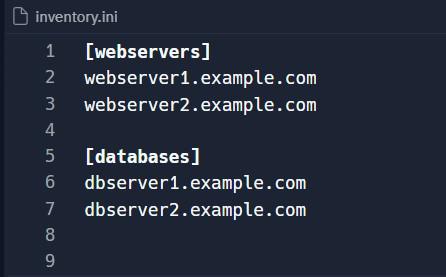
Example of a static inventory file in INI format:
[webservers]
webserver1.example.com
webserver2.example.com

[databases]
dbserver1.example.com
dbserver2.example.com
Example with SSH settings and group combination:
# Group: Web Servers
[webservers]
web1.example.com ansible_user=ubuntu ansible_port=22
web2.example.com ansible_user=ec2-user ansible_port=2222

# Group: Database Servers
[databases]
db1.example.com ansible_user=admin ansible_port=22 ansible_ssh_private_key_file=/home/admin/.ssh/id_rsa

# Group: Production (combining other groups)
[production:children]
webservers
databases
Explanation:
webserversanddatabasesare host groups.ansible_userdefines the SSH user.ansible_portspecifies the SSH port.ansible_ssh_private_key_filesets the private key file for authentication.production:childrencombines both groups under one parent group.
YAML Format (Structured & Modern)
all:
  children:
    webservers:
      hosts:
        web1.example.com:
          ansible_user: ubuntu
          ansible_port: 22
        web2.example.com:
          ansible_user: ec2-user
          ansible_port: 2222
    databases:
      hosts:
        db1.example.com:
          ansible_user: admin
          ansible_port: 22
          ansible_ssh_private_key_file: /home/admin/.ssh/id_rsa
    production:
      children:
        webservers:
        databases:
Explanation:
allis the top-level group containing all hosts.childrendefines subgroups (webservers,databases, andproduction).- Variables are specified per host using key-value pairs.
How to Test the Inventory
- To view the inventory structure:
ansible-inventory -i inventory.ini --list
# or for YAML
ansible-inventory -i inventory.yml --list- To check connectivity to a group of hosts (e.g.,
webservers):
ansible webservers -m ping -i inventory.ini- You should see a response
"ping": "pong"indicating successful connection. - Run a ping module on the webservers group:
ansible -m ping -i inventory.ini webservers
2. Dynamic Inventory
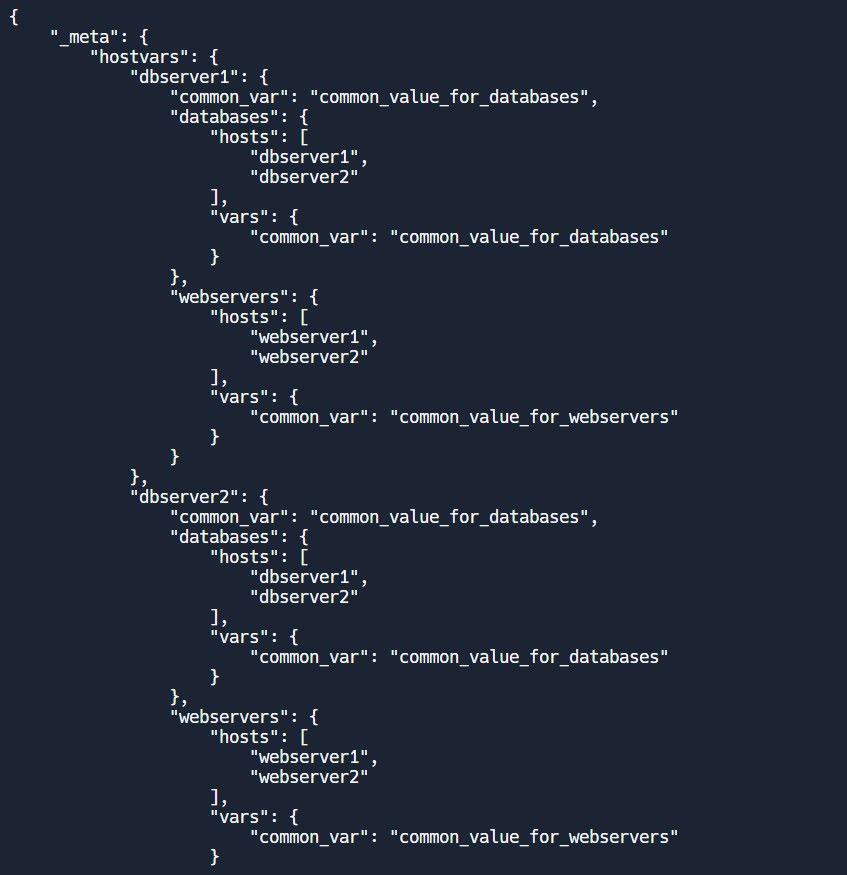
A dynamic inventory is generated at runtime by an external script or program that queries a source (such as a cloud provider API) to determine the inventory. This is useful for environments where the infrastructure is highly dynamic. Here’s a simplified example of a dynamic inventory script in Python:
#!/usr/bin/env python

import json

def get_inventory():
    inventory = {
        "webservers": {
            "hosts": ["webserver1", "webserver2"],
            "vars": {"common_var": "common_value_for_webservers"}
        },
        "databases": {
            "hosts": ["dbserver1", "dbserver2"],
            "vars": {"common_var": "common_value_for_databases"}
        }
    }
    print(json.dumps(inventory))

if __name__ == "__main__":
    get_inventory()
When run, this script outputs a JSON structure that Ansible can use as its inventory.
Using Ansible Inventories
To use an inventory with Ansible, specify it with the -i option in the ansible or ansible-playbook command. For example:
ansible-playbook -i inventory.ini site.ymlAnsible will use the specified inventory to determine which hosts to manage and apply the tasks defined in the playbook site.yml.
Defining Inventory Variables
Variables can be defined at different levels in an inventory: for individual hosts, groups, or even globally. For instance:
[webservers]
webserver1.example.com http_port=80 max_clients=200
webserver2.example.com http_port=8080 max_clients=300

[databases]
dbserver1.example.com ansible_user=dbadmin
dbserver2.example.com ansible_user=dbadmin
In this example, http_port and max_clients are host variables specific to each webserver, while ansible_user is a host variable for the database servers.
Inventory Structure
Ansible inventories are organized into groups and hosts, with the ability to define variables at different levels. This section delves deeper into the structure of inventories, using detailed examples and step-by-step instructions to help you run and see the output.
Inventory Components
- Groups: Collections of hosts, often categorized by function, geography, or other criteria.
- Hosts: Individual managed nodes, such as servers or network devices.
- Variables: Configuration parameters that can be applied to hosts or groups.
Step-by-Step Example Using a Static Inventory
Let's create a detailed example of a static inventory in YAML format. We'll define two groups: webservers and databases, with specific variables for each group and host.
Step 1: Create the Inventory File
Create a file named inventory.yml with the following content:
all:
  children:
    webservers:
      hosts:
        webserver1:
          ansible_host: 192.168.1.1
          http_port: 80
          max_clients: 200
        webserver2:
          ansible_host: 192.168.1.2
          http_port: 8080
          max_clients: 300
      vars:
        common_var: "common_value_for_webservers"
    databases:
      hosts:
        dbserver1:
          ansible_host: 192.168.1.3
          db_port: 5432
          db_user: "dbadmin"
        dbserver2:
          ansible_host: 192.168.1.4
          db_port: 3306
          db_user: "dbadmin"
      vars:
        common_var: "common_value_for_databases"
In this example:
- The all group contains two child groups: webservers and databases.
- Each host has specific variables such as ansible_host, http_port, and max_clients.
- Group-level variables (common_var) are defined under vars for both webservers and databases.
Step 2: Create a Simple Ansible Playbook
Next, create a playbook file named site.yml to interact with the inventory. This playbook will print out the host-specific variables.
- name: Display host and group variables
  hosts: all
  tasks:
    - name: Print the variables
      debug:
        msg:
          - "Host: {{ inventory_hostname }}"
          - "Ansible Host: {{ ansible_host }}"
          - "Common Var: {{ common_var | default('N/A') }}"
          - "HTTP Port: {{ http_port | default('N/A') }}"
          - "Max Clients: {{ max_clients | default('N/A') }}"
          - "DB Port: {{ db_port | default('N/A') }}"
          - "DB User: {{ db_user | default('N/A') }}"
This playbook will iterate over all hosts and print the defined variables.
Step 3: Run the Playbook
Execute the playbook using the following command:
ansible-playbook -i inventory.yml site.ymlStep 4: Observe the Output
The output will display the host-specific and group-specific variables for each host. Here’s an example of what the output might look like:
PLAY [Display host and group variables] ****************************************

TASK [Gathering Facts] *********************************************************
ok: [webserver1]
ok: [webserver2]
ok: [dbserver1]
ok: [dbserver2]

TASK [Print the variables] *****************************************************
ok: [webserver1] => {
    "msg": [
        "Host: webserver1",
        "Ansible Host: 192.168.1.1",
        "Common Var: common_value_for_webservers",
        "HTTP Port: 80",
        "Max Clients: 200",
        "DB Port: N/A",
        "DB User: N/A"
    ]
}
ok: [webserver2] => {
    "msg": [
        "Host: webserver2",
        "Ansible Host: 192.168.1.2",
        "Common Var: common_value_for_webservers",
        "HTTP Port: 8080",
        "Max Clients: 300",
        "DB Port: N/A",
        "DB User: N/A"
    ]
}
ok: [dbserver1] => {
    "msg": [
        "Host: dbserver1",
        "Ansible Host: 192.168.1.3",
        "Common Var: common_value_for_databases",
        "HTTP Port: N/A",
        "Max Clients: N/A",
        "DB Port: 5432",
        "DB User: dbadmin"
    ]
}
ok: [dbserver2] => {
    "msg": [
        "Host: dbserver2",
        "Ansible Host: 192.168.1.4",
        "Common Var: common_value_for_databases",
        "HTTP Port: N/A",
        "Max Clients: N/A",
        "DB Port: 3306",
        "DB User: dbadmin"
    ]
}

PLAY RECAP *********************************************************************
dbserver1                  : ok=2    changed=0    unreachable=0    failed=0    skipped=0    rescued=0    ignored=0
dbserver2                  : ok=2    changed=0    unreachable=0    failed=0    skipped=0    rescued=0    ignored=0
webserver1                 : ok=2    changed=0    unreachable=0    failed=0    skipped=0    rescued=0    ignored=0
webserver2                 : ok=2    changed=0    unreachable=0    failed=0    skipped=0    rescued=0    ignored=0
Here is a simple representation of the inventory structure: