Cursor AI is an AI-powered code editor built on Visual Studio Code platform which is designed to significantly enhance developer productivity. By integrating advanced artificial intelligence features, it simplifies tasks like writing, refactoring and understanding code which allows developers to work more efficiently. In this article, we’ll see the core features of Cursor AI, its capabilities and other core concepts.
AI Features of Cursor
Cursor AI has a range of useful AI-driven features to assist us with coding which makes the process more efficient. Lets see how to use them:
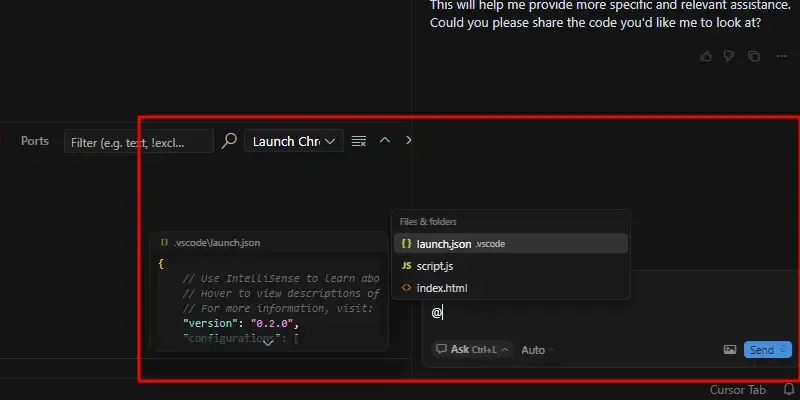
1. AI Chat Panel
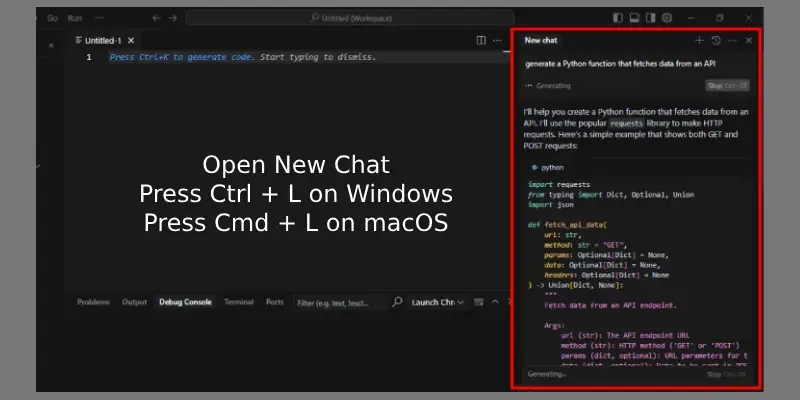
- AI Chat Panel allows us to interact with the AI assistant directly. We can ask questions about our code, request new code generation or seek clarifications for specific code snippets.
- Open the chat panel by pressing Ctrl + L (or Cmd + L on macOS).
- We can ask for explanations of functions or code blocks, requesting code generation based on simple descriptions like "Create a function to fetch data from an API" and receiving suggestions to optimize or improve our existing code.
2. Composer
- It allows us to instruct the AI to generate multiple code files or implement complex features based on our descriptions.
- Open the Composer by pressing Ctrl + I (or Cmd + I on macOS).
- We can describe the project structure or features we need like "Create a Node.js app with authentication and routes" and AI will generate the required files and code, saving us time on repetitive tasks.
3. Terminal Integration
- The integrated terminal allows us to execute commands directly within the editor without needing to switch contexts.
- Open the terminal within the editor.
- We can run common commands (e.g npm start, python script.py) and use AI-generated commands to automate tasks based on our prompts like “Build the project and run tests”.
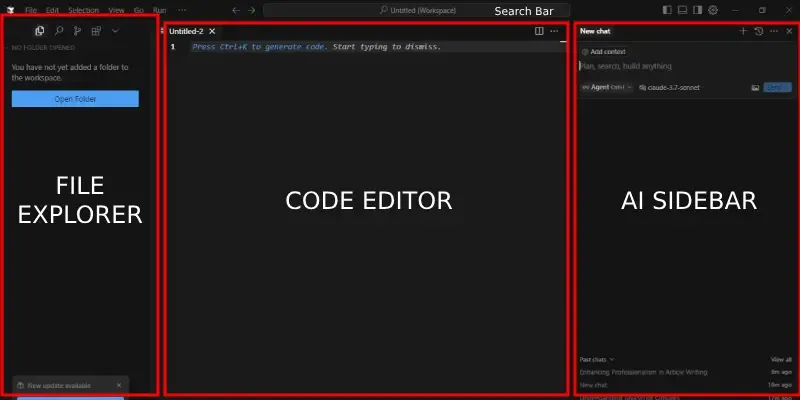
Understanding Cursor AI Interface
Cursor AI interface is designed to help us write, manage and interact with our code efficiently.
- Code Editor: It is the central pane where we write and edit code.
- AI Sidebar: On the right, access AI-powered features like code suggestions, documentation and chat.
- File Explorer: On the left, navigate through our project files and directories.
Key Features of Cursor AI
Cursor AI is an AI-powered code editor designed to enhance productivity by simplifying coding tasks such as writing, refactoring and understanding code. Below there is a detailed overview of each feature along with step-by-step instructions and practical examples:
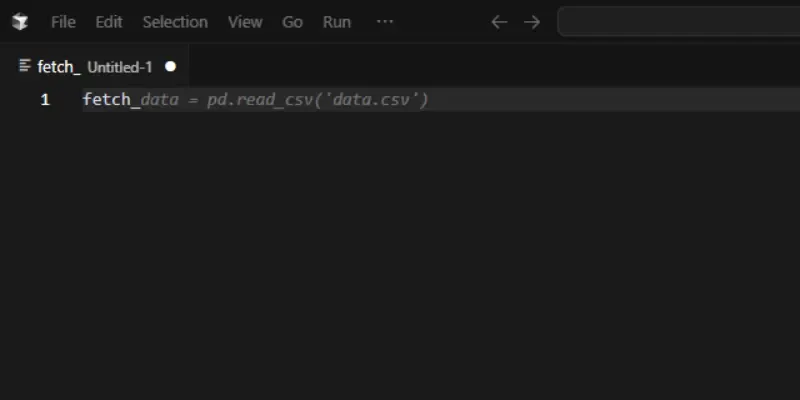
1. AI-Powered Autocomplete
Cursor AI provides an intelligent autocompletion that helps to speed up our coding by suggesting relevant functions, variables and methods as we type. This feature reduces errors and makes coding more efficient.
How to Use:
- Ensure autocomplete is enabled in settings (under General or Editor settings).
- Start typing a function, variable or method name. It will suggest completions based on context.
- Press Tab to accept a suggestion or keep typing to refine the options further.
Example: Typing fetch_ in JavaScript could suggest functions like fetch_data() or fetchUser() which makes it easy to select the right one.
Tip: It works with natural language. For example, typing "double for loop" can suggest relevant code snippets.
2. Code Generation with AI Chat
Cursor AI’s Chat panel allows us to interact with the assistant and generate code based on our descriptions. It’s perfect for creating repetitive code, functions or even large blocks.
How to Use:
- Open the chat panel by pressing Ctrl + L (or Cmd + L on macOS).
- Describe the code we need such as "Create a simple form to fiill student deatils like Name, Email Address, Phone Number, Graduation Year and College Name." or "Optimize this loop."
- Apply the AI’s suggestions by clicking the play button on the generated code block.
Example: Asking “Create a simple form to fiill student deatils like Name, Email Address, Phone Number, Graduation Year and College Name.
What Cursor Generate
<!DOCTYPE html>
<html lang="en">
<head>
  <meta charset="UTF-8">
  <title>User Details Form</title>
  <style>
    body {
      font-family: Arial, sans-serif;
      background: #f4f4f4;
      margin: 0;
      padding: 0;
    }
    .container {
      background: #fff;
      max-width: 400px;
      margin: 50px auto;
      padding: 30px 40px 25px 40px;
      border-radius: 8px;
      box-shadow: 0 2px 8px rgba(0,0,0,0.1);
    }
    h2 {
      text-align: center;
      margin-bottom: 25px;
      color: #333;
    }
    label {
      display: block;
      margin-bottom: 6px;
      color: #555;
      font-size: 15px;
    }
    input[type="text"],
    input[type="email"],
    input[type="tel"],
    input[type="number"] {
      width: 100%;
      padding: 8px 10px;
      margin-bottom: 18px;
      border: 1px solid #ccc;
      border-radius: 4px;
      font-size: 15px;
      box-sizing: border-box;
      transition: border-color 0.2s;
    }
    input[type="text"]:focus,
    input[type="email"]:focus,
    input[type="tel"]:focus,
    input[type="number"]:focus {
      border-color: #007bff;
      outline: none;
    }
    input[type="submit"] {
      width: 100%;
      background: #007bff;
      color: #fff;
      border: none;
      padding: 10px 0;
      border-radius: 4px;
      font-size: 16px;
      cursor: pointer;
      transition: background 0.2s;
    }
    input[type="submit"]:hover {
      background: #0056b3;
    }
    /* Popup message styles */
    .popup-message {
      display: none;
      position: fixed;
      top: 0; left: 0; right: 0; bottom: 0;
      background: rgba(0,0,0,0.3);
      z-index: 1000;
      align-items: center;
      justify-content: center;
    }
    .popup-content {
      background: #fff;
      padding: 30px 40px;
      border-radius: 8px;
      box-shadow: 0 2px 8px rgba(0,0,0,0.2);
      text-align: center;
      font-size: 18px;
      color: #333;
      min-width: 250px;
    }
    .popup-content button {
      margin-top: 18px;
      padding: 8px 22px;
      background: #007bff;
      color: #fff;
      border: none;
      border-radius: 4px;
      font-size: 15px;
      cursor: pointer;
      transition: background 0.2s;
    }
    .popup-content button:hover {
      background: #0056b3;
    }
  </style>
</head>
<body>
  <div class="container">
    <h2>User Details Form</h2>
    <form id="userForm">
      <label for="name">Name:</label>
      <input type="text" id="name" name="name" required />

      <label for="email">Email ID:</label>
      <input type="email" id="email" name="email" required />

      <label for="phone">Phone Number:</label>
      <input type="tel" id="phone" name="phone" required />

      <label for="gradYear">Graduation Year:</label>
      <input type="number" id="gradYear" name="gradYear" min="1900" max="2100" required />

      <label for="college">College Name:</label>
      <input type="text" id="college" name="college" required />

      <input type="submit" value="Submit" />
    </form>
  </div>
  <!-- Popup message -->
  <div class="popup-message" id="popupMessage">
    <div class="popup-content">
      <span>Details added successfully!</span>
      <br>
      <button onclick="closePopup()">OK</button>
    </div>
  </div>
  <script>
    const form = document.getElementById('userForm');
    const popup = document.getElementById('popupMessage');

    form.addEventListener('submit', function(e) {
      e.preventDefault();
      popup.style.display = 'flex';
      form.reset();
    });

    function closePopup() {
      popup.style.display = 'none';
    }
  </script>
</body>
</html>
Output:
Shortcut: Use Cmd+Enter(or Ctrl+Enter) to chat with the entire codebase for broader queries.
3. Codebase Queries and Answers
This feature makes it easy to search for specific functions, classes or variables across our entire project which helps in quicker navigation and better understanding of our code.
How to Use:
- In the chat panel, type @Codebase followed by the keyword (e.g @Codebase fetch_).
- Ask questions like "Where is the login function defined?" to quickly locate code in our project.
Example: Searching @Codebase fetch_ will return all instances where functions starting with fetch_ are defined or called which helps us to easily navigate a large codebase.
4. Collaborative Coding Assistance
Cursor AI simplifies collaboration by allowing team members to share the workspace and work together in real-time. The AI-powered suggestions and real-time error fixes enhance team productivity.
How to Use:
- Share our project with team members using Cursor AI’s collaboration features.
- Use the AI Chat to discuss code segments, ask questions and receive suggestions in real-time.
Example: If we're working on a feature, the AI can help merge different code contributions, resolve conflicts and ensure the code quality is maintained.
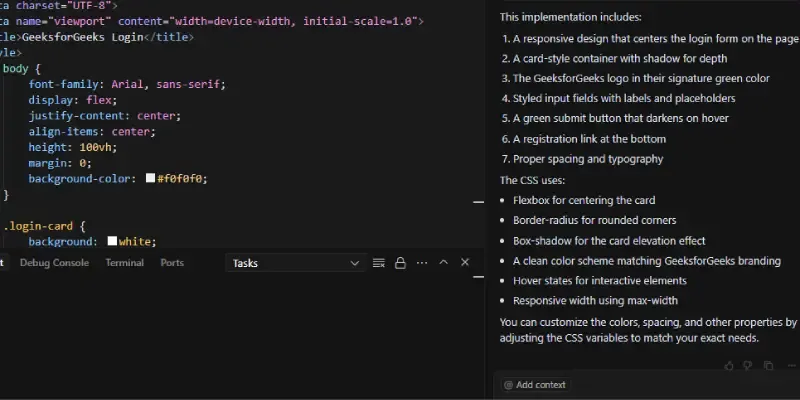
5. Use Images to Generate Code (UI Design to Code)
With Cursor AI, we can upload images such as UI mockups and the AI will generate the corresponding code. This makes front-end development faster and more efficient.
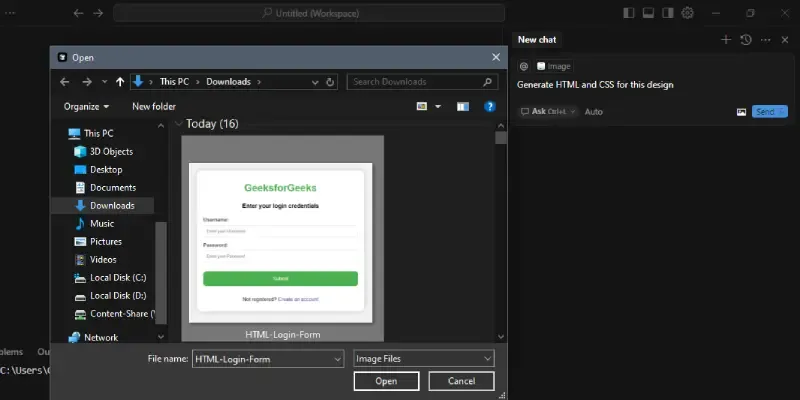
How to Use:
- Drag and drop an image like a UI design into the chat input box.
- Ask the AI to generate the corresponding HTML, CSS or JavaScript.
Example: Upload a login screen mockup and ask "Generate HTML and CSS for this design" to get responsive code which reduces the time needed to manually write code.
6. Documentation Integration
Cursor AI integrates inline documentation which allows us to understand code functionality without leaving the editor. Hover over code elements to view explanations and usage examples.

How to Use:
- Hover over functions, methods or classes to see a tooltip with documentation.
- Type @LibraryName like @Pytorch in the chat to access related library documentation.
- Add custom docs via @Docs → Add new doc useful for internal APIs.
Example: Hovering over fetch_data() will show its purpose, parameters and usage examples which makes it easier to understand without needing to look up external documentation.
7. Edit and Write Code with Cmd K or Ctl+k
It makes it easy to edit or generate new code using natural language. With just a simple shortcut, we can make changes to our code or add entirely new functions.
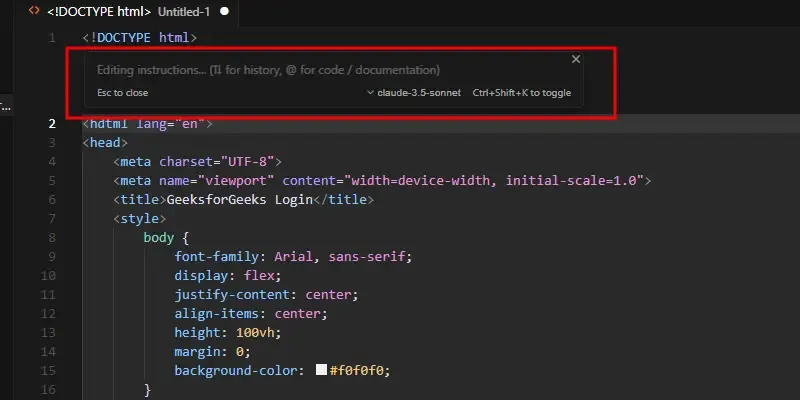
How to Use:
- To edit: Select the code, press Cmd + K (or Ctrl + K) and describe the change we need like "Add error handling".
- To generate: Place our cursor, press Cmd + K and provide instructions like "Write a function to sort a list".
Example: Select a function, press Cmd + K, type "Add input validation" and see the changes reflected in the code.
8. Quick Questions
Ask immediate questions about specific code elements without opening the full chat panel. This is great for quick clarifications.
How to Use:
- Select the code we want to inquire about, press Cmd + K (or Ctrl + K) and choose "quick question."
- Ask specific questions like "What does this variable do?" to get instant answers.
Example: Select a variable and ask, “Is this variable used elsewhere?” to get a quick, direct response.
9. Agent Mode
Agent Mode automates end-to-end tasks and allows the AI to integrate with our project to complete coding tasks. This is helpful for handling complex workflows efficiently.
How to Use:
- Enable Composer then access Agent Mode by selecting 'agent' in the settings.
- Provide specific instructions such as "Implement user authentication with JWT" and the AI will generate the code across multiple files.
Example: Provide instructions like 'Create a REST API endpoint' and let the AI generate the necessary code.
10. Multi-File Code Generation with Composer
This feature lets us quickly generate multiple files by describing the structure of the application. It's ideal for projects that involve multiple components and need rapid setup.
How to Use:
- Open the Composer by pressing Ctrl + I (or Cmd + I on macOS).
- Describe the multi-file structure needed for our project like "Create a Node.js project with separate routes, controllers and models".
- The AI will generate the necessary files and code, organizing them within our project.
Example: For a web application, we might generate routes.js, controllers.js and models.js with appropriate boilerplate code to get started quickly.
11. Cursor Debugging
Cursor AI’s debugging tool helps identify and fix errors in our code with ease. It integrates seamlessly into our workflow which provides real-time feedback and suggestions for resolving issues.
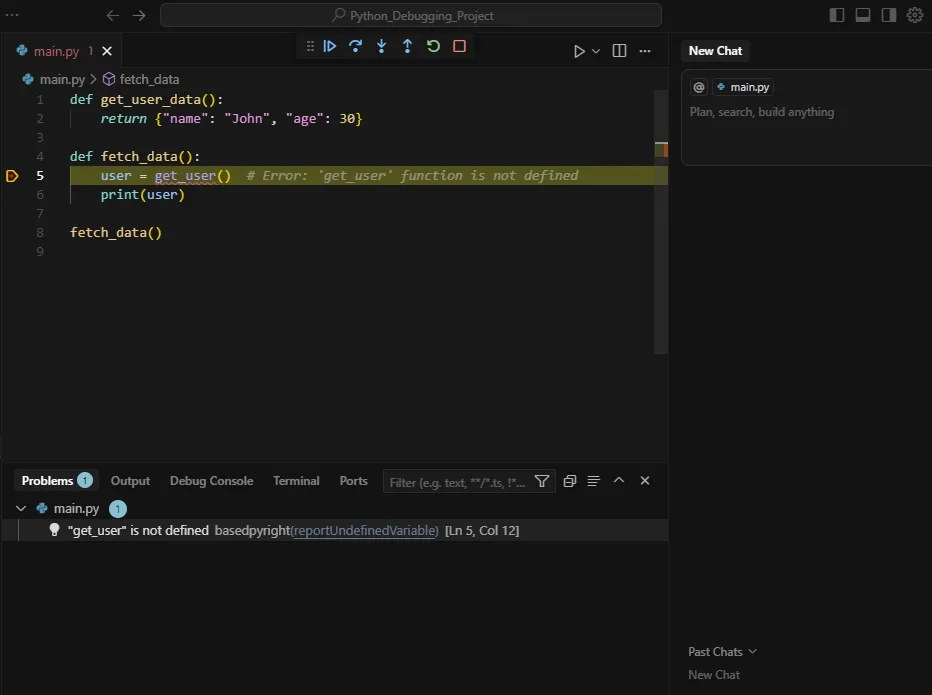
How to Use:
- Open the Debug Panel by clicking the debug icon on the sidebar or using the shortcut Ctrl + Shift + D (or Cmd + Shift + D on macOS).
- Set breakpoints in our code by clicking on the line number where we want to pause execution.
- Start debugging by pressing F5 or selecting Run > Start Debugging from the menu.
- It will highlight issues and offer solutions along with an option to view detailed error messages.
Example: If there is a runtime error in our code such as accessing a variable that’s undefined, the debugger will stop at the line of code and suggest how to handle the error.
Tips and Best Practices
To boost our productivity and efficiency, there are some practical tips and best practices to follow:
- Master the Shortcuts: Use shortcuts like Cmd/ Ctrl +K (edit), Cmd/ Ctrl +L (chat) and Cmd/ Ctrl +I (Composer) to speed up our workflow and save time on repetitive tasks.
- Provide Clear Prompts: More specific the prompts are, the better AI can respond. For example, instead of asking "Make this faster," try "Optimize this loop for large datasets."
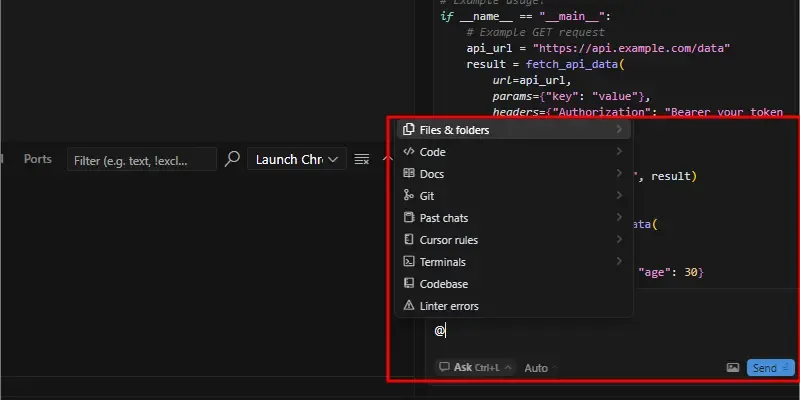
- Use Context for Better Results: Using the @ symbol to reference specific files, pull data from the web or access documentation which will help refine AI responses and provide more precise answers.
- Experiment with Different AI Models: Explore AI models like GPT-4 and Claude to find the one that best suits our development style and project needs.
- Stay Up-to-Date: Regularly check the changelog for new features, improvements and updates to make sure we're using the latest tools and enhancements.
Limitations of Cursor AI
Despite having many advanced features, there are some limitations to Cursor AI that might impact certain users or use cases:
- Learning Curve for New Users: While Cursor AI is packed with advanced features, beginners might find the AI-powered tools and Composer a bit challenging at first.
- Beta Features: Some features like Agent Mode and Composer are still in beta which means they may not be as polished or fully stable as other features.
- System Requirements: It requires a decent system to run smoothly, especially when using AI-powered features so it may not be optimal for devices with lower specs.
- Limited Offline Functionality: Some features of Cursor AI like code generation or querying the web, require an active internet connection which may limit its usage in offline environments.
- Compatibility with Legacy Code: While it supports modern languages and frameworks well, older projects or legacy code may require additional configuration or debugging when used with the AI features.
With Cursor AI, we can enhance our coding experience and work more efficiently on our projects.