A multi-module project in Maven allows you to manage multiple related modules within a single project. It helps organize large applications into smaller, independent components while maintaining a unified build process.
- Centralized Dependency Management: Manage all dependencies from the parent POM
- Modularization: Break the application into smaller, manageable modules
- Reusability: Share common code across modules
- Consistent Build Process: Build all modules together using a single command
Key Terminologies
- Parent POM (Parent Project Object Model): The POM file that acts as the parent for one or more child modules, centralizing configurations and dependencies inherited by the child modules.
- Child Module: A sub-project of the parent POM, each with its own POM file and directory structure.
- Module: A sub-project within a multi-module Maven project. Each module has its own POM file and is treated as a separate Maven project.
- Packaging: The type of artifact that Maven will produce, like JAR, WAR, and POM.
- Dependency Management: The section in the parent POM that specifies the versions and configurations used in the child modules.
- Plugin Management: The section in the parent POM that defines the plugin configurations, versions, and settings used by the build process.
- Plugin: A tool or extension that performs specific tasks during the build process.
- Artifact: The package output of the Maven build, such as a JAR, WAR, or ZIP file
Implementation of Multi-Module Project with Maven
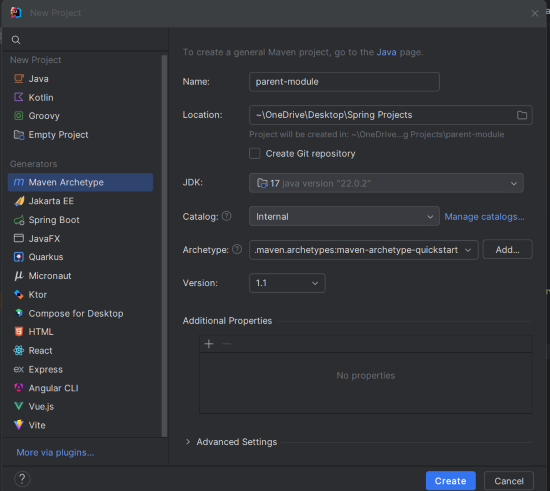
Step 1: Create the Parent Module
Create a Maven archetype project using IntelliJ IDEA with the following options:
- Name: parent-module
- JDK: 17
- Archetype: maven-archetype-quickstart
Click on the Create button.
Step 2: Create the Child Module1
Create another Maven archetype project using IntelliJ IDEA with the following options:
- Name: child-module1
- JDK: 17
- Archetype: maven-archetype-quickstart
Click on the Create button.

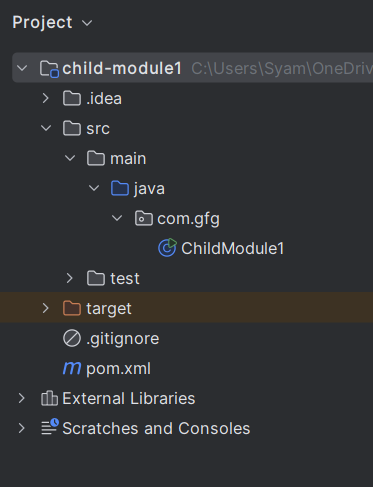
After creating the child-module1 project, the file structure will look like the below image.
Step 3: Create the ChildModule1 Class
package com.gfg;

/**
 * Hello world!
 *
 */
public class ChildModule1
{
    public static void main( String[] args )
    {
        System.out.println( "Hello Child Module 1!" );
    }
}
pom.xml for child-module1:
<project xmlns="https://maven.apache.org/POM/4.0.0" xmlns:xsi="https://www.w3.org/2001/XMLSchema-instance"
  xsi:schemaLocation="https://maven.apache.org/POM/4.0.0 https://maven.apache.org/xsd/maven-4.0.0.xsd">
  <modelVersion>4.0.0</modelVersion>

  <groupId>com.gfg</groupId>
  <artifactId>child-module1</artifactId>
  <version>1.0-SNAPSHOT</version>
  <packaging>jar</packaging>

  <name>child-module1</name>
  <url>http://maven.apache.org</url>

  <properties>
    <project.build.sourceEncoding>UTF-8</project.build.sourceEncoding>
  </properties>

  <dependencies>
    <dependency>
      <groupId>junit</groupId>
      <artifactId>junit</artifactId>
      <version>3.8.1</version>
      <scope>test</scope>
    </dependency>
  </dependencies>
</project>
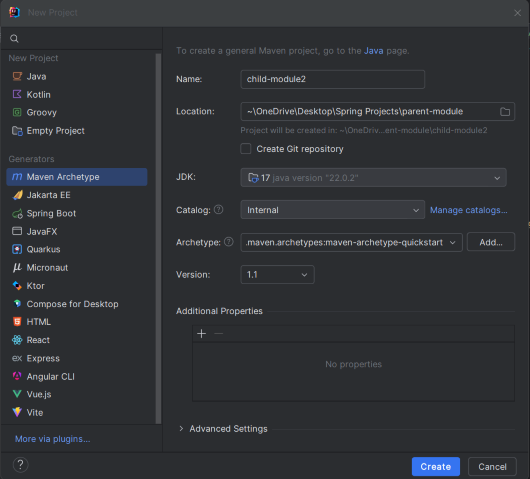
Step 4: Create the Child Module2
Create another Maven archetype project using IntelliJ IDEA with the following options:
- Name: child-module2
- JDK: 17
- Archetype: maven-archetype-quickstart
Click on the Create button.
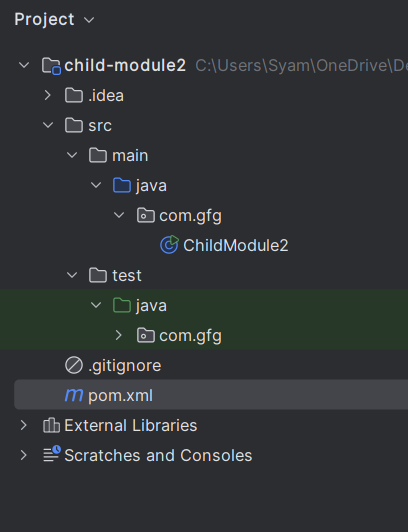
After creating the child-module2 project, the file structure will look like the below image.
Step 5: Create the ChildModule2 Class
package com.gfg;

/**
 * Hello world!
 *
 */
public class ChildModule2
{
    public static void main( String[] args )
    {
        System.out.println( "Hello Child Module2!" );
    }
}
pom.xml for child-module2:
<project xmlns="https://maven.apache.org/POM/4.0.0" xmlns:xsi="https://www.w3.org/2001/XMLSchema-instance"
  xsi:schemaLocation="https://maven.apache.org/POM/4.0.0 https://maven.apache.org/xsd/maven-4.0.0.xsd">
  <modelVersion>4.0.0</modelVersion>

  <groupId>com.gfg</groupId>
  <artifactId>child-module2</artifactId>
  <version>1.0-SNAPSHOT</version>
  <packaging>jar</packaging>

  <name>child-module2</name>
  <url>http://maven.apache.org</url>

  <properties>
    <project.build.sourceEncoding>UTF-8</project.build.sourceEncoding>
  </properties>

  <dependencies>
    <dependency>
      <groupId>junit</groupId>
      <artifactId>junit</artifactId>
      <version>3.8.1</version>
      <scope>test</scope>
    </dependency>
  </dependencies>
</project>
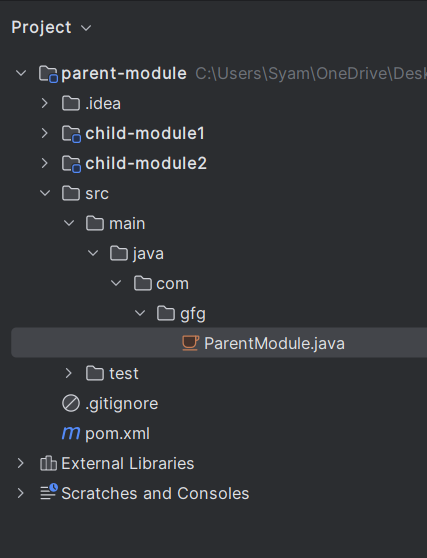
Step 6: Parent File Structure
After setting up the child modules, the parent file structure should look like this:
Step 7: Add Spring Starter to parent pom.xml
Add the Spring starter dependency to the parent pom.xml:
<dependencyManagement>
<dependencies>
<dependency>
<groupId>org.springframework.boot</groupId>
<artifactId>spring-boot-starter</artifactId>
<version>3.3.2</version>
</dependency>
</dependencies>
</dependencyManagement>
Step 8: Add Maven Plugin
Add the Maven compiler plugin to the parent pom.xml:
<build>
<pluginManagement>
<plugins>
<plugin>
<groupId>org.apache.maven.plugins</groupId>
<artifactId>maven-compiler-plugin</artifactId>
<version>3.8.1</version>
<configuration>
<source>1.8</source>
<target>1.8</target>
</configuration>
</plugin>
</plugins>
</pluginManagement>
</build>
Step 9: Add the Child Modules
Add the child modules to the parent pom.xml:
<modules>
<module>child-module1</module>
<module>child-module2</module>
</modules>
Parent pom.xml:
<project xmlns="https://maven.apache.org/POM/4.0.0"
         xmlns:xsi="https://www.w3.org/2001/XMLSchema-instance"
         xsi:schemaLocation="https://maven.apache.org/POM/4.0.0 https://maven.apache.org/xsd/maven-4.0.0.xsd">
  <modelVersion>4.0.0</modelVersion>

  <groupId>com.gfg</groupId>
  <artifactId>parent-module</artifactId>
  <version>1.0-SNAPSHOT</version>
  <packaging>pom</packaging>

  <name>parent-module</name>

  <properties>
    <project.build.sourceEncoding>UTF-8</project.build.sourceEncoding>
  </properties>

  <modules>
    <module>child-module1</module>
    <module>child-module2</module>
  </modules>

  <dependencies>
    <!-- Dependencies defined here are inherited by child modules -->
    <dependency>
      <groupId>junit</groupId>
      <artifactId>junit</artifactId>
      <version>3.8.1</version>
      <scope>test</scope>
    </dependency>
  </dependencies>

  <dependencyManagement>
    <dependencies>
      <dependency>
        <groupId>org.springframework.boot</groupId>
        <artifactId>spring-boot-starter</artifactId>
        <version>3.3.2</version>
      </dependency>
    </dependencies>
  </dependencyManagement>

  <build>
    <pluginManagement>
      <plugins>
        <plugin>
          <groupId>org.apache.maven.plugins</groupId>
          <artifactId>maven-compiler-plugin</artifactId>
          <version>3.8.1</version>
          <configuration>
            <source>1.8</source>
            <target>1.8</target>
          </configuration>
        </plugin>
      </plugins>
    </pluginManagement>
  </build>

</project>
Step 10: Create the ParentModule Class
package com.gfg;

/**
 * Hello world!
 *
 */
public class ParentModule
{
    public static void main( String[] args )
    {
        System.out.println( "Hello Parent Module!" );
    }
}
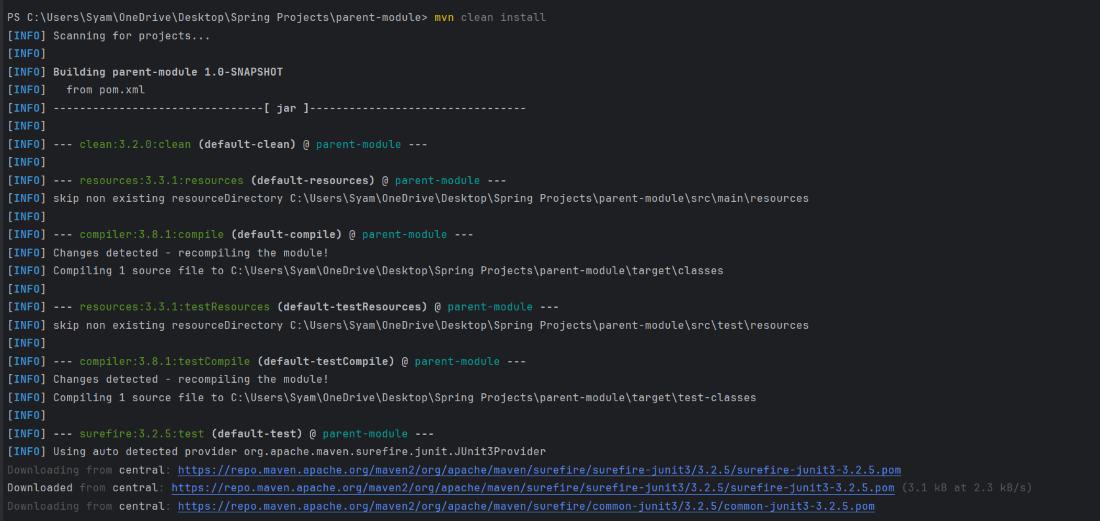
Step 11: Install the Maven
Use the following command to install the Maven of the parent module:
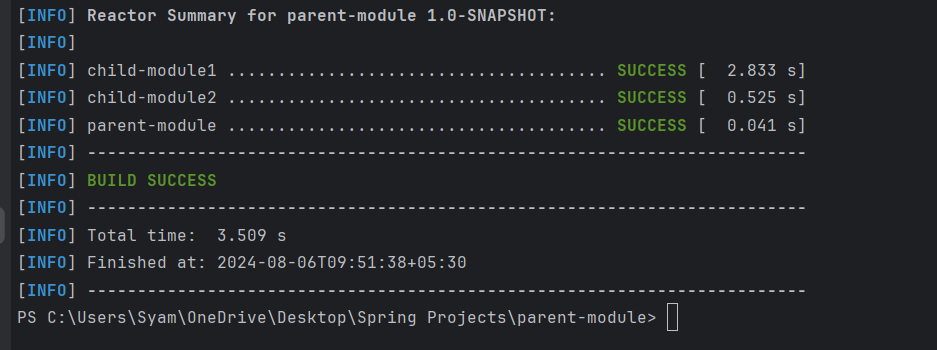
mvn clean install
Output:
Test Result:
Step 12: Run Child Module1
Use the following command to run Child Module1:
java -cp target/classes com.gfg.ChildModel1
Output:

Step 13: Run Child Module2
Use the following command to run Child Module2:
java -cp target/classes com.gfg.ChildModel2
Output:
