Spring Security framework is used to secure Java applications by handling authentication and authorization. It integrates smoothly with Spring Boot, making it easy to apply security configurations with minimal setup. It also protects applications from common security threats.
- Verifies user identity and controls access based on roles and permissions.
- Provides built-in security against attacks like CSRF, session fixation, and clickjacking.
- Supports both annotation-based and Java-based configuration for customizing security rules.
Application of Spring Security
Spring Security is widely used in web applications to secure user authentication, manage authorization, and protect sensitive resources from unauthorized access and cyber attacks.
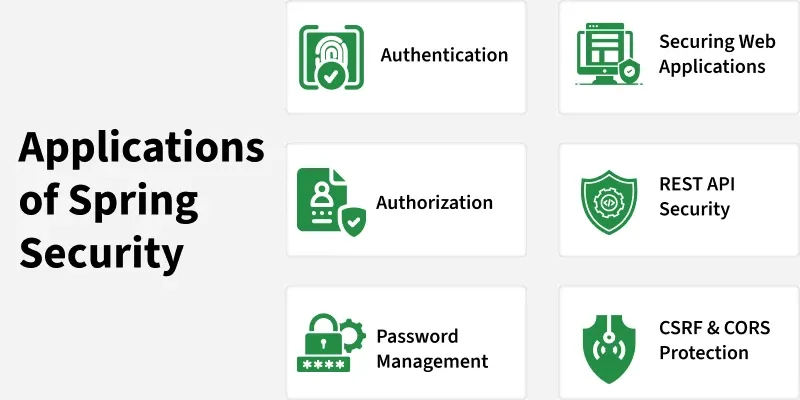
Spring Security provides various security features, including:
Authentication and Authorization
- Authentication: Verifies the identity of users (e.g., login with username and password).
- Authorization: Determines whether a user has permission to perform a specific action (e.g., access a page or API).
Comprehensive Protection Against Common Vulnerabilities
Spring Security offers out-of-the-box protection for many well-known security threats, including:
- CSRF (Cross-Site Request Forgery)
- Session Fixation Attacks
- Clickjacking
- Cross-Site Scripting (XSS) (with content security policies)
Seamless Integration with Spring Framework
Spring Security is tightly integrated with Spring Boot and Spring MVC, which means you can enable security features with minimal configuration. For example, adding spring-boot-starter-security to your project automatically applies basic authentication.
Password Management
- Supports modern password encoding mechanisms such as bcrypt.
- Provides built-in utilities for hashing and verifying passwords.
Method-Level Security
We can secure specific methods in your application using annotations such as:
- @PreAuthorize
- @PostAuthorize
- @Secured
Example:
@PreAuthorize("hasRole('ADMIN')")
public void deleteUser(Long id) {
// only admins can delete users
}
Support for Modern Security Standards
- JWT (JSON Web Tokens) for stateless authentication.
- OAuth2 and OpenID Connect for single sign-on (SSO).
- LDAP for enterprise authentication.
Steps to Implements Basic Authentication in Spring Boot
Follow these steps to Build Basic Authentication in a Spring Boot application.
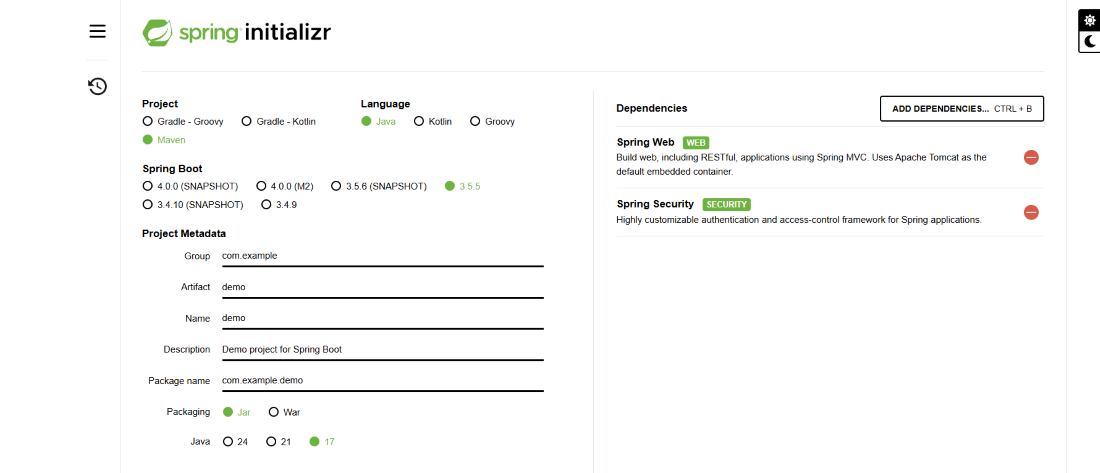
Step 1. Create a new Spring Boot project
Use Spring Initializr or create manually.
Suggested project coordinates:
- Project: Maven Project
- Group: com.example
- Artifact: demo
- Java: 17 (or your preferred LTS)
- Add Dependencies: Spring Web and Spring Security
- Click Generate: downloads demo.zip.
Extract the zip to a folder and import project on IDE.
pom.xml:
<project xmlns="http://maven.apache.org/POM/4.0.0"
    xmlns:xsi="http://www.w3.org/2001/XMLSchema-instance"
    xsi:schemaLocation="http://maven.apache.org/POM/4.0.0
    http://maven.apache.org/xsd/maven-4.0.0.xsd">
    <modelVersion>4.0.0</modelVersion>
    <parent>
        <groupId>org.springframework.boot</groupId>
        <artifactId>spring-boot-starter-parent</artifactId>
        <version>3.2.4</version>
        <relativePath/>
    </parent>
    <groupId>com.example</groupId>
    <artifactId>demo</artifactId>
    <version>0.0.1-SNAPSHOT</version>
    <name>spring-security-basic-auth-demo</name>
    <description>Spring Boot Basic Auth Demo</description>
    <properties>
        <java.version>17</java.version>
    </properties>
    <dependencies>
        <dependency>
            <groupId>org.springframework.boot</groupId>
            <artifactId>spring-boot-starter-web</artifactId>
        </dependency>
        <dependency>
            <groupId>org.springframework.boot</groupId>
            <artifactId>spring-boot-starter-security</artifactId>
        </dependency>
        <dependency>
            <groupId>org.springframework.boot</groupId>
            <artifactId>spring-boot-starter-test</artifactId>
            <scope>test</scope>
        </dependency>
    </dependencies>
    <build>
        <plugins>
            <plugin>
                <groupId>org.springframework.boot</groupId>
                <artifactId>spring-boot-maven-plugin</artifactId>
            </plugin>
        </plugins>
    </build>
</project>
Step 2. Add a simple REST controller
Create a java class inside -> src/main/java/com/example/demo/HelloController.java with:
HelloController.java
package com.example.demo;

import org.springframework.web.bind.annotation.GetMapping;
import org.springframework.web.bind.annotation.RestController;

@RestController
public class HelloController {

    @GetMapping("/hello")
    public String hello() {
        return "Welcome! You are successfully authenticated."
    }
}
Step 3. Configure credentials (recommended)
Set properties inside -> src/main/resources/application.properties and add:
application.properties
spring.security.user.name=admin
spring.security.user.password=admin123
Step 4. Run the application
Open main class and run an application:
DemoApplication.java
package com.example.demo;

import org.springframework.boot.SpringApplication;
import org.springframework.boot.autoconfigure.SpringBootApplication;

@SpringBootApplication
public class DemoApplication {
  public static void main(String[] args) {
    SpringApplication.run(DemoApplication.class, args);
  }
}
Step 5. Test the secured endpoint
Open browser visit ->
http://localhost:8080/login
We saw login prompt appears with user name and password
Output:
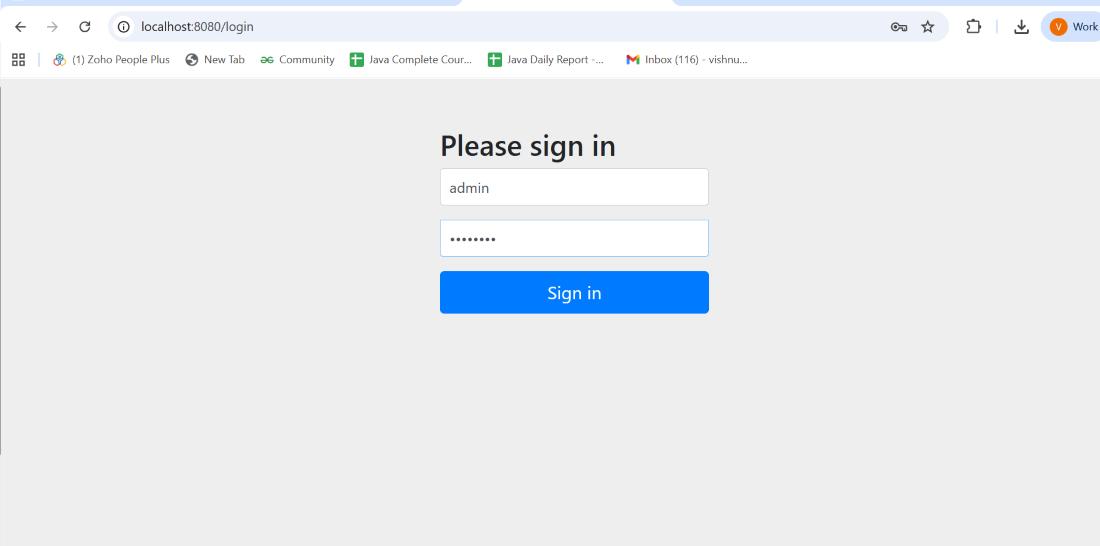
Fill details:
- Uername-> admin
- password -> admin123.
And Click Sign in then you can see message.

Advantages of Spring Security
Some major benefits of using Spring Security include:
- Protection against threats like CSRF, session fixation and clickjacking.
- Integration with Spring MVC and Spring Boot.
- Supports Java-based configuration.
- Works with standard Servlet API.
- Prevents brute-force attacks.
- Active open-source community ensuring continuous improvements