Spring Boot provides a robust framework for building microservices and web applications. As part of ensuring quality and reliability, Testing is a crucial aspect of the development process. Testcontainers is a Java library that provides lightweight disposable instances of common databases Selenium web browsers or anything else that can run in a Docker container. Spring Boot has integrated support for Testcontainers making It easier to write integration tests that interact with external dependencies.
Integrating Testcontainers in Spring Boot involves configuring your tests to use containers for dependencies like databases, message brokers, and others. This setup that your tests are environment-independent and more reliable.
Here is a high-level overview of how Testcontainers work with Spring Boot.
- Testcontainers Dependency: Include the Testcontainers library in our project.
- Container Configuration: Define the container configuration in our test class.
- Spring Boot Integration: Use Annotation and configuration to integrate Testcontainers with Spring Boot.
Prerequisites
- Java Development Kit
- Docker
- Maven or Gradle ( Here we use Gradle )
- Spring Boot Application
- IDE ( Here we use Spring Tool Suite )
Using Testcontainers for Local Development with Spring Boot DevTools
Testcontainers is a Java library and it provides light weight, disposable containers for running of the tests. It is particularly useful for testing Spring Boot Applications as it allows developers to spin up real instances of databases and other dependencies as docker containers.
Integrating Testcontainers with Spring DevTools can greatly enhance the development experience by providing a more reliable and consistent testing environment, reducing setup complexity and enabling faster feedback loops.
Setting Up Testcontainers:
1. Add Testcontainers Dependencies:
First, we need to add the necessary dependencies to our build.gradle file or pom.xml here we use gradle.
Maven:
<dependency>
    <groupId>org.testcontainers</groupId>
    <artifactId>testcontainers</artifactId>
    <version>1.16.0</version>
    <scope>test</scope>
</dependency>
<dependency>
    <groupId>org.testcontainers</groupId>
    <artifactId>junit-jupiter</artifactId>
    <version>1.16.0</version>
    <scope>test</scope>
</dependency>
<dependency>
    <groupId>org.testcontainers</groupId>
    <artifactId>mysql</artifactId>
    <version>1.16.0</version>
    <scope>test</scope>
</dependency>
Gradle:
testImplementation 'org.testcontainers:testcontainers:1.16.0'
testImplementation 'org.testcontainers:junit-jupiter:1.16.0'
testImplementation 'org.testcontainers:mysql:1.16.0'
2. Configure Testcontainers
Create a JUnit test class to configure and manage our Testcontainers setup. Below we provide example for your reference.
import org.junit.jupiter.api.Test;
import org.springframework.boot.test.context.SpringBootTest;
import org.testcontainers.containers.MySQLContainer;

@SpringBootTest
public class MyApplicationTests {

    static MySQLContainer<?> mysqlContainer = new MySQLContainer<>("mysql:8.0.26")
            .withDatabaseName("testdb")
            .withUsername("testuser")
            .withPassword("testpass");

    static {
        mysqlContainer.start();
        System.setProperty("DB_URL", mysqlContainer.getJdbcUrl());
        System.setProperty("DB_USERNAME", mysqlContainer.getUsername());
        System.setProperty("DB_PASSWORD", mysqlContainer.getPassword());
    }

    @Test
    void contextLoads() {
        // Your test code here
    }
}
3. Adjust Application Configuration
Update your application properties file to use the environment variables set by Testcontainers.
spring.datasource.url=${DB_URL}
spring.datasource.username=${DB_USERNAME}
spring.datasource.password=${DB_PASSWORD}
Integrating with Spring Boot DevTools
Spring Boot DevTools provides enhanced development experience by enabling automatic restarts, live, reload and configuration that are more suited for development.
1. Add DevTools Dependency:
Ensure you have the Spring Boot DevTools dependency in your project.
Maven:
<dependency>
    <groupId>org.springframework.boot</groupId>
    <artifactId>spring-boot-devtools</artifactId>
    <optional>true</optional>
</dependency>
Gradle:
developmentOnly 'org.springframework.boot:spring-boot-devtools'2. Enable DevTools:
By default DevTools is enabled in the development environment. Ensure that your application.properties has the following settings to optimize for development.
spring.devtools.restart.enabled=true
spring.devtools.livereload.enabled=true
Comparing Traditional Methods with Testcontainers
Below we provide traditional methods for Comparing Traditional Methods with Testcontainers.
Traditional Methods:
- Embedded Databases: Using H2, HSQLDB, or Derby for local development.
- Pros: Fast, lightweight, easy to set up.
- Cons: Differences from production databases can cause discrepancies, limited feature set.
- Shared Development Databases:
- Pros: Consistency with production-like environment.
- Cons: Risk of data contamination, difficult to maintain state, limited to local network.
Testcontainers Approach:
- Containerized Dependencies: Uses Docker containers to spin up required services.
- Pros:
- Consistency: Identical to production environments, reducing "it works on my machine" issues.
- Isolation: Each test runs in an isolated environment, preventing interference.
- Flexibility: Supports various databases and services (PostgreSQL, MySQL, Kafka, etc.).
- Automation: Easy to integrate into CI/CD pipelines.
- Cons:
- Requires Docker to be installed and running.
- Slightly longer setup time compared to embedded databases.
- Pros:
Implement Built-in Testcontainers Support in Spring Boot
Here, we created a sample Spring Boot project by using Spring Initilizer with below mention dependencies. Below we provide them for your reference.
Project Folder:
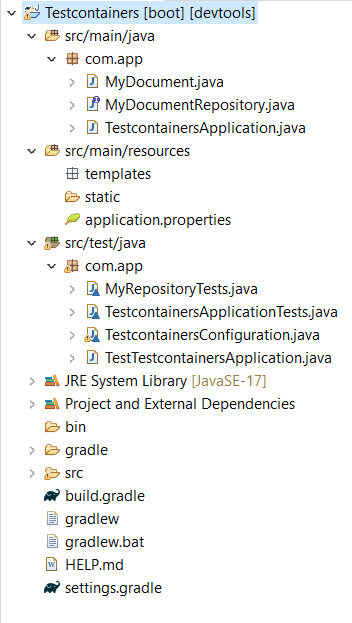
Dependencies:
dependencies {
	implementation 'org.springframework.boot:spring-boot-starter-web'
	compileOnly 'org.projectlombok:lombok'
	developmentOnly 'org.springframework.boot:spring-boot-devtools'
	annotationProcessor 'org.projectlombok:lombok'
	testImplementation 'org.springframework.boot:spring-boot-starter-test'
	testImplementation 'org.springframework.boot:spring-boot-testcontainers'
	testImplementation 'org.testcontainers:junit-jupiter'
	testRuntimeOnly 'org.junit.platform:junit-platform-launcher'
	testImplementation 'org.testcontainers:mongodb:1.16.0'
    implementation 'org.springframework.boot:spring-boot-starter-data-mongodb'
}
Below are the implementation steps of Built-in Testcontainers Support in Spring Boot.
Step 1: Configure Application Properties
Once Project is successfully created, then open application properties file. In that file, provide the database connection configuration like below.
spring.application.name=Testcontainers

spring.data.mongodb.uri=mongodb://localhost:27017/test
spring.devtools.restart.enabled=true
spring.devtools.livereload.enabled=true
Step 2: Main Application Class
It is the main class of the Spring Project and Application execution started from here only.
package com.app;

import org.springframework.boot.SpringApplication;
import org.springframework.boot.autoconfigure.SpringBootApplication;

@SpringBootApplication
public class TestcontainersApplication {

	public static void main(String[] args) {
		SpringApplication.run(TestcontainersApplication.class, args);
	}

}
Step 3: Create Domain Class
Now, create a Domain class in the project folder. Here, we created a domain class with name MyDocument and we define a id field with setters and setters methods. We provide that class in the below.
MyDocument.java:
package com.app;

import org.springframework.data.annotation.Id;
import org.springframework.data.mongodb.core.mapping.Document;

@Document(collection = "testCollection")
public class MyDocument {
    @Id
    private String id;

    public MyDocument(String id) {
        this.id = id;
    }

    public String getId() {
        return id;
    }

    public void setId(String id) {
        this.id = id;
    }
}
Step 4: Create Repository Interface
Now, we created a repository interface with name MyDocumentRepository and it is extends to MongoRepository and it takes Domain name and Id type in the domain class as input.
MyDocumentRepository.java:
package com.app;

import org.springframework.data.mongodb.repository.MongoRepository;

public interface MyDocumentRepository extends MongoRepository<MyDocument, String> {
}
Step 5: Add Testcontainers Dependency
We add Testcontainers dependency while creating a Spring Project. The Spring Framework by default created three class in the src/test/java folder. The names of these files depends on the application name. TestcontainersApplicationTests, TestcontainersConfiguration, TestTestcontainersApplication.
Step 6: Create Test Class
TestcontainersApplicationTests.java:
This is main test class in the spring boot project created by the Spring Boot.
package com.app;

import org.junit.jupiter.api.Test;
import org.springframework.boot.test.context.SpringBootTest;
import org.springframework.context.annotation.Import;

@Import(TestcontainersConfiguration.class)
@SpringBootTest
class TestcontainersApplicationTests {

    @Test
    void contextLoads() {
    }
}
Step 7: Create Testcontainers Configuration Class
TestcontainersConfiguration.java:
In this class, we define the MongoDB configuration. By using required configuration information below mention that configuration code for your reference.
package com.app;

import org.springframework.boot.test.context.TestConfiguration;
import org.springframework.context.annotation.Bean;
import org.testcontainers.containers.MongoDBContainer;

@TestConfiguration(proxyBeanMethods = false)
class TestcontainersConfiguration {

    @Bean
    MongoDBContainer mongoDBContainer() {
        MongoDBContainer mongoDBContainer = new MongoDBContainer("mongo:4.4.2")
                .withExposedPorts(27017)
                .withReuse(true);
        mongoDBContainer.start();
        return mongoDBContainer;
    }
}
Step 8: Create Test Application Class
TestTestcontainersApplication.java:
It is another class in the Test folder. It is used for testing the spring project.
package com.app;

import org.springframework.boot.SpringApplication;

public class TestTestcontainersApplication {

	public static void main(String[] args) {
		SpringApplication.from(TestcontainersApplication::main).with(TestcontainersConfiguration.class).run(args);
	}

}
Step 9: Create MongoDB Connection Test Class
Here, we created another test class which is used for test the MongoDB connection.
package com.app;

import org.junit.jupiter.api.Test;
import org.springframework.beans.factory.annotation.Autowired;
import org.springframework.boot.test.context.SpringBootTest;
import org.springframework.data.mongodb.core.MongoTemplate;
import org.springframework.test.context.DynamicPropertyRegistry;
import org.springframework.test.context.DynamicPropertySource;
import org.testcontainers.containers.MongoDBContainer;

import static org.assertj.core.api.Assertions.assertThat;

@SpringBootTest
class MyRepositoryTests {

    static MongoDBContainer mongoDBContainer = new MongoDBContainer("mongo:4.4.2");

    static {
        mongoDBContainer.start();
    }

    @DynamicPropertySource
    static void mongoProperties(DynamicPropertyRegistry registry) {
        registry.add("spring.data.mongodb.uri", mongoDBContainer::getReplicaSetUrl);
    }

    @Autowired
    private MongoTemplate mongoTemplate;

    @Test
    void testDatabase() {
        // Insert a document into MongoDB
        mongoTemplate.save(new MyDocument("testDocument"), "testCollection");

        // Fetch the document from MongoDB
        MyDocument retrievedDocument = mongoTemplate.findById("testDocument", MyDocument.class, "testCollection");

        // Assert the document is retrieved successfully
        assertThat(retrievedDocument).isNotNull();
        assertThat(retrievedDocument.getId()).isEqualTo("testDocument");
    }
}
Step 10: Run the Project
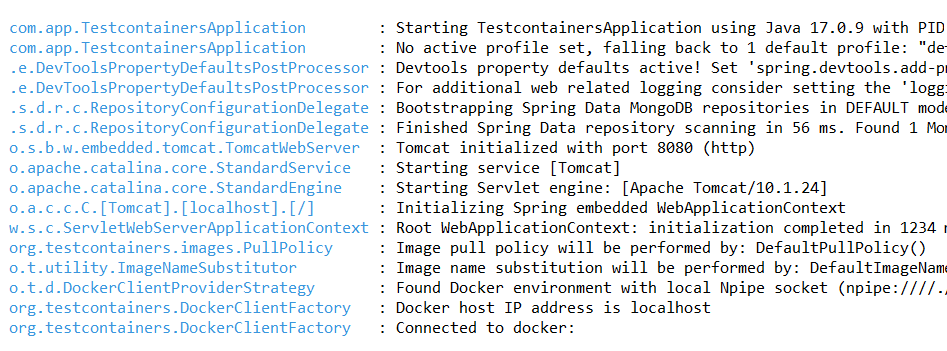
Once implementation is completed now run this project. By default this Spring Project run on port number 8080 with help of Tomcat server.
After successfully running the project. The Test containers created a docker image in the Docker tool.
Output:

Now Docker also running successfully. Observer below image.
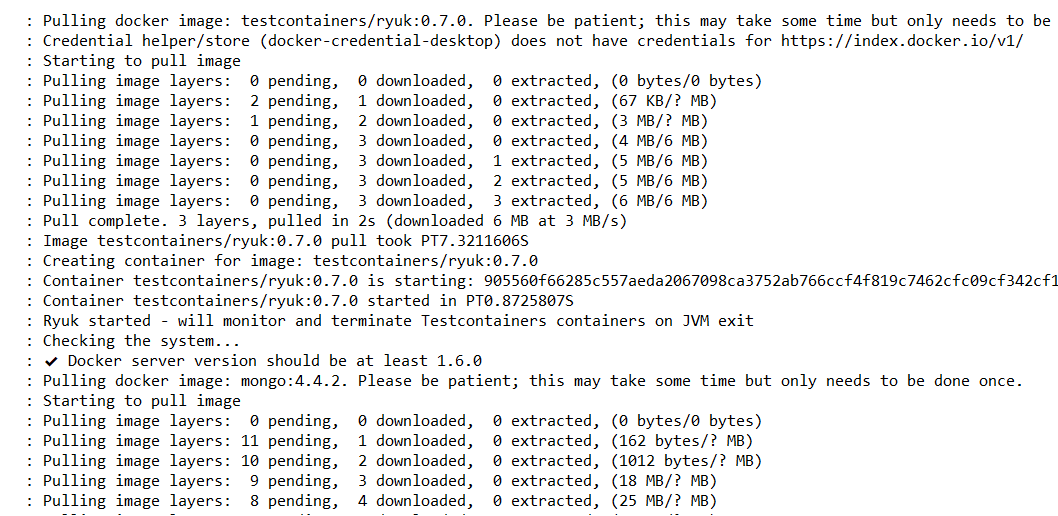
When project is running these images are created in the docker tool. That means project is fine.

Conclusion
This setup ensures that our integration tests are isolated and reliable by using Testcontainers to manage our test dependencies with MongoDB in a Spring Boot application. The tests will run a MongoDB instance in a Docker container, ensuring a consistent environment for our tests.