⚠️ New changes or fixes may not be immediately reflected in the tools or written guides.
Therefore, be aware that updates to the tools or their usage may occur without prior notice or immediate documentation. Always check the latest available information provided before starting any process.
The developers and contributors do their best to keep the tools functional and up to date; however, delays in updates can occur. In such cases, you may need to wait for a new release or for a workaround to be published.
Latest Version Updated: 26 July 2026 – All other versions are outdated.
⚠️ PLEASE READ AND FOLLOW ALL THE INSTRUCTIONS IN THE RESPECTIVE GUIDES CAREFULLY
⚠️ THE GUIDES CONTAIN EVERYTHING YOU NEED!
🔗 DIRECT LINKS
-
⛔ GENERATIVE FILL, FIREFLY AND GENERATIVE AI FEATURES DISABLED
-
🐒 GUIDE #7 - MONKRUS INDIVIDUAL / COLLECTION (EASIEST METHOD)
-
🚫 GUIDE #8 - BLOCKING UNNECESSARY ADOBE BACKGROUND PROCESSES (PS/DC)
-
🛠 GENP v4.2.1 - USING THE GOOD PATCH (ALTERNATIVE TO WINTRUST)
🆓 GENP IS COMPLETELY FREE
GenP is completely free by design and always has been. No donations are required or accepted for GenP itself, as keeping the project accessible to everyone is a core principle. No one officially connected with GenP will ever ask for payment or donations for the tool.
The GenP community operates officially through Lemmy and Stoat, where the GenP Wiki serves as the only trusted source for downloads and documentation. These platforms link directly to the official GenP Wiki to prevent confusion caused by mirrors and reuploads.
Unfortunately, GenP is frequently leeched by third parties who reupload it under their own name, often bundled with ads, fake download managers, popups, surveys, or even malware. These uploads exist solely to exploit GenP’s popularity for traffic and profit.
⚠️ Never download GenP from unofficial sources: Including YouTube links, shady forums, torrent trackers, file-sharing sites, P2P networks, or social media posts (such as Reddit, Telegram, Discord, GitHub, etc.) that are not explicitly linked from the official GenP Wiki.
If you are asked to wait, complete tasks, click monetised links, use mirrors, download through ads or installers, or enter a password to extract the archive, you are not using a legitimate source. The official GenP download is not password-protected and is never distributed through ad-gated installers.
Important clarification: The issue is not the platform itself, but unofficial mirrors and reuploads that are not linked from the official GenP Wiki.
These third-party uploads offer no support, often contain tampered files, and regularly cause problems that are wrongly blamed on GenP itself.
Many users trust familiar site names, branding, or platform icons without verifying the actual source of the download. This often leads to avoidable issues that are already clearly explained in the official GenP guides, resulting in unnecessary confusion and problems that could have been prevented by using the official source.
This pattern has repeated for years: skipping the guide, downloading from the wrong place, encountering errors, and then expecting others to fix issues caused by unsafe sources, not by GenP.
✅ Summary: GenP is 100% free. If you are paying with your money, your clicks, your time, or your data, you are not downloading it from the correct place. Always use the official GenP Wiki.
While GenP itself does not accept donations, contributions toward Lemmy server hosting costs are welcome. These donations help keep the community infrastructure running and have no impact on access to GenP.
🔴 EVERYTHING BELOW IS FOR WINDOWS SYSTEMS ONLY
GenP only supports x64-based Windows 10 and Windows 11 editions that are officially supported by Adobe for the specific app being installed.
Monkrus works on x86 and x64-based Windows 10 or 11 systems (depending on the release), but may bypass certain installer-side checks at the cost of stability and compatibility.
Neither GenP nor Monkrus supports ARM64, Windows on ARM, IoT editions, or modified or stripped-down Windows builds.
LTSC editions are not universally supported. Compatibility depends entirely on whether the specific Adobe app currently lists that LTSC version in its official system requirements.
Since GenP and Monkrus work by modifying Adobe apps directly, all official Adobe system requirements still apply. Unsupported Windows editions, unsupported app/OS combinations, or heavily customised builds remain unsupported regardless of activation status, update patches, or ESU usage.
ℹ️ Important Note:
Repacked installers do not rely on private Adobe installers, exclusive activation methods, or proprietary runtime modifications. They generally use the same publicly released Adobe installer components and the same GenP-based file replacement methods as standard installations, with differences focused on packaging, convenience, and pre-applied patches.
Installer-level bypasses (such as OS version or AVX2 checks) only affect whether setup launches. They do not add missing system features, CPU instructions, dependencies, or runtime compatibility. A successful installation does not guarantee stable operation once the application is launched.
🔐 Microsoft Extended Security Updates (ESU) (Windows 10 only):
Using ESU on a standard Windows 10 edition (e.g. Home or Pro) is acceptable, as ESU only extends security updates and does not alter the Windows edition or system capabilities. ESU has no effect on GenP itself and does not override Adobe’s system requirements.
ESU does not make unsupported Windows editions Adobe-compatible, nor does it guarantee continued functionality of Adobe apps once Adobe officially drops Windows 10 support.
Accordingly, questions or requests for help involving unsupported Windows editions, modified builds, or systems outside Adobe’s requirements will not be supported in this community. Any use on unsupported systems is done entirely at the user’s own risk.
⚠️ GenP and ARM Architecture – Incompatibility Notice:
If your device uses a Qualcomm Snapdragon processor (e.g. the Snapdragon X Elite or X Plus found in newer "Copilot+ PCs" like the Surface Pro 11), then it is ARM-based, even if the system does not explicitly say "Windows on ARM".
Windows on ARM includes an emulation layer called Prism to run x86 and x64 apps. While Prism has improved compatibility and performance, it does not support low-level tools like GenP, which rely on specific behaviours found only in native x64 environments.
Furthermore, Adobe is transitioning many apps to native ARM64 builds, which may no longer include x64 binaries. This means there may be nothing for GenP to patch, even when running under emulation.
⚠️ Emulation support itself is also fragile, and breakages may occur after Windows updates, driver changes, or Adobe updates.
ℹ️ What about Monkrus prepatched builds?
Monkrus builds are not a workaround. They still rely on GenP's patching techniques and therefore face the same limitations on ARM devices.
🚫 Unsupported Platforms – Read Before Asking:
GenP and Monkrus do not support:
-
macOS: Use AdobeZii or Cmacked instead, or other trusted sites.
-
Linux: Ubuntu, Kali, Arch, or any other Linux distribution or Unix-like operating system.
-
Windows on ARM: Already covered above; not compatible, including Copilot+ PCs with Snapdragon processors.
-
Modified or Custom Windows Editions: e.g. Tiny10/11, GhostSpectre, Windows PE, heavily customised Enterprise editions, unofficial images, and other stripped or altered Windows builds.
-
IoT Editions: Not supported unless explicitly listed by Adobe for the specific app, which is uncommon.
-
LTSC Editions: Only supported where the specific Adobe app officially lists that LTSC version in its current system requirements.
-
Windows Insider Preview Builds: GenP and Monkrus may run on these builds, but use is not recommended due to potential instability and lack of official support. Support will not be provided for problems arising from Insider builds.
These editions and builds are unsupported and may cause errors or unexpected behaviour.
These platforms are not fully supported here, and questions about workarounds for them may not be answered.
⚠️ Please read the guides thoroughly before taking any action or posting repeated questions.
We aim to extend your trial period significantly beyond the usual duration, giving you ample time to gain experience before committing yourself to the traditional path, both professionally and financially.
If you notice any issues or areas for improvement in the information provided, or in how the guides are presented, please message Mean_Plantain_7909 or another Admin or Mod with specific details or constructive feedback.
🟢 LATEST GENP VERSION
⚠️ This is the official GenP version currently recommended for all users.
GenP Current Release: GenP v4.2.1 with Config v4.2.1
GenP Last Updated: 26/07/2026
Important: Please ensure you're using this version to maintain compatibility and avoid issues.
This is much larger than older builds as many previously manual steps are now built in and automated. It is expected and doesn't affect how it runs.
Earlier versions of GenP may no longer be compatible with current app releases or system updates. In some cases, apps may fail to launch or close immediately due to patching issues that have been resolved in newer GenP builds.
🆕 v4.2.1 NEW FEATURES
Corrections:
-
General Fixes: Various stability and reliability improvements.
-
Older versions download reliability: Clearer messages when Adobe blocks a request, and more dependable downloads and installs.
New features:
-
Proxy targeting (per-app): the "Proxy" tab now includes a "Targeting" button. By default the proxy runs in Global mode, which intercepts all Adobe traffic, this is the recommended setting because it also covers Adobe's shared licensing services. You can optionally switch to Targeted mode and tick up to four installed apps to limit interception to just those. Your choice is saved in
config.ini. -
Combined "Start / Stop Proxy" button: the previous "Toggle Run" and "Toggle Proxy" buttons are now a single button that starts the proxy and enables the Windows system proxy together, and stops both.
-
Centred popups: GenP's dialogs and message boxes now open centred on the GenP window instead of the middle of the screen.
-
Older versions download verified, self-contained installs: Every package is size-checked and confirmed complete before install (missing files are reported, not passed on), and the required Adobe installer components are fetched automatically each time, so downloaded versions install cleanly with no manual setup.
v4.2.0 NEW FEATURES
Proxy tab (new):
- Full in-house popup-blocking proxy, replacing the previous manual workaround. "Setup", "Targeting", "Start / Stop Proxy", "Open Log" and "Remove", all from the "Proxy" tab.
Hosts tab - Schedule Updates (new button):
- Full in-house hosts file auto-updating, replacing the previous manual setup process. The new "Schedule Updates" button installs the Windows scheduled task (
UpdateHostsFile) to keep your hosts file current automatically.
Options tab - new options:
-
Clear license caches after patching - clears any cached license state after a patch run (checked as default).
-
Trigger one-off capture and launch on save - initiates an immediate update capture on the next Save, useful during first-time setup.
-
Show app launch toolbar - enables a small floating toolbar for launching patched apps directly, bypassing CC. Configurable via the toolbar's own "Configure" button.
-
Older versions download - a built-in fallback downloader for offline Adobe CC installers, fetched directly from Adobe's own servers, with no account or trial required. Adobe's own "Other versions" list should now appear for all users again, but if it doesn't show for you, this option lets you fetch any available older version directly.
Automatic Adobe reload after patching:
- When patching finishes, GenP now automatically reloads Adobe, it stops and relaunches Adobe's background processes so the patched files take effect immediately. There's no prompt and no restart needed; it runs as part of the patch. The activity log stays on the "Log" tab, so you can review it or use "Copy" to save it.
Final Adobe Clean Check:
- Now runs in a dedicated live progress window showing each check step as it executes. It also performs a full reset, clearing Adobe's license caches and restoring the CCX Start home to Adobe defaults, so run it only as part of a clean uninstall/reset, not to keep patched apps working.
Config validation:
- GenP now checks that
config.iniis complete and correctly structured at startup. If anything is wrong, a warning popup is displayed notifying you of the issue before any patching occurs.
Build integrity / hash files:
- Every release ships with
GenP-v4.2.1.exe.hashes.txt(Binary) andGenP-v4.2.1.au3.hashes.txt(Source), each listing the file name, size, SHA256 and MD5. The executable also carries an embedded self-hash that is verified at runtime. Always compare your download against the officially published values before running.
Good patch - Gude Log Cleanup task (new):
- When you first enable the
Goodpatch and click "Save Options", GenP now prompts you to install an automatic cleanup scheduled task (GenP Gude Log Cleanup) that removesgude-YYYY-MM-DD.logfiles every 3 hours. Clicking "Yes" opens a drive selector where you choose which drives GenP will scan for log files. If you later disable theGoodpatch, GenP will ask whether to keep or remove the task.
🆕 FIRST RUN MODE SETUP
GenP uses patch_states.ini - a per-file ledger that lives next to GenP-v4.2.1.exe and records what's been patched, each file's original and patched MD5 checksums, which apps have WinTrust applied, and the version of each detected Adobe app. The file is maintained automatically as you Patch and Restore; you don't need to edit it manually.
The ledger powers the new Modified workflow (which patches only files that have drifted since the last run) and gives Verify accurate per-file status. Without it, GenP can't tell which files need patching after an Adobe update, so getting the ledger established correctly on first run matters.
Two scenarios - pick the one that matches you. If unsure, choose Scenario 1 ("Create new...") - it's the recommended path for most users.
1. First-time GenP user, or upgrading without an existing patch_states.ini:
Use "Create new patch_states.ini" in First Run Options on the "Options" tab:
-
Note: Ensure you don't skip setting the Path first as the process uses the location.
-
On the "Main" tab, set Path to your Adobe install root (e.g.
C:\Program Files\Adobe, orD:\Adobeif you've installed elsewhere). -
On the "Options" tab, check "Create new patch_states.ini (using location set by Path only)".
-
Click "Save Options".
-
GenP will scan your install, restore any already-patched files back to their originals (so the MD5 baseline is correct), record every file in the ledger, then automatically patch everything fresh.
-
When the run completes, the "Log" tab opens showing the full activity log. Your install is fully patched and the ledger is fully populated.
-
This is a one-time process that takes a couple of minutes depending on install size. The Create option auto-unchecks itself after Save so it doesn't run on subsequent option saves.
-
ℹ️ Tip: For normal use, reopening Creative Cloud after the run is all you need. But if you want to install or update another Adobe app straight afterwards, restart your PC first as Adobe can return a 304 error on an install/update attempted immediately after patching (its own update cache). A restart clears it in seconds.
2. Advanced: carrying an existing patch_states.ini over from a previous setup:
Use "Reconcile imported patch_states.ini" in First Run Options on the "Options" tab:
-
Note: This method requires GenP
v4.0.2or later, and is intended for users who need to preserve specific ledger state. Most users should use Scenario 1 instead and "Create new...". -
Place your existing
patch_states.ininext to the newGenP-v4.x.x.exe. -
Note: Ensure you don't skip setting the Path first as the process uses the location.
-
On the "Main" tab, set Path to your Adobe install root.
-
On the "Options" tab, check "Reconcile imported patch_states.ini (using location set by Path only)".
-
Click "Save Options".
-
GenP will scan your install and validate every file's live MD5 against the imported ledger:
-
Files that are still accurate are confirmed, files whose MD5 has drifted are flagged, files no longer on disk are removed from the ledger, and new files found that aren't in the ledger are added.
-
When done, GenP switches to the "Main" tab with any drifted or new files visible and pre-checked. Reconcile is diagnostic, it doesn't auto-patch. Review the listed files and click "Patch" (or "Restore") yourself as appropriate.
-
The Reconcile option auto-unchecks itself after Save.
ℹ️ Notes:
-
Create and Reconcile are mutually exclusive: checking one auto-unchecks the other.
-
Both options use the location set by Path on the "Main" tab, set this before checking either option.
-
Clicking Save Options is what triggers the run.
-
If you accidentally end up with a corrupted or wrong
patch_states.ini, use "Reset patch_states.ini" in Clean Options on the "Options" tab to delete it, then re-run Create.
⚠️ Fallback Precaution:
-
If you encounter persistent issues or errors with a specific app after updating GenP, perform a clean slate for that individual app only:
-
Uninstall the affected app, ensuring you remove any leftover app folder (usually in
C:\Program Files\Adobe), reinstall it via the CC app, and patch with GenP again as a fresh install.
🔄 ESSENTIAL LATEST GENP VERSION REQUIREMENT
If you have patched your apps using an outdated version of GenP, it is essential to uninstall, reinstall, and repatch any apps patched with versions earlier than GenP v3.5.0 using the most recent version of GenP.
This recommendation also applies to the CC app, as GenP v3.5.0 introduced a patch designed to prevent updates from breaking previously patched apps.
🛠️ GENP DISTRIBUTION FORMATS EXPLAINED
GenP is available in three formats.
💡 Best Practice:
- After downloading or extracting any GenP version (Binary, Source, or Torrent, where available), keep it in its own dedicated folder. Do not mix files from older versions. This prevents configuration conflicts, patching errors, or build-related issues.
Binary:
-
✅ Precompiled and ready to use.
-
Best for users who want to apply the patch without building from source.
-
No build or compilation steps required.
-
💡 Binary downloads may include
.nfoor.mdfiles. If.nfofiles open in Windows "System Information" or if.mdfiles don't open automatically, this is normal. You can open both in Notepad or any text editor to view the release details and instructions.
Source:
-
🧩 Includes all source files for manual building.
-
For advanced users who wish to inspect or manually build GenP.
-
⚠️ Keep the Source folder completely intact and in its own dedicated folder. Do not move, rename, delete, or merge files or folders before or during the build.
-
⚠️ Simply opening the main
.au3file to inspect it will not cause any issues. Only if you choose to modify and re-save the file should you ensure it is saved usingANSIencoding (notUTF-8 with BOMorUTF-16), as incorrect encoding can cause build errors such assyntax error (illegal character)and prevent successful compilation. -
Comes with a portable, self-contained
AutoItandSciTEenvironment. -
To build, run
run_build.batas Administrator; it will compileGenP.exeautomatically. -
⚠️ During the build process, a temporary folder
C:\GenP-BuildEnvis created for the portableAutoItandSciTEfiles. You can safely delete this folder after building. -
💡 Source downloads may include
.nfoor.mdfiles. If.nfofiles open in Windows "System Information" or if.mdfiles don't open automatically, this is normal. You can open both in Notepad or any text editor to view the release details and instructions.
Torrent (where available):
-
🌐 Peer-to-peer format (P2P).
-
Separate torrents for Binary and Source versions, delivered via P2P for wider availability.
-
⚠️ Might not be the latest release, check the version before using.
-
Functionality is identical to the direct downloads; only the delivery method differs.
🔐 Verifying Your Download (Hash Files):
-
Every build ships with a matching hash text file so you can confirm your copy hasn't been altered or tampered with.
-
The Binary download includes
GenP-v4.2.1.exe.hashes.txtin theReleasefolder, next toGenP-v4.2.1.exe. The Source download includesGenP-v4.2.1.au3.hashes.txtin theGenPfolder, next to the originalGenP-v4.2.1.au3file. -
Each file lists the
File,Size(in bytes),SHA256andMD5; the source file also lists itsSaved(last-modified) time. Compare these against the official SHA256/MD5 published with the release. If they match, your file is genuine.
Example (GenP-v4.2.1.exe.hashes.txt):
File:   GenP-v4.2.1.exe
Size:   <bytes>
SHA256: <value>
MD5:    <value>
Built:  <timestamp>
- The executable additionally carries an embedded SHA-256 self-hash, which GenP verifies against itself at runtime, so a modified
.execan be detected even without opening the text file. Always make sure the official SHA256 (and CID) match your own download before running.
🛠️ GenP Build Process Overview (Source Version):
For users building from Source, here's how the process works:
✅ Prerequisites Check:
-
The script checks for required components:
AutoIt,SciTE,UPX, andwintrust.dll. -
If
AutoItorSciTEis missing, they are downloaded on demand. -
These are unpacked into a temporary folder at
C:\GenP-BuildEnv. -
Once you’ve finished building, you can safely delete
C:\GenP-BuildEnvto clean up.
🔐 Administrator Privileges:
-
run_build.batincludes the#RequireAdmindirective. -
Admin rights are necessary to compile the program and make system-level changes.
-
🛑 Always run
run_build.batandGenP.exeas Administrator. Admin rights are required for the build to complete successfully and for the patching step to work correctly.
📦 Downloads and Extraction:
-
If missing, the portable versions of
AutoItandSciTEare downloaded. -
Dependencies are extracted into
C:\GenP-BuildEnv. -
This avoids requiring permanent installations on your system.
💡 Note on curl warnings:
-
During downloads, you may see messages like:
-
curl: (35) schannel: next InitializeSecurityContext failed: CRYPT_E_NO_REVOCATION_CHECK (0x80092012) - The revocation function was unable to check revocation for the certificate. -
These warnings mean Windows couldn’t check the certificate revocation server.
-
They do not affect the download, the files still extract and build correctly.
-
You can safely ignore them.
📁 UPX Compression and DLL Patch:
-
upx.exeis prepared to compress the final binary. -
wintrust.dllis patched to allow proper functionality. -
During this step, antivirus may block or quarantine the patched DLL when it is moved into the
GenPfolder. If this happens, the build will fail even though the patching step itself succeeded.
🛠️ AutoIt Compilation:
-
The main
.au3file is compiled intoGenP.exeusingAutoItandSciTE. -
Any stripped or partial
.au3files are removed before compiling. -
Errors during compilation are logged to
Logs\AutoIt_err.log.
📤 Final Output:
-
Once built,
GenP.exeis copied into theReleasefolder. -
A typical successful build log looks like this:
Starting build process...
The following components are missing and need to be downloaded:
 - AutoIt Portable (~17MB)
 - SciTE Portable (~7MB)
Proceed with downloading these components? (y/n)
Enter 'y' to proceed, 'n' to cancel: y

Creating installation directory at C:\GenP-BuildEnv...

Preparing UPX...
 - Extracting zip: upx-5.0.1-win64.zip
 - Found UPX directory: C:\Users\user\Downloads\GenP_4.2.1_SOURCE\genp-4.2.1-src\UPX\upx-5.0.1-win64
 - UPX copied to C:\Users\user\Downloads\GenP_4.2.1_SOURCE\genp-4.2.1-src\GenP

Patching wintrust.dll...
 - Patched wintrust.dll and moved to C:\Users\user\Downloads\GenP_4.2.1_SOURCE\genp-4.2.1-src\GenP

Downloading AutoIt Portable...
curl: (35) schannel: next InitializeSecurityContext failed: CRYPT_E_NO_REVOCATION_CHECK (0x80092012) - The revocation function was unable to check revocation for the certificate.
 - Extracting AutoIt Portable to C:\GenP-BuildEnv\AutoIt
 - AutoIt extracted to C:\GenP-BuildEnv\AutoIt

Downloading SciTE Portable...
curl: (35) schannel: next InitializeSecurityContext failed: CRYPT_E_NO_REVOCATION_CHECK (0x80092012) - The revocation function was unable to check revocation for the certificate.
 - Extracting SciTE Portable to C:\GenP-BuildEnv\AutoIt\install\SciTE
 - SciTE extracted to C:\GenP-BuildEnv\AutoIt\install\SciTE

Building GenP...
 - Selected .au3 file: C:\Users\user\Downloads\GenP_4.2.1_SOURCE\genp-4.2.1-src\GenP\GenP-4.2.1.au3
 - Building GenP-4.2.1.au3
 - Appending self-hash trailer...
   Appended 80-byte trailer (SHA256 body = <hash>)
 - GenP executable built at C:\Users\user\Downloads\GenP_4.2.1_SOURCE\genp-4.2.1-src\Release\GenP-v4.2.1.exe
 - Computing release hashes...
   SHA256: <value>
   MD5:    <value>
   Size:   <bytes>
   Saved to GenP-v4.2.1.exe.hashes.txt
 - Computing source hashes...
   SHA256: <value>
   MD5:    <value>
   Size:   <bytes>
   Saved:  <timestamp>
   Saved to GenP-v4.2.1.au3.hashes.txt

Build process completed successfully!
Press any key to exit . . .
💡 File Size Differences:
-
The precompiled Binary and the Source build come out around the same size (~66MB), with the Binary usually a touch larger than the Source. This is expected and does not affect the functionality of either version.
-
Note: Don't worry if your download shows a different figure than expected. The same file can appear as a smaller or larger number depending on how size is measured, Windows Explorer uses binary units (MB/MiB), while a raw byte count or some download sites use decimal units (MB). It's the exact same file; only the unit of measurement differs.
-
Both downloads are much larger than previous GenP releases (which were only a few MB). That's because a lot of what used to be manual, do-it-yourself steps is now handled automatically inside GenP, with the resources needed to run them bundled in. The larger size is expected, applies equally to the binary and source versions, and does not affect functionality or safety in either.
💡 Why the difference?
-
Most of the ~66MB in both downloads is the bundled resources GenP now ships with, that part is identical either way, so it isn't what makes them differ.
-
On top of that, the compiled Binary embeds the AutoIt runtime inside the
.exe, which adds a small amount of overhead over the source package, so the Binary ends up a touch larger. -
In earlier versions, UPX compression could make the binary smaller than the source. In
v4.2.1the embedded resources and runtime outweigh any compression, so the compiled.exesits marginally above the source, the more usual outcome for a compiled build. -
Metadata such as build timestamps, debug symbols, or compiler-specific settings can also shift the size slightly, even though the program itself is identical.
-
If your build runs and patches correctly, it's working as intended. The size difference is purely cosmetic.
⚠️ Antivirus Interference During Build:
-
Antivirus software can interfere with the Source build at more than one stage.
-
WinTrust DLL Patch Step:
-
Some antivirus may block or quarantine the patched
wintrust.dllwhen it is moved into theGenPfolder. -
When this happens, the patching step cannot complete properly, and the script will return an error like:
-
Failed to patch or move wintrust.dll. -
This occurs before the AutoIt compilation step, so the build fails immediately, even though it may seem like nothing has been compiled yet.
-
Final Build Step:
-
Some antivirus may block the creation of the
.exein theReleasefolder. -
This usually results in an error popup like:
-
Aut2Exe Error: Error copying source to destination file: C:\Users\user\AppData\Local\AutoItv3\Aut2.exe\~xxxxxx.tmp.exe. -
The path points to your own
AppDatafolder and~xxxxxx.tmp.exeis randomly generated. -
The console output may look like this, dependent on where you have saved the folder yourself:
Building GenP...
 - Selected .au3 file: C:\Users\user\Downloads\GenP_4.2.1_SOURCE\genp-4.2.1-src\GenP\GenP-4.2.1.au3
 - Building GenP-4.2.1.au3
Failed to build AutoIt script: AutoIt3Wrapper failed to produce a GenP*.exe in C:\Users\user\Downloads\GenP_4.2.1_SOURCE\genp-4.2.1-src\GenP. Check C:\Users\user\Downloads\GenP_4.2.1_SOURCE\genp-4.2.1-src\Logs\AutoIt_err.log.
Failure. Check the error messages above.
Press any key to exit . . .
✅ Solution:
-
Temporarily disable your antivirus completely before running the build.
-
If you see an error, disable antivirus and simply re-run the build script.
-
Since most steps will already be complete, the script will skip straight to building the
.exe.
Starting build process...
 - upx.exe found in C:\Users\user\Downloads\GenP_4.2.1_SOURCE\genp-4.2.1-src\GenP\, skipped preparing UPX
 - wintrust.dll found in C:\Users\user\Downloads\GenP_4.2.1_SOURCE\genp-4.2.1-src\GenP\, skipped patching WinTrust
 - AutoIt found in C:\GenP-BuildEnv\AutoIt\, skipped downloading AutoIt
 - SciTE found in C:\GenP-BuildEnv\AutoIt\install\SciTE\, skipped downloading SciTE

Building GenP...
 - Found stripped .au3 file(s): GenP-4.2.1_stripped.au3. Deleting to proceed with build.
 - Selected .au3 file: C:\Users\user\Downloads\GenP_4.2.1_SOURCE\genp-4.2.1-src\GenP\GenP-4.2.1.au3
 - Building GenP-4.2.1.au3
 - Appending self-hash trailer...
   Appended 80-byte trailer (SHA256 body = <hash>)
 - GenP executable built at C:\Users\user\Downloads\GenP_4.2.1_SOURCE\genp-4.2.1-src\Release\GenP-v4.2.1.exe
 - Computing release hashes...
   SHA256: <value>
   MD5:    <value>
   Size:   <bytes>
   Saved to GenP-v4.2.1.exe.hashes.txt
 - Computing source hashes...
   SHA256: <value>
   MD5:    <value>
   Size:   <bytes>
   Saved:  <timestamp>
   Saved to GenP-v4.2.1.au3.hashes.txt

Build process completed successfully!
Press any key to exit . . .
💡 Tips & Troubleshooting:
-
If you still run into build issues, try installing AutoIt and SciTE directly on your system instead of using the portable versions.
-
If nothing works, fall back to the Binary release, it’s precompiled, ready to use, and avoids all build dependencies.
🔒 Why Does the Build Process Require Admin Privileges?
The GenP build script, written in AutoIt and compiled via SciTE, and the compiled GenP.exe both require elevated privileges to function correctly.
This is because they interact with protected parts of the system, including:
-
Modifying the Windows registry.
-
Writing to system-protected directories.
-
Performing software patching or injection operations.
Windows enforces Administrator rights through User Account Control (UAC) because of the #RequireAdmin directive in the script; without these rights, patching will fail.
🛑 Always run run_build.bat and GenP.exe as Administrator. Admin rights are required for the build to complete successfully and for the patching step to work correctly.
✅ RECOMMENDED BROWSER SETUP FOR DOWNLOADING GENP
Our official GenP Wiki is the primary source for downloading the latest version of GenP. Always use the official link provided in this guide and avoid downloading from unverified sources.
If you are downloading from the official source, the browser measures listed below are optional but still recommended to improve privacy, security, and ad blocking during regular browsing.
If the official source becomes temporarily unavailable, a trusted third-party hosting link will be clearly provided to prevent confusion and ensure downloads only come from safe locations. These third-party sites may include advertising to generate revenue, so we recommend optimising your browser to block unwanted ads, trackers, and popups for a smoother and safer experience.
We recommend installing uBlock Origin or AdGuard for their superior performance, flexibility, and enhanced adblocking capabilities. You can also use supplementary extensions like Ghostery (privacy-focused), Adblock Plus, Total Adblock, and Popup Blocker, though these are generally less customisable.
If you already use a different extension that meets these needs, you can continue using what works best for you.
⚠️ Important Note:
If the official source or a third-party mirror fails to load, or you encounter connection errors, this is almost always due to blocking or restrictions on your end. The issue is typically local or network-related, rather than the website being offline.
Possible causes include ISP or regional restrictions, DNS filtering or poisoning, router-level parental controls, or modified DNS settings. Firewalls, antivirus software, and certain browser extensions (such as ad blockers, privacy filters, or script blockers) can also prevent access. In some cases, restricted corporate, school, or public Wi-Fi networks with captive portals may block the site. Less commonly, a corrupted DNS cache or incorrect entries in the system hosts file can cause similar symptoms. Rarely, an inaccurate system date or time can trigger SSL/TLS errors that stop the site from loading.
To resolve these issues, try switching to a different DNS service (such as Google DNS or Cloudflare DNS), flushing your DNS cache, or using a VPN. Check your firewall, antivirus, and browser settings, and ensure your system clock is accurate. While occasional website downtime or CDN-based regional blocks can occur, in most cases the problem is caused by local or network-level restrictions.
⛔ GENERATIVE FILL, FIREFLY AND GENERATIVE AI FEATURES DISABLED
Generative AI Features Are Subscription-Based:
-
Generative AI features are fully integrated into Adobe's subscription model and will not work without an active subscription or trial.
-
Posts related to Generative AI features not working due to subscription or access limitations will be removed, as these features are tied to licensed accounts.
Generative AI Features in Both General Availability (GA) Apps and Public Beta Apps (x86/x64):
-
Generative AI features may appear in both General Availability (GA) and Public Beta versions of Adobe apps.
-
Access in Beta does not mean the features are free, unrestricted, or permanently available.
-
Full functionality across all versions still requires an active, genuine subscription or trial.
Free Credits for Adobe Account Users:
-
Free Adobe account holders receive a limited allocation of Generative Credits per month, as defined and controlled by Adobe.
-
Free Membership credits do not provide the same level of access, availability, or credit allocation as a paid subscription.
-
Generative Credits are tied to the user’s Adobe ID, not to individual apps, installations, or versions.
-
Credits are shared across supported Creative Cloud products according to the account’s actual subscription status.
-
For GenP users, Adobe still recognises the account as a Free Membership when signed in.
-
GenP modifications are local only; anything processed online is governed entirely by Adobe’s servers and the account’s real subscription and credit status.
Generative Credits – Adobe Clarification:
-
According to Adobe’s Generative Credits FAQ here.
-
Some Generative AI features do not currently consume Generative Credits. This list is non-exhaustive:
-
Adobe Express: Generate Text Effects and Clip Maker.
-
Illustrator: Turntable (Beta).
-
Lightroom: Generative Remove.
-
Photoshop: Remove Tool.
-
Substance 3D Sampler: Text to Material and Text to Pattern.
-
Substance 3D Stager: Text to 3D.
-
Substance 3D Viewer (Beta): Text to 3D.
-
Important: Even if a feature does not consume Generative Credits, most server-based Generative AI tools still require a genuine subscription.
-
Credit usage and entitlement are separate checks.
-
A full and current list of Generative AI features that consume credits is maintained by Adobe here.
Why Firefly Is Strictly Enforced:
-
Adobe Firefly runs entirely on Adobe-controlled servers using proprietary models and infrastructure.
-
Entitlement checks occur before any credit usage is evaluated.
-
As a result:
-
Some features fail even when they do not consume credits.
-
Local app modifications cannot enable Firefly access.
-
Subscription status is enforced regardless of app version or Beta access.
Beta Features:
-
Some Generative AI features may still be available in Beta and may work temporarily.
-
Once fully integrated into Adobe’s subscription model, access is restricted to subscribers.
Non-Subscriber Access:
-
Server-Based Generative AI Features:
-
Most modern Generative AI tools rely on Adobe Firefly or server-based Sensei processing and require an active, genuine subscription.
-
Local ML Processing:
-
Some older machine-learning features still run locally using Adobe Sensei models on-device and do not require server processing.
-
Internet-Dependent Tools:
-
Certain tools (e.g. Photoshop’s Remove Tool in its cloud modes) may require an internet connection for validation, updates, or telemetry even when processing locally.
-
Internet access alone does not imply cloud-based AI.
-
The on-device Device mode officially runs offline once installed, but background licensing checks mean certain generative features may still fail or grey out without an internet connection.
-
Photoshop Remove Tool Note:
-
The Remove Tool offers three modes: Cloud (Firefly, subscription required), Generative AI Off (local Sensei), and Device (on-device generative model).
-
Set it to "Generative AI Off" to revert to traditional Sensei-based behaviour rather than Firefly. See the Photoshop Remove Tool add-on sections for the full breakdown.
-
Other Apps:
-
Photoshop currently allows disabling Generative AI to fall back on local processing.
-
Most other apps (Adobe Express, After Effects, Illustrator, InDesign, Lightroom, Premiere Pro) do not offer this option.
-
Their Generative AI features are fully cloud-based and require an active subscription.
Clarification: Local Processing vs Cloud Generative AI:
-
"Runs locally" no longer automatically means older, non-generative Sensei ML.
-
Traditional local ML (Sensei): Runs on-device with no prompts, no credit costs, and no Firefly interaction (e.g., Content-Aware Fill or Remove Tool set to "Generative AI Off").
-
On-device generative AI: A true generative model that runs on your local hardware and works offline. It is significantly heavier than classic Sensei and is not prompt-based (e.g., Remove Tool set to "Device").
-
Cloud generative AI (Firefly / server Sensei): Prompt-based models running on Adobe's servers. These require a genuine subscription and cannot be enabled via local modifications.
-
Entitlement is decided by where processing happens and whether Adobe's servers are contacted, not whether a feature is labelled "generative."
Feature Visibility ≠ Access:
-
The presence of buttons, panels, or menus does not imply entitlement.
-
Access is validated server-side, and requests may fail or be disabled even when UI elements are visible.
Summary:
-
Local modifications only affect app behaviour.
-
All Generative AI features, credits, and Firefly access are enforced entirely by Adobe servers based on the Adobe ID’s genuine subscription status.
-
This enforcement applies regardless of app version, Beta access, or local changes.
Important Reminder:
- Repeated posts about Generative AI features not working due to subscription status or access limitations will be ignored or removed.
✅ GUIDE LINKS, DOWNLOADS, AND IMAGES
Guide Section Links:
- To navigate to the correct section in any guide, use the "DIRECT LINKS" found at the top of the guide.
Guide Downloads:
-
On some mobile browsers, the download prompt may not appear even though the download is shown as finished.
-
Switching your browser to desktop site mode forces a prompt, allowing you to choose where to save the file.
Guide Images:
-
Images should be visible on all devices, although they might not show on some mobile devices.
-
For full visibility, use desktop mode.
🤔 GENP OR MONKRUS: WHICH ONE SHOULD I USE
When deciding between GenP and Monkrus, key factors to consider include your system's performance, the number of apps you need, and whether you require online or cloud-based features for your workflow.
✅ Important Reminder:
- The choice of which method to use is always yours. Don't let others' experiences or recommendations influence your decision, as what works well for one person's setup may not be suitable for yours. Take the time to carefully evaluate your own needs, system capabilities, and preferences before choosing your preferred method.
⚠️ Important Note:
-
Both GenP and Monkrus offer alternative, non-genuine installation methods for Adobe products. While they can unlock functionality, they also carry technical, legal, and ethical risks. Proceed with caution, and stay informed by regularly checking updated guidance in community discussions and trusted sources.
-
For full details on potential risks and your responsibilities, refer to our GenP Rules and Disclaimer before using either approach.
For More In-Depth Details:
To explore both patching methods, troubleshooting, and best practices, refer to the guides below:
🔗 Patch Setup Guide - GenP vs Monkrus – A practical guide to patching methods.
🔗 Guide #2 - CC+GenP – For GenP installation.
🔗 GenP Setup, Troubleshooting, and Best Practices Guide – For everything else about GenP.
🔗 Guide #7 - Monkrus – For Monkrus installation.
🔗 Monkrus Setup, Troubleshooting, and Best Practices Guide – For everything else about Monkrus.
For a quick comparison, feel free to refer to the table below for a side-by-side look at the key differences between GenP and Monkrus.
| Feature | GenP | Monkrus |
|---|---|---|
| Installation | Requires Adobe Creative Cloud and internet access for sign-in and updates | Offline installation; no Creative Cloud needed, but sign-in may be required for some apps |
| Ease of Use | More steps; patching required | Simple: download, install, use |
| Updates | Updates via Creative Cloud; avoids having to do a full app re-download | Each update requires downloading the entire app again; this process overwrites the currently installed version. |
| Safety | Considered safer by most due to manual control | Mixed opinions; some concerns about bundled malware |
| Flexibility | Ideal for full Adobe suites and multiple apps | Best for single app installs |
| Performance | Full Adobe-like experience; optimised workflows and service integration | Lightweight and stripped-back; some features may not work as intended |
| Feature Availability | All standard content packs and tools included by default via official installer | Some features require separate downloads (e.g. Premiere Speech Pack); content may be stripped to reduce installer size |
💡 Performance Note:
- GenP closely follows Adobe's official installation method, offering better optimisation and compatibility, especially on newer Windows systems with cloud integration enabled. Monkrus, on the other hand, skips Creative Cloud entirely, which can reduce system load, but may limit access to certain integrated features and cloud services.
💡 Feature Availability & Missing Components:
- GenP includes all standard content packs and tools by default via Adobe's installer. In contrast, Monkrus builds often exclude non-essential components to reduce installer size, including language packs, speech modules, and in-app downloadable assets.
📦 Missing Components in Monkrus Builds:
- For example, Premiere Pro's Enhance Speech and Transcribe Sequence features appear in the interface, but to function properly they require a separate Speech Pack download (~13GB). This pack includes key language files needed for voice processing and transcription in non-English languages, none of which are bundled in the Monkrus Premiere Pro install by default, as a trade-off for reduced installer size.
⚠️ Always verify which components are included in your Monkrus build before installation, especially if you rely on cloud-connected features or advanced content tools.
GenP (Recommended for Most Users):
-
Best For: Users seeking the newest Adobe apps, full control over update management, smooth integration with cloud-based tools, and a dependable patching process that minimises hassle.
-
Safer & More Reliable: GenP uses Adobe's official installer, modifying only the necessary files to make the app appear activated. This method ensures a smoother experience, especially with cloud features like syncing and updates.
-
More Control: You can manually patch your apps and roll back to previous versions if needed.
-
Supports Updates: You can easily update apps as long as you repatch after each update.
-
Best Compatibility: GenP offers the best support for Adobe's cloud-based services, and most Adobe features work well, even offline. Some cloud services may be limited due to patching.
-
Future-Proof: GenP mimics Adobe's own process, making it the most reliable and long-term solution.
Monkrus (Simpler, but With Some Limitations):
-
Best For: Users who prefer a quicker, offline installation process and don't mind sacrificing some cloud functionality and control over updates.
-
Easier Setup: Monkrus offers prepatched Adobe apps, making installation faster and more streamlined, with no need for Creative Cloud or an Adobe account for activation.
-
Offline Use: Ideal for users who want Adobe apps without relying on online services or cloud-based features.
-
More Invasive: Monkrus removes and modifies more files than GenP to make the apps work without Creative Cloud. This can sometimes cause issues with updates or missing features.
-
Less Control & Potential Risks: Since Monkrus relies on repacked third-party tools (including GenP), it doesn't offer the same level of compatibility, update support, or security as GenP.
Factors to Consider:
✅ Your Setup, Your Choice:
- What works for one person might not work for you. Your decision should be based on your unique system specs, requirements, and what you're comfortable with. Don't rely solely on others' experiences or recommendations when making your choice.
Workload & App Requirements:
-
If you only need one app, Monkrus might be a better option for its simplicity. However, if you require the full suite of apps, GenP offers more control and better integration with cloud services.
-
If you're working on an older machine, GenP might be a better choice because it allows for easier updates and is less invasive. However, if your system is more limited in resources, it's important to avoid overloading it with unnecessary apps.
-
In this case, Monkrus might actually be a better option if you only need one or two specific apps, as it provides a simpler, more streamlined installation with fewer background processes. Limiting the number of installed apps can help ensure your system runs more smoothly.
Adobe Account Requirement:
- Keep in mind that Monkrus users may sometimes need to create or use an existing Adobe account. Some apps require you to sign in to Adobe to work or download additional in-app content. This may be necessary even if you're not using Creative Cloud itself.
How to Choose:
-
Choose GenP if you're seeking a reliable, future-proof solution with full compatibility for most of Adobe's cloud features, enhanced control over updates, and a seamless patching process engineered for sustained performance with minimal disruption.
-
Choose Monkrus if you prefer a simple, offline setup and are willing to sacrifice some functionality and updates for ease of use.
IMPORTANT:
🔴 Never mix and match the two methods, as combining GenP and Monkrus can lead to conflicts and instability.
⭐ DOWNLOAD DIRECTORY
Any link or text enclosed with 🚨 ... 🚨 is either outdated or broken.
Monkrus downloads may not always reflect the latest release.
ℹ️ IMPORTANT NOTE:
Before proceeding with any GenP download, please ensure you have read and understood the "GENP DISTRIBUTION FORMATS EXPLAINED" section to choose the correct version (Binary or Source) for your needs.
If downloading via Torrent, note that it simply delivers the same Binary/Source files through P2P and might be the previous release, as it's not always updated at the same time as the direct downloads.
Then, read the "RECOMMENDED BROWSER SETUP FOR DOWNLOADING GENP" section to optimise your privacy, enhance your browsing experience, and block unwanted ads, trackers, and popups effectively.
🆕 If you're upgrading from a previous GenP version, also read the "FIRST RUN MODE SETUP" section before starting, as GenP has now introduced a per-file state ledger that needs a one-time setup pass on first run.
Neither Photoshop Elements nor Premiere Elements are part of Creative Cloud. You will need to download and install them separately, along with any updates, either directly through the apps themselves or via Adobe's freely available update pages. However, they can both be patched normally through GenP.
CC + GenP - (Go to Guide #2)
🔗 Creative Cloud (CC) - Adobe Download - Always use this one first as priority
🔗 Creative Cloud (CC) - Adobe Alternative Download - Use if you have issues with Adobe Download
🔗 Creative Cloud (CC) - Backup Download - Only use if you have issues with both Adobe downloads above
🔗 🚨 GenP v3.4.13.4 CGP+Co 🚨 - (Cinema 4D Only)
🔗 🚨 GenP v3.4.2 CGP 🚨 - (Fresco/XD Only)
Note: GenP downloads below may be rate-limited, and some public gateways can be blocked or throttled by certain ISPs or in some regions. If a link doesn't work, try one of the other backup links first or use a VPN if a gateway is blocked for you. Your antivirus may also block the download. If so, you will need to allow it first, which is already covered in Guide #1 - How to Whitelist Files.
Note: The SHA256 or MD5 shown for each download is for the extracted file inside the zip, not the zip itself. Unzip first, then hash the extracted file to check it against the value listed. The IPFS CID already guarantees the download itself arrived intact.
💡Tip: Most links download when clicked. If one opens a preview page instead, "right-click" it and choose "Save link as…" to download it directly. The torrent links in particular may do nothing when clicked, "right-click" it and choose "Save link as…" to save the small .torrent file, then open that file in your torrent app to start the download.
Note: Occasionally a download may get saved under its CID (e.g. Qme7rK…) instead of its proper name, this can happen when using a VPN. The content is still intact; just rename the file to the correct .zip / .torrent name, or try another link or turn your VPN off to restore the proper name.
Binary:
🔗 GenP v4.2.1 - Binary
-
File:
GenP-v4.2.1.exe -
SHA256:
7248E21019E911B6A4ECBB143053C1297DA4CE972697E00E06E72B8217FA43A8 -
MD5:
026A72CBD92937AA0C3DFB095C3F7F9A -
CID:
Qme7rKVsBGEP1Dgzhpy8bmyE5E8zUZzzzDNgjLnRED7sJL
🔗 GenP v4.2.1 - Binary Backup
-
File:
GenP-v4.2.1.exe -
SHA256:
7248E21019E911B6A4ECBB143053C1297DA4CE972697E00E06E72B8217FA43A8 -
MD5:
026A72CBD92937AA0C3DFB095C3F7F9A -
CID:
Qme7rKVsBGEP1Dgzhpy8bmyE5E8zUZzzzDNgjLnRED7sJL
🔗 GenP v4.2.1 - Binary Backup
-
File:
GenP-v4.2.1.exe -
SHA256:
7248E21019E911B6A4ECBB143053C1297DA4CE972697E00E06E72B8217FA43A8 -
MD5:
026A72CBD92937AA0C3DFB095C3F7F9A -
CID:
Qme7rKVsBGEP1Dgzhpy8bmyE5E8zUZzzzDNgjLnRED7sJL
🔗 GenP v4.2.1 - Binary Torrent
-
File:
GenP-v4.2.1.torrent -
Info-Hash:
153d1043d9e0ef065713c67493482f7f4716cf28 -
SHA256:
8620563DEF1EB8A8DDA04AF58C0F4D62BFC20CB6F35B7EB5FAF3DB96D7871C9E -
MD5:
278A4547540C448298C19D48AF5B434D -
CID:
QmXRZKW1JHoBwkpzt9WcKq33qVbnGjBxCvFfRTn7LuBnZv
Source:
🔗 GenP v4.2.1 - Source
-
File:
GenP-v4.2.1.au3 -
SHA256:
AC3687DA1FC11A3EAFF1A7E97457E2B7EDDDC285D7D08CE86EFC72B92AC6BE11 -
MD5:
A02B84E45C7EB346F251D0B32685F1F7 -
CID:
QmezK7rj2PnaXsyv9JkmbmVMAkWe6kVeTY9vVE3iR4WW5r
🔗 GenP v4.2.1 - Source Backup
-
File:
GenP-v4.2.1.au3 -
SHA256:
AC3687DA1FC11A3EAFF1A7E97457E2B7EDDDC285D7D08CE86EFC72B92AC6BE11 -
MD5:
A02B84E45C7EB346F251D0B32685F1F7 -
CID:
QmezK7rj2PnaXsyv9JkmbmVMAkWe6kVeTY9vVE3iR4WW5r
🔗 GenP v4.2.1 - Source Backup
-
File:
GenP-v4.2.1.au3 -
SHA256:
AC3687DA1FC11A3EAFF1A7E97457E2B7EDDDC285D7D08CE86EFC72B92AC6BE11 -
MD5:
A02B84E45C7EB346F251D0B32685F1F7 -
CID:
QmezK7rj2PnaXsyv9JkmbmVMAkWe6kVeTY9vVE3iR4WW5r
🔗 GenP v4.2.1 - Source Torrent
-
File:
GenP-v4.2.1-source.torrent -
Info-Hash:
f6a9812ef8f9eea9637e45b14f2455e160cc36f9 -
SHA256:
96A07EE7EAE62026A71D24576AB334D3D83DE1B46E5E1985375173DA7553A47F -
MD5:
0FD00948E1989B9FEC3059898562B77F -
CID:
QmVxK6oTtb6zzeXcegReJYuJwJEsmeBZaq6nripq39ArcF
Elements + GenP - (Go to Guide #2)
NOTHING IS WORKING / FULL CLEANING - (Go to Guide #4)
🔗 Adobe Creative Cloud Cleaner Tool
Monkrus Individual / Collection - (Go to Guide #7)
🔗 Monkrus Individual Apps / Collection - All Apps (VK)
Monkrus Optional Quick-Search Sources: (desktop-only convenience)
🔗 Monkrus Individual - Acrobat Pro (TG)
🔗 Monkrus Individual - After Effects (TG)
🔗 Monkrus Individual - Illustrator (TG)
🔗 Monkrus Individual - InDesign (TG)
🔗 Monkrus Individual - Lightroom Classic (TG)
🔗 Monkrus Individual - Media Encoder (TG)
🔗 Monkrus Individual - Photoshop (TG)
🔗 Monkrus Individual - Photoshop Remove Tool AI (TG)
🔗 Monkrus Individual - Premiere Pro (TG)
🔗 Monkrus Individual - Speech to Text Add-on for Premiere Pro (TG)
🔗 Monkrus Individual - Substance 3D apps (TG)
🔗 Monkrus Individual - XD (TG)
🔗 Monkrus Collection - All Apps (TG)
🔓 GUIDE #1 - HOW TO WHITELIST FILES
On Windows Defender:
Windows 11:
Windows 11 Official Instructions
-
Click the Windows key.
-
Write "Settings".
-
Go to
Privacy & security > Windows Security > Virus & Threat Protection. -
Under Virus & threat protection settings, click "Manage settings".
-
Under Exclusions, click on "Add or remove exclusions".
-
Locate the extracted GenP folder and click "Select folder".
Note: A folder exclusion will apply to all subfolders within the folder as well.
Windows 10:
Windows 10 Official Instructions
-
Click the Windows key.
-
Write "Settings".
-
Go to
Update & Security > Windows Security > Virus & Threat Protection. -
Under Virus & threat protection settings, click "Manage settings".
-
Under Exclusions, click on "Add or remove exclusions".
-
Locate the extracted GenP folder and click "Select folder".
Note: A folder exclusion will apply to all subfolders within the folder as well.
On Google Chrome:
-
On an empty page, press
CTRL+Jto bring up your "Download history tab". -
Click on "More Actions" (three vertical dots) and choose "Download dangerous file".
Trust GenP and add to Allowed to show download insecure content:
-
In Chrome Settings go to
Privacy and Security > Site Settings > Additional Content Settings > Insecure content. -
Click "Add" on Allowed to show insecure content, add the site address for GenP, and click "Add".
Trust Specific Site Only:
-
Click "View site information" in the address bar (icon on left side of address).
-
Click "Site Settings", scroll down to "Insecure Content" and change it to "Allow".
On Used Antiviruses (AV):
Note: Some of these links can be outdated or needing to be updated to amtch latest software released, that is on your used antivirus provider to do themselves and not us, we are not accountable for antivirus providers that list outdated and irrelevant content.
Avast:
AVG:
Bitdefender:
Bitdefender Official Instructions
Kaspersky:
Kaspersky Official Instructions
Malwarebytes:
Malwarebytes Official Instructions
Mcafee:
Norton:
☠️ GUIDE #2 - GUIDE FOR FIRST TIMERS GENP (CC + GENP)
[No video tutorial]
ℹ️ IMPORTANT NOTE:
Before proceeding with any GenP download, please ensure you have read and understood the "GENP DISTRIBUTION FORMATS EXPLAINED" section to choose the correct version (Binary or Source) for your needs.
If downloading via Torrent, note that it simply delivers the same Binary/Source files through P2P and might be the previous release, as it's not always updated at the same time as the direct downloads.
Then, read the "RECOMMENDED BROWSER SETUP FOR DOWNLOADING GENP" section to optimise your privacy, enhance your browsing experience, and block unwanted ads, trackers, and popups effectively.
DOWNLOADS / TOOLS NEEDED:
🔗 Creative Cloud (CC) - Adobe Download - Always use this one first as priority
🔗 Creative Cloud (CC) - Adobe Alternative Download - Use if you have issues with Adobe Download
🔗 Creative Cloud (CC) - Backup Download - Only use if you have issues with both Adobe downloads above
Note: GenP downloads below may be rate-limited, and some public gateways can be blocked or throttled by certain ISPs or in some regions. If a link doesn't work, try one of the other backup links first or use a VPN if a gateway is blocked for you. Your antivirus may also block the download. If so, you will need to allow it first, which is already covered in Guide #1 - How to Whitelist Files.
Note: The SHA256 or MD5 shown for each download is for the extracted file inside the zip, not the zip itself. Unzip first, then hash the extracted file to check it against the value listed. The IPFS CID already guarantees the download itself arrived intact.
💡Tip: Most links download when clicked. If one opens a preview page instead, "right-click" it and choose "Save link as…" to download it directly. The torrent links in particular may do nothing when clicked, "right-click" it and choose "Save link as…" to save the small .torrent file, then open that file in your torrent app to start the download.
Note: Occasionally a download may get saved under its CID (e.g. Qme7rK…) instead of its proper name, this can happen when using a VPN. The content is still intact; just rename the file to the correct .zip / .torrent name, or try another link or turn your VPN off to restore the proper name.
Binary:
🔗 GenP v4.2.1 - Binary
-
File:
GenP-v4.2.1.exe -
SHA256:
7248E21019E911B6A4ECBB143053C1297DA4CE972697E00E06E72B8217FA43A8 -
MD5:
026A72CBD92937AA0C3DFB095C3F7F9A -
CID:
Qme7rKVsBGEP1Dgzhpy8bmyE5E8zUZzzzDNgjLnRED7sJL
🔗 GenP v4.2.1 - Binary Backup
-
File:
GenP-v4.2.1.exe -
SHA256:
7248E21019E911B6A4ECBB143053C1297DA4CE972697E00E06E72B8217FA43A8 -
MD5:
026A72CBD92937AA0C3DFB095C3F7F9A -
CID:
Qme7rKVsBGEP1Dgzhpy8bmyE5E8zUZzzzDNgjLnRED7sJL
🔗 GenP v4.2.1 - Binary Backup
-
File:
GenP-v4.2.1.exe -
SHA256:
7248E21019E911B6A4ECBB143053C1297DA4CE972697E00E06E72B8217FA43A8 -
MD5:
026A72CBD92937AA0C3DFB095C3F7F9A -
CID:
Qme7rKVsBGEP1Dgzhpy8bmyE5E8zUZzzzDNgjLnRED7sJL
🔗 GenP v4.2.1 - Binary Torrent
-
File:
GenP-v4.2.1.torrent -
Info-Hash:
153d1043d9e0ef065713c67493482f7f4716cf28 -
SHA256:
8620563DEF1EB8A8DDA04AF58C0F4D62BFC20CB6F35B7EB5FAF3DB96D7871C9E -
MD5:
278A4547540C448298C19D48AF5B434D -
CID:
QmXRZKW1JHoBwkpzt9WcKq33qVbnGjBxCvFfRTn7LuBnZv
Source:
🔗 GenP v4.2.1 - Source
-
File:
GenP-v4.2.1.au3 -
SHA256:
AC3687DA1FC11A3EAFF1A7E97457E2B7EDDDC285D7D08CE86EFC72B92AC6BE11 -
MD5:
A02B84E45C7EB346F251D0B32685F1F7 -
CID:
QmezK7rj2PnaXsyv9JkmbmVMAkWe6kVeTY9vVE3iR4WW5r
🔗 GenP v4.2.1 - Source Backup
-
File:
GenP-v4.2.1.au3 -
SHA256:
AC3687DA1FC11A3EAFF1A7E97457E2B7EDDDC285D7D08CE86EFC72B92AC6BE11 -
MD5:
A02B84E45C7EB346F251D0B32685F1F7 -
CID:
QmezK7rj2PnaXsyv9JkmbmVMAkWe6kVeTY9vVE3iR4WW5r
🔗 GenP v4.2.1 - Source Backup
-
File:
GenP-v4.2.1.au3 -
SHA256:
AC3687DA1FC11A3EAFF1A7E97457E2B7EDDDC285D7D08CE86EFC72B92AC6BE11 -
MD5:
A02B84E45C7EB346F251D0B32685F1F7 -
CID:
QmezK7rj2PnaXsyv9JkmbmVMAkWe6kVeTY9vVE3iR4WW5r
🔗 GenP v4.2.1 - Source Torrent
-
File:
GenP-v4.2.1-source.torrent -
Info-Hash:
f6a9812ef8f9eea9637e45b14f2455e160cc36f9 -
SHA256:
96A07EE7EAE62026A71D24576AB334D3D83DE1B46E5E1985375173DA7553A47F -
MD5:
0FD00948E1989B9FEC3059898562B77F -
CID:
QmVxK6oTtb6zzeXcegReJYuJwJEsmeBZaq6nripq39ArcF
Instructions to install CC + GenP
1. Download and Install Creative Cloud
Always use Adobe Download first when you require Creative Cloud, as this is Adobe’s standard online installer.
If you have issues downloading Creative Cloud using Adobe Download, switch to Adobe Alternative Download, which provides Adobe's official offline installer, and obtain Creative Cloud from the "Windows | Alternative downloads" dropdown. If downloading still fails, you may use the Backup Download, which is simply Adobe's standard online setup installer mirrored to an alternative location to help work around download or connectivity issues when Adobe Download or Adobe’s servers fail.
If you get a .dmg file when you download Creative Cloud, it’s likely because you’re using Opera or Opera GX as your web browser.
Adobe has stated that both Opera and Opera GX are not compatible and interfere with the recognition of the operating system on their website, likely due to how these browsers identify themselves through user agent strings and related headers. As a result, Adobe may serve the macOS .dmg installer instead of the Windows .exe installer. While Adobe hasn’t confirmed this behaviour for all users of these browsers, it’s a common issue. To avoid this, using a different browser is recommended.
Adobe Account Required for Sign-In During Creative Cloud Installation:
This requirement by Adobe cannot be bypassed and ensures you have access to your subscription and all associated services.
You can create a free account using your email, a temporary email (search "temp mail" on Google; any should work), or use an existing account.
Note: Some temporary email services may be blocked or filtered by Adobe, so you might need to try a few different ones until you find one that works.
IMPORTANT: Avoid using any existing account that has an active or previous subscription, or one that has ever started a free trial (to avoid problems).
If you choose to use a temporary email, make sure to keep the inbox open long enough to receive Adobe's verification message. If you're later prompted to verify your account and no longer have access to that inbox, you'll need to create a new account.
During Install:
Ensure you are logged into your device with an Administrator account. Whether it's a Local Administrator account or one connected to a Microsoft Administrator account, it must have full Administrative privileges.
If you're using a Standard, Guest, or Non-Admin Local or Microsoft account, switch to one with full Administrative rights.
If shown - Account authentication window - Quit the installer and double-check your setup.
You must both be logged in as an Administrator and right-click the Creative_Cloud_Set-Up.exe file and select "Run as Administrator".
Also ensure that User Account Control (UAC) is enabled. This is required for the install to proceed smoothly without repeated prompts or permission errors.
If shown - Do NOT install Adobe Genuine Service (AGS) - if not shown, continue anyway.


Once installed go to Menu > File > Preferences and in the "General" tab disable the following:
Launch Creative Cloud at login;
Run Creative Cloud in the background after closing;
Automatically keep Creative Cloud up to date.
Once that is done go Menu > File > Quit Creative Cloud.

⚠️ Possible Problem & Solution - Step 1
⚠️ Adobe still shows the Account authentication window despite running as Administrator and running Creative_Cloud_Set-Up.exe as Administrator.
This usually occurs when either the system account doesn't have full Administrative rights during the installation, or a UAC (User Account Control) prompt is triggered as part of the process.
Ensure you are fully logged into Windows with Administrator privileges and that you're right-clicking and selecting "Run as Administrator" on Creative_Cloud_Set-Up.exe. Both of these conditions must be met to avoid authentication prompts.
Note: If you're not signed in with full Administrator privileges or didn't launch the installer by selecting "Run as Administrator" from the right-click menu, the Account Authentication window may prompt you to enter the Administrator password (e.g. your device's system password, not your Adobe ID).
This is a standard Windows security prompt that verifies your permission to install software at the system level. If you encounter this unexpectedly, cancel the install and restart it using full Administrator access to ensure all components install correctly and without restriction.
If you have done both and the window still appears, it's most likely the standard UAC prompt, in this case, just click "Continue" to proceed. The setup should continue normally afterward.
If the installer still fails or encounters network/authentication issues:
- Try switching to the offline installer via the Alternative Download. This removes the dependency on a constant internet connection and may sidestep certain errors.
If issues persist even after that:
-
Temporarily disable antivirus or firewall software, as they may interfere with authentication or installation processes.
-
Redownload
Creative_Cloud_Set-Up.exeto rule out corruption. -
Check your UAC settings, and consider creating a new Administrator account to install from a fresh profile.
-
Lastly, make sure your Windows system is fully up to date, as missing updates can sometimes block installer components.
Once Creative Cloud is successfully installed, remember to launch the CC app itself as Administrator as well. This ensures you retain full privileges when installing or patching individual Adobe apps without interruption.
2. Download Latest GenP Version - Extract ALL Contents from Zip
It is advised to fully disable your used antivirus as it can sometimes block the GenP download.
⚠️ If the official GenP website or a hosted mirror does not load, it is almost always caused by local or network restrictions rather than the site itself being offline. Refer to the "RECOMMENDED BROWSER SETUP FOR DOWNLOADING GENP" section for the full troubleshooting guide.
Once you have the GenP.v4.2.1.zip file, right-click and "Extract All" contents.
💡 Best Practice:
After extracting the GenP zip, always keep that version in its own dedicated folder. Do not mix files from older versions. This ensures GenP uses the correct internal configuration and prevents patching errors caused by leftover data from previous releases.
⚠️ Possible Problem & Solution - Step 2
⚠️ Antivirus programs may sometimes block the download. You should fully disable your antivirus before downloading. This will fix the issue of GenP not being able to be downloaded.
⚠️ Antivirus programs may sometimes delete or move files into quarantine. You can either whitelist GenP as safe or fully disable your antivirus before extracting. This will fix the issue of .exe not showing in the folder after extraction.
Whitelisting GenP as safe is always the preferred option. However, you may fully disable your antivirus temporarily if you prefer, remembering to re-enable it once finished.
Disabling Windows Defender:
Go to Settings > Privacy & security > Windows Security > Virus & Threat Protection and toggle off the available options.
If this is still not sufficient, go to Settings > Privacy & security > Windows Security > App & browser control and toggle off the options under Reputation-based protection.
If not fully disabled, Windows Defender SmartScreen, which is commonly triggered by tools like GenP, may cause false positives. This happens because SmartScreen flags unrecognised apps as potentially unsafe. If you encounter a warning, click "More info" on the SmartScreen prompt, then select "Run anyway" to continue.
If you are using a different antivirus and are unsure how to disable or whitelist files, refer to the instructions provided by your antivirus vendor. We only provide links for the preferred whitelisting method in "Guide #1 - How to whitelist files".
Windows 11 - Smart App Control:
If you are using Windows 11 and have Smart App Control enabled, GenP and patched Adobe apps may be blocked from running. There is currently no way to bypass Smart App Control for individual apps.
To resolve this, disable Smart App Control at Settings > Privacy & security > Windows Security > App & browser control > Smart App Control.
Important: Smart App Control is not a feature you can freely toggle on and off. Once it is disabled, it cannot be re-enabled unless Windows is reinstalled.
This behaviour is expected and occurs because Smart App Control blocks unsigned apps by design. For a more detailed explanation, refer to the "GenP Setup, Troubleshooting, and Best Practices Guide".
You can also read Microsoft’s official documentation: Smart App Control / Smart App Control Frequently Asked Questions.
3. Patch Creative Cloud with GenP
Note that you should be running GenP as Administrator.
You are advised to always make sure that you close CC before patching by going Menu > File > Quit Creative Cloud to close it fully. However, if you did leave CC open when you use GenP, it will automatically close CC for you.
Open GenP.v4.2.1 folder and run GenP-v4.2.1.exe.
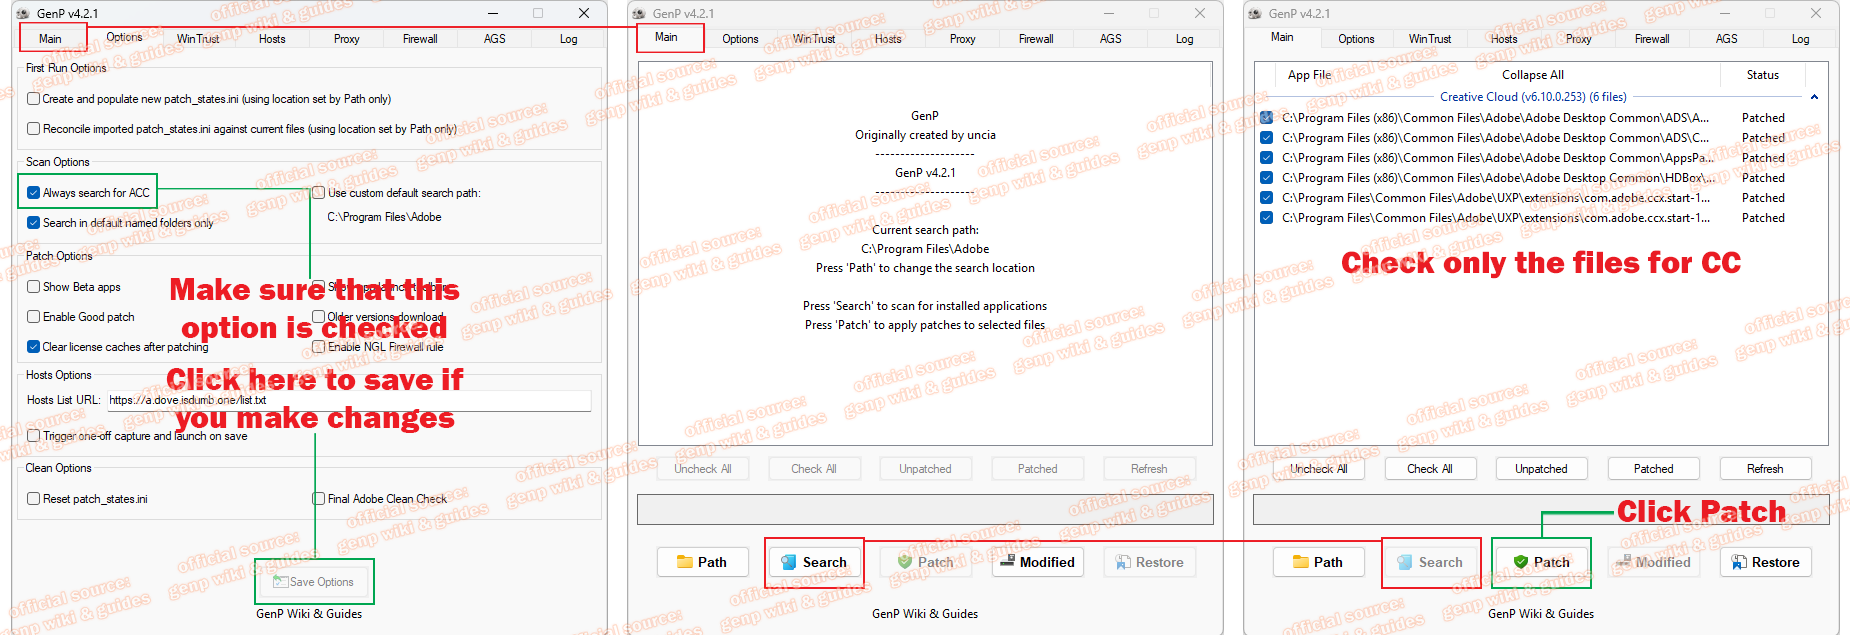
Go to the "Options" tab and make sure "Always search for ACC" is checked, if it is not, then check the box and click on "Save Options".
For the other Options, leave them at their defaults: "Search in default named folders only" (Checked), "Show Beta apps" (Checked if you want Beta apps included), "Clear license caches after patching" (Checked), "Enable Good patch" (your preference). MD5 verification is now compulsory and runs automatically.
Go back to the "Main" tab and click on "Search" and wait for it to return the results.
Check the three files for ACC at the top.+
+ At a later date, when you want to repatch CC after updating it, you can uncheck all other files using "Uncheck All" and only select the ACC files at the top.
Click on "Patch" and let it run and finish.
The patch runs automatically and performs all the necessary actions (Do not touch anything until done).
ℹ️ After Patching - Automatic Adobe Reload:
When patching finishes, GenP automatically reloads Adobe for you, it stops and relaunches Adobe's background processes so the patched files take effect straight away. There's nothing to click and no restart is needed for normal use; it just happens as part of the patch. Once it's done, reopen Creative Cloud and it will show as normal.
If you plan to install or update an app straight after patching, Adobe may block it with a 304 error until a quick device restart clears it, see the ⚠️ 304 error note below for full details.
You will know it's finished when it switches to the "Log" tab (this is only informational; continue with the guide).
The activity log stays on the "Log" tab, so you can review it or use "Copy" to save it if you want.
⚠️ Note: Adobe can push silent CC app updates in the background. If unexpected license popups appear after a period of working normally, check whether the CC app has been updated and repatch it with GenP.
💁♂️ Every time CC gets updated, you must repatch it with GenP again.
⚠️ Possible Problem & Solution - Step 3
⚠️ If you're having issues opening GenP, ensure you've followed step 2 and either whitelisted it or fully disabled your used antivirus.
⚠️ Required files for patching are not shown after using Search; only Creative Cloud is listed:
Either click on the "Expand All" banner at the top, click on the "v" on the right, or double-click the Creative Cloud title bar.
⚠️ Fails to find CC or it takes a long time to search:
Make sure "Always search for ACC" is checked, as mentioned above.
You can manually use "Path" to select Adobe Desktop Common in C:\Program Files (x86)\Common Files\Adobe, so the path shown in GenP is now set to C:\Program Files (x86)\Common Files\Adobe\Adobe Desktop Common, after which you do "Search" and "Patch" as mentioned above.
⚠️ "Not Responding" during patching is normal:
The GenP window may grey out or show "(Not Responding)" in its title while it works through the files on your machine. This is expected, let it finish, and do not force-close it.
⚠️ 304 error, apps fail to install/update, or revert from "Open" back to "Install":
This happens when Adobe's background processes are still holding the old, pre-patch state or files in memory. After a while they run an online check, which can surface as a 304 error, block new installations, or temporarily flip the app buttons back to "Install".
GenP now handles this for you automatically: it reloads Adobe at the end of every patch so the patched files load straight away, and it pins the known-good CCX Start "home" component so Adobe updates can't quietly replace it with an unpatched copy. Because of this, these issues should now be rare.
Adobe's update cache, though, isn't always cleared by that automatic reload. If you do run into these issues, try the following:
-
If installs or updates fail or are blocked with a 304 error, a quick device restart clears the memory cache, and installs or updates will work again.
-
If apps revert back to "Install" instead of showing "Open", quit Creative Cloud and GenP fully and simply reopen both again (GenP will already have reloaded Adobe) and the apps should return to "Open". If an app still shows as "Install", just reinstall and repatch that specific app.
4. Open Creative Cloud > Apps > Install
You are advised to run CC as Administrator.
Go to CC location: C:\Program Files\Adobe\Adobe Creative Cloud\ACC.
Find Creative Cloud.exe, right-click on it, and select Properties > Compatibility.
Check the box for "Run this program as an administrator", then Apply > OK.
On the side menu, if you click on "Apps"
You should now have the install button. Install all the apps you want, wait until everything is installed.
DON'T OPEN ANY YET.
Once everything you want is installed, go to Menu > File > Quit Creative Cloud.

If this AGS popup appears while CC is open - do NOT install AGS (Adobe Genuine Service), - check the box for "Don't show again" and choose "Decline".

⚠️ Possible Problem & Solution - Step 4
⚠️ Running CC as Administrator and getting UAC prompt at startup:
Upon starting your device, you might get a User Account Control (UAC) prompt asking if you want to allow Adobe Creative Cloud to make changes to your device, just click "Yes" and carry on as normal.
If you have toggled off "Launch Creative Cloud at login" as described in step one, the UAC prompt should only appear when you manually open the CC app, otherwise, it will appear at login.

This UAC prompt is shown to check that you allow Adobe to run CC as Administrator, so when CC is used it has the correct level of Administrator privileges to be able to install or update either CC or any individual app properly and make the necessary changes and additions to your own system.
The UAC prompt refers to CC being run as Administrator, as setup in this step already, with the apps location here: C:\Program Files\Adobe\Adobe Creative Cloud\ACC\Creative Cloud.exe.
⚠️ UAC prompt still shows at startup even with "Launch Creative Cloud at login" toggled off:
Please be aware that preventing CC from opening at login will not prevent the background processes used for Adobe apps and services from starting. These background processes will still open regardless of whether CC opens during the login process.
Therefore, for some users, the UAC prompt will still appear, not for CC itself, but for the CC background processes that are still running at startup.
⚠️ Removing UAC prompt at startup:
Disable via Task Manager - This stops CC from launching automatically at startup, so the UAC prompt will only appear when you manually open the CC app.
Open Task Manager and go to the "Startup" tab, locate Creative Cloud.exe, right-click on it, and select "Disable".
You will need to restart your used device for this change to take effect.
5. Run GenP on Installed Apps
Note that you should be running GenP as Administrator.
Open GenP.v4.2.1 folder and run GenP-v4.2.1.exe.
Go to the "Options" tab and check that "Always search for ACC" is unchecked, if it is not then uncheck the box and click on "Save Options".
For the other Options, leave them at their defaults: "Search in default named folders only" (Checked), "Show Beta apps" (Checked if you want Beta apps included), "Clear license caches after patching" (Checked), "Enable Good patch" (your preference). MD5 verification is now compulsory and runs automatically.
Go to the "Main" tab and click "Search" and wait for it to return the results. It will look at the default locations in C:\Program Files\Adobe - (The "Path" option is for apps installed in a different location; most users will never need to use this).
✅ After Effects / Premiere Pro: No Manual Unpack Step Needed
In earlier GenP versions you had to manually unpack RuntimeInstaller.dll for After Effects and Premiere Pro before patching, using a dedicated Unpack tab. This is no longer required as GenP now auto-unpacks any UPX-packed RuntimeInstaller.dll transparently during the normal patching process.
-
Just click "Search", then "Patch".
-
The Unpack tab has been removed from the GenP interface entirely.
-
If a
RuntimeInstaller.dllis encountered that isn't UPX-packed, GenP silently skips the unpack step and patches it normally.
ℹ️ If your log mentions a UPX-related notice, this is informational only and not a failure, patching will continue.
💡 Premiere Pro ≥v26.3: Not needed for the main patch, but GenP will still auto-unpack it if found, as it remains a requirement for alternative patching options. If you see in your log that this unpacking step ran but nothing was modified afterwards, this is completely normal and expected behaviour for these versions. No additional action required, just Search > Patch > Run.
⚠️ Important: Due to Adobe changes, After Effects ≥v25.4 may fail to open or crash on startup if WinTrust has been applied to the app (either currently or previously). GenP itself is not the cause. If you experience issues, especially on older versions, refer to "GENERAL POPUPS EXCEPTION" in the Troubleshoot Section.
All other apps and earlier After Effects versions (≤v25.3) continue to work normally with WinTrust.
You can de-select the respective apps if there are any you do not want to patch.
Once all required steps are complete, click "Patch" and wait for the process to complete.
ℹ️ After Patching - Automatic Adobe Reload:
When patching finishes, GenP automatically reloads Adobe for you, it stops and relaunches Adobe's background processes so the patched files take effect straight away. There's nothing to click and no restart is needed for normal use; it just happens as part of the patch. Once it's done, reopen Creative Cloud and it will show as normal.
If you plan to install or update an app straight after patching, Adobe may block it with a 304 error until a quick device restart clears it, see the ⚠️ 304 error note below for full details.
You will know it's finished when it switches to the "Log" tab (this is only informational; continue with the guide).
The activity log stays on the "Log" tab, so you can review it or use "Copy" to save it if you want.
💁♂️ Every time the apps get updated, you must repatch the respective apps again with GenP.
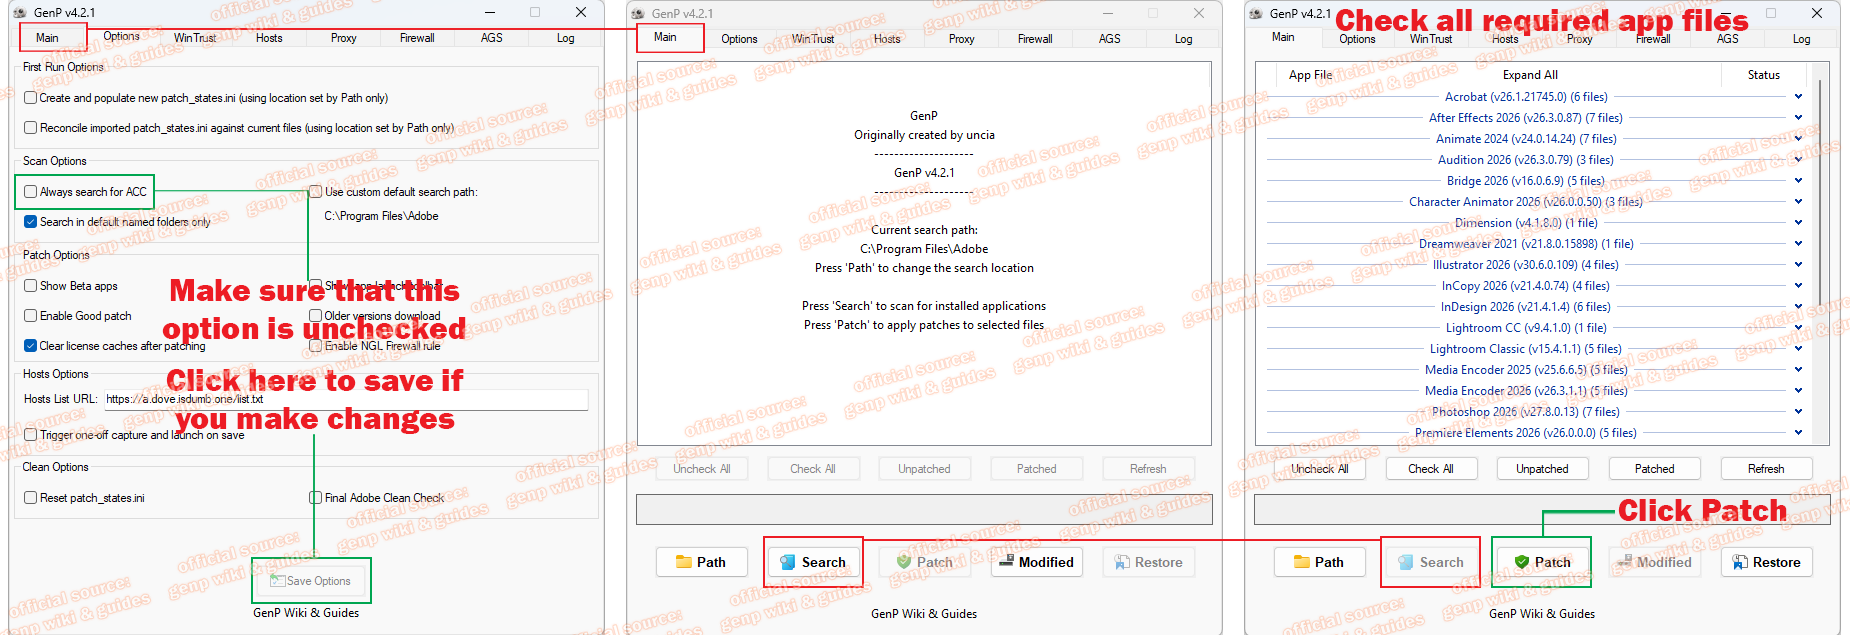
⚠️ Possible Problem & Solution - Step 5
⚠️ If you're having issues opening GenP, ensure you've followed step 2 and either whitelisted it or fully disabled your used antivirus.
⚠️ Required files for patching are not shown after using Search; only the installed apps are listed:
Either click on the "Expand All" banner at the top, or for a specific app, click on the "v" on the right, or double-click the app's title bar.
⚠️ Fails to find any apps or takes a long time to search:
You can manually use "Path" to verify that it is set to Adobe in C:\Program Files. If the path shown in GenP is not set to C:\Program Files\Adobe, or if the apps are installed in a different location, you will need to update the folder path to match the install directory. Once the correct path is set, proceed with "Search" and then "Patch" again.
If apps are installed in a different location and not showing correctly, go to the "Options" tab and uncheck "Search in default named folders only" so that GenP can also look in non-Adobe or custom install folders. After unchecking, click "Save Options", then run "Search" again to find the missing items.
⚠️ "Not Responding" during patching is normal:
The GenP window may grey out or show "(Not Responding)" in its title while it works through the files on your machine. This is expected, let it finish, and do not force-close it.
⚠️ 304 error, apps fail to install/update, or revert from "Open" back to "Install":
This happens when Adobe's background processes are still holding the old, pre-patch state or files in memory. After a while they run an online check, which can surface as a 304 error, block new installations, or temporarily flip the app buttons back to "Install".
GenP now handles this for you automatically: it reloads Adobe at the end of every patch so the patched files load straight away, and it pins the known-good CCX Start "home" component so Adobe updates can't quietly replace it with an unpatched copy. Because of this, these issues should now be rare.
Adobe's update cache, though, isn't always cleared by that automatic reload. If you do run into these issues, try the following:
-
If installs or updates fail or are blocked with a 304 error, a quick device restart clears the memory cache, and installs or updates will work again.
-
If apps revert back to "Install" instead of showing "Open", quit Creative Cloud and GenP fully and simply reopen both again (GenP will already have reloaded Adobe) and the apps should return to "Open". If an app still shows as "Install", just reinstall and repatch that specific app.
⚠️ Patching Cinema 4D:
To patch Cinema 4D, use GenP v3.4.13.4, the last version that supports Cinema 4D patching. All later versions of GenP no longer support Cinema 4D.
GenP v3.4.13.4 is available only in the Download Directory and is required for Cinema 4D.
Cinema 4D can only be patched up to and including v2024.2.0. All later versions going forward are unsupported, untested, and may fail. If you wish to continue using Cinema 4D and GenP, use the free genuine lifetime license for Cinema 4D Lite to have full access to the latest versions.
⚠️ NSudo Error on Opening (GenP v3.4.13.4 Only):
If you encounter an NSudo error, remove NSudoLG.exe from the GenP folder and run GenP again. Refer to the README.txt file for more information about NSudo, which was used to launch programs with full privileges.
⚠️ Patching UWP apps:
To patch UWP apps (Fresco/XD), use GenP v3.4.2, the last version that supports UWP patching. All later versions of GenP no longer support UWP apps.
GenP v3.4.2 is available only in the Download Directory and is required for patching UWP apps.
As Fresco is now free across all tiers, it eliminates the need for patching. A patched version provides no additional benefits over the free one.
⚠️ Fails to find UWP apps (GenP v3.4.2 Only):
Make sure you have clicked on "Runas TI", otherwise you can manually use "Path" to select WindowsApps in C:\Program Files, so the path shown in GenP is now set to C:\Program Files\WindowsApps, after which you do "Search" and "Patch" as mentioned above.
6. Open Apps Through Their .EXE and NOT FROM Creative Cloud
You are free to pin apps and open them from the taskbar, Start menu, shortcut, or the app's own .exe, etc.
The key point is: Don't open Creative Cloud just to click Open on Photoshop, for example.
ℹ️ Why Does Opening via Creative Cloud Cause Issues?
When you open an app through CC, even though your files and settings are stored locally on your machine, CC establishes a connection to Adobe's cloud services. This connection enables features like syncing settings, checking for updates, and verifying licenses. However, this cloud-based interaction can conflict with the patched .exe file because the patch is designed to run independently from Adobe's cloud infrastructure.
Specifically, the patched .exe is configured to bypass or alter certain default behaviours that rely on Adobe's cloud services (such as auto-update features or online validation). By launching the app through CC, you're triggering cloud services that may interfere with the patch's intended functionality, preventing it from being applied correctly or causing unexpected behaviour in the app.
To avoid this issue, always open the patched app directly via its .exe file or a shortcut you create, which ensures the patch runs as intended without interference from Adobe's cloud processes.
GenP includes an optional App Launch Toolbar that makes this easy. Once enabled in Options > Patch Options > Show app launch toolbar and saved, a small floating panel appears. When the toolbar first opens it starts blank, click "Configure" on the toolbar to choose which of your patched apps to show, up to a maximum of 10. Once set up, click any app icon to launch it directly without needing shortcuts or taskbar pins, bypassing CC entirely. The toolbar stays on top of other windows and remembers its position between sessions. A "Minimise GenP" button at the bottom lets you tuck the main GenP window away while keeping the toolbar visible, so you can launch apps without having GenP open on screen.
⚠️ The toolbar requires that the First Run Options have been completed, either "Create new patch_states.ini" or "Reconcile imported patch_states.ini" must have been run before the toolbar will function. If you have not done this yet, see the FIRST RUN MODE SETUP section above.
⚠️ Possible Problem & Solution - Step 6
⚠️ When you first open an app, you may receive an error message stating that Windows cannot access the specified file, or the app may be flagged by your antivirus as potentially malicious:
This happens because some antivirus programs scan apps the first time they are opened or if they have been modified, and may mistakenly flag them as threats, especially if they've been patched using GenP.
To resolve this, open your antivirus, go to the quarantine or threat history section, and restore the required .exe. Then, add an exclusion for the specific app or its folder to prevent it from being quarantined or removed again in the future.
ℹ️ Files left unpatched by GenP are intentional:
If a file appears in the list but is not patched after clicking Patch, this is by design, either no matching pattern applies to that specific file version, or the file does not require patching. Do not attempt to patch these files repeatedly; it will not change the outcome and is not the cause of any issues you may be experiencing.
Everything should be working now! End of Guide.
⚠️ Installing and Updating - Possible Problem & Solution
Always check the regularly updated Compatibility List before updating any apps; otherwise don't update.
APPS: If you want to install more apps or update them, click "Install" or "Update" on the chosen app, let it download, and then run GenP on them again, using "Search" and "Patch".
ℹ️ Note: Adobe apps that are several major releases behind (e.g. years old) cannot be updated directly via the CC app, as Adobe does not support direct upgrade paths across multiple major releases. In such cases, the CC app may show them as "up to date" for that legacy version. To move to the latest release, a full reinstall is required.
⚠️ Project Compatibility Notice:
When updating to a new major Adobe CC release (e.g. CC2025 > CC2026), projects saved in the newer version cannot be opened in earlier versions. This is standard Adobe behaviour and applies to all Adobe Creative Cloud applications, without exception. Once a project is saved in a newer version, its internal project format (schema) is updated, which older versions do not recognise and will therefore refuse to open.
Adobe may provide a "Save a Copy As…" or version-specific export option to create a backward-compatible file; this is not guaranteed, availability and behaviour vary by application and version, and not all features or settings are guaranteed to transfer correctly, potentially resulting in partial data loss or missing functionality.
ℹ️ Note: This also applies to Beta versions. Projects saved in a Beta build cannot be opened in the General Availability (GA) release, even if the version number appears to match.
🔄 Rollback/Repatch (If Needed):
In some cases, individual app updates may temporarily conflict with GenP, particularly following changes introduced by Adobe. If an updated app fails to open, behaves unexpectedly, or breaks after repatching, it likely means that version is not yet supported by GenP. In this case, you’ll need to roll back the affected app to a previous supported version and then repatch it using GenP until compatibility is restored.
ℹ️ Note: The in-app "Other versions" list in the Creative Cloud desktop app should now be available to all users again, so in most cases you can roll back directly from within CC. If it doesn't appear for you, GenP includes a built-in older-versions downloader as a fallback. For these options, and why it is best to avoid updating an app that is already working, see the ROLLBACK TO OLDER ADOBE VERSIONS and OLDER ADOBE VERSIONS ALTERNATIVE METHOD sections below, and the Compatibility List notes.
CC: If you update CC, click "Update", let it update, and then run GenP on it again, using "Search" and "Patch".
-
If the CC app itself requires an update, you can go ahead and update it, but make sure the update fully completes. In some cases, the CC app doesn’t finish updating until it is reopened.
-
Once the CC app has been opened and fully updated, go to
Menu > File > Quit Creative Cloudto close it completely. After that, repatch the CC app with GenP. -
If you patch it before that final update completes (or without quitting properly), the app may self-repair and override the patch, meaning you’ll have to patch it again.
⚠️ Important Note:
Even if you have "Automatically keep Creative Cloud up to date" toggled off in your CC app preferences, CC app updates are still mandatory, as specified in Adobe's release notes for the CC app. Adobe enforces these updates because the CC app serves as the central hub for managing all individual Adobe apps. Since these apps receive regular updates (at least once a month for most), the CC app must stay current in order to ensure compatibility and maintain optimal functionality.
In addition to managing app updates, the CC app provides essential features, such as syncing settings, preferences, and assets across your devices, enabling access to Adobe Fonts, integrating cloud storage, and facilitating collaboration tools. Without updates, Adobe will eventually block access to the CC app, deeming it too outdated to function. This may also prevent you from accessing cloud features, file syncing, and other vital services. Therefore, it's crucial to allow these updates to keep both the CC app and all associated apps fully functional.
🔄 Repair/Repatch (If Needed):
In rare cases, CC app updates may temporarily conflict with GenP, typically following backend or structural changes introduced by Adobe. If the CC app fails to open, behaves unexpectedly, or breaks after repatching, you may need to repair CC or fully uninstall, reinstall, and then repatch it using GenP.
Adobe also provides a support guide here, that covers how to repair or uninstall and reinstall CC, if you need more information.
This process is also outlined in detail in the Troubleshoot Section.
GENP: To update GenP, simply download the latest version from any of the available download links and use it for any future patching.
💡 Best Practice:
When updating to a new GenP release, always keep it in its own dedicated folder environment. Do not mix files from older versions. This ensures GenP uses its correct internal configuration and prevents patching errors or problems caused by leftover data from previous releases.
Troubleshooting Tips
🛠️ GenP not launching or crashing?
Try running GenP in Compatibility Mode for Windows 10 or 11 if you experience issues like crashing, freezing, or failure to start.
⚠️ Important Note:
If you're installing or updating Adobe apps via the CC app, make sure Compatibility Mode is turned off.
Running GenP or the CC app in Compatibility Mode, even if set to Windows 10 or 11, can mislead Adobe's systems into detecting your OS as outdated or unsupported. This may cause issues such as:
-
The error message “This version of Creative Cloud isn’t compatible with your system.” may appear.
-
Adobe apps not showing up or failing to update properly.
✅ Best Practice:
-
✅ Use Compatibility Mode only if GenP won’t launch normally.
-
🚫 Turn it off when using the CC app for installations or updates.
💡 Need More Help?
If you're still experiencing problems or seeing popups, check the TROUBLESHOOT SECTION toward the bottom of the guides page.
For anything not covered there, or for more advanced fixes and usage tips, visit: GenP Setup, Troubleshooting, and Best Practices Guide for a deeper resource on using Adobe apps through the GenP method.
☢️ GUIDE #4 - NOTHING IS WORKING / FULL CLEANING
Video Tutorial (0 to 7:20 only)
DOWNLOADS / TOOLS NEEDED:
🔗 Adobe Creative Cloud Cleaner Tool
Optional third-party cleaning tool (not covered below):
🔗 Revo Uninstaller (Optional)
The free version of Revo Uninstaller may be used as an optional or supplementary tool to help identify and remove leftover Adobe files and registry entries after uninstallation, as Adobe’s own Cleaner Tool may occasionally leave remnants behind. This is intended for users who prefer a guided uninstallation process and is not required if you follow the manual steps below. Other third-party uninstall or cleaning tools may also be suitable; however, their usage is outside the scope of this guide and is not supported.
⚠️ Attention:
If you are still experiencing issues, or simply want to restore stability, we recommend removing all Adobe‑related files and starting fresh.
⚠️ Important:
Plugins, extensions, scripts, or creative assets such as actions, brushes, gradients, patterns, presets, shapes, styles, swatches, templates, fonts, and other assets should all be saved or exported to folders outside of Adobe's main directories. This includes project and master files from any app (e.g. After Effects (.ae), Illustrator (.ai), InDesign (.indd), Photoshop (.psd), Premiere Pro (.prproj), and others), as well as any associated resources or dependencies.
If you don't already have a dedicated folder for these files, it's recommended to create one to keep them organised and ensure they are stored separately from Adobe's main directories.
Instructions to Fully Clean:
1. Remove Any Trace of ALL Adobe
Run Adobe Cleaner Tool in ALL | (E, Y, 1, Clean All, Y).
Note: The Cleaner Tool does not prompt you to keep or remove preferences, such as app notifications, alerts, interface settings, plugins, and other preferences. It will remove all selected components entirely.
Check Windows Control Panel > Uninstall to see if the app was successfully removed. If not, remove it manually.
2. Delete Adobe Folders from Your Disk Drive
C:\Program Files
C:\Program Files\Common Files
C:\Program Files (x86)
C:\Program Files (x86)\Common Files
%appdata% to go to AppData\Roaming
%localappdata% to go to AppData\Local
%localappdata%/temp or just %temp% to go to AppData\Local\Temp
CoreSync Removal Issue:
Some users may not be able to delete CoreSync_x64.dll due to a "file in use" error, which is a common leftover from CC app uninstallation.
To remove it, go to C:\Program Files (x86)\Common Files\Adobe and rename the CoreSyncExtension folder to CoreSyncExtension.old.
Or go to the file itself and rename it from CoreSync_x64.dll to CoreSync_x64.dll.old.
Then, restart Windows Explorer via Task Manager (right-click Windows Explorer and select Restart) or reboot your computer. After that, you should be able to delete the folder.
These steps can also be applied to resolve issues with other Adobe folders showing a "still in use" error during deletion.
3. Registry Editor
Press the Windows key, type registry editor and open it.
Go to HKEY_CURRENT_USER and HKEY_LOCAL_MACHINE
Look for Software and delete Adobe.
4. Remove Windows Firewall Rules, Hosts File Lines, Scheduled Tasks, or WinTrust DevOverride Reg Key
For Windows Firewall:
Go to Windows > Windows Firewall > Advanced Settings
Check in both Outbound and Inbound.
Remove or disable any rules blocking Adobe processes or services.
You must do the same if you created these in your own used firewall.
For Hosts File:
Open Notepad (as Admin), go to FILE > OPEN > C:\Windows\System32\drivers\etc
Remove all the lines related to "ADOBE", replace with the default hosts lines from below, save the file with no extension and reboot your system.
Note that when saving your hosts file from Notepad, you need to change the Save as type to All file types (*.*) and NOT Text files (*.txt) or Notepad will always try to tack on a .txt extension.
If you are told that you don’t have permission to save the hosts file back into your etc folder because you didn’t follow the steps and open Notepad (as Admin), you will have to save it to your desktop instead.
There you should check it has been saved as file and NOT .txt by going to your Explorer window and View > Show > File Name Extensions. Check your hosts file name, if it says hosts.txt you need to remove the .txt and agree to the changes. You then cut and paste it back into your etc folder, saying yes to replace your existing hosts file.
DEFAULT HOSTS LINES - You can copy and paste it
# Copyright (c) 1993-2009 Microsoft Corp.
#
# This is a sample HOSTS file used by Microsoft TCP/IP for Windows.
#
# This file contains the mappings of IP addresses to host names. Each
# entry should be kept on an individual line. The IP address should
# be placed in the first column, followed by the corresponding host name.
# The IP address and the host name should be separated by at least one
# space.
#
# Additionally, comments (such as these) may be inserted on individual
# lines or following the machine name denoted by a '#' symbol.
#
# For example:
#
#      102.54.94.97     rhino.acme.com          # source server
#      38.25.63.10      x.acme.com              # x client host

# localhost name resolution is handled within DNS itself.
#      127.0.0.1        localhost
#      ::1              localhost
For Scheduled Tasks:
Open Task Scheduler and delete any of the following tasks if present, by right-clicking and selecting "Delete":
-
UpdateHostsFile- installed by the "Hosts" tab Schedule Updates button. -
GenP Gude Log Cleanup- installed when enabling the Good patch.
For WinTrust:
Open GenP, go to the "WinTrust" tab and click "Toggle WinTrust".
Click "Untrust", then check "Select All" to ensure all apps are covered.
Click "OK" and allow the process to run. This will untrust all apps.
Once finished it will move to Log and return "Untrust completed. Successfully processed xx of xx application(s)." in the log window.
Go back to the "WinTrust" tab and click "Toggle Reg Key".
Click "Remove Reg Key" to remove DevOverrideEnable key from your registry.
Click "OK", and ensure you restart your system as described in Step 6 for the changes to take effect.
Note: Failure to reboot your system will mean the key is not cleared.
5. Run Final Adobe Clean Check
Before restarting, open GenP and go to the "Options" tab. Under "Clean Options", check "Final Clean Check" and click "Save Options". A live progress window will open and verify that everything has been properly cleaned. Wait for it to complete and confirm clean before moving to the next step.
6. Restart the PC
Adobe should no longer be present on your system. If you decide to install it again, it should behave normally. 🙂
Note: If you ran the Final Adobe Clean Check in Step 5 and have already restarted your device as part of that process, this step is not needed.
🐒 GUIDE #7 - MONKRUS INDIVIDUAL / COLLECTION (EASIEST METHOD)
[No video tutorial]
DOWNLOAD NEEDED:
🔗 Torrent Software - qBittorrent
MONKRUS DOWNLOAD OPTIONS:
Monkrus releases are standalone installers repacked to already include GenP-patched files.
Acrobat is an exception and applies GenP-patched files after the app is installed.
Monkrus individual app builds are maintained by Monkrus, not GenP.
Monkrus builds may not always match the GenP Compatibility List and should not be relied on as a reference for Monkrus builds.
The listings may show a sign-in prompt depending on platform; content is viewable without an account.
This guide does not provide support for external sites.
PRIMARY LISTINGS:
The main source for all releases.
🔗 Monkrus Individual Apps / Collection - All Apps (VK)
Scroll the listing to find the app and version you need.
OPTIONAL QUICK-SEARCH SOURCES: (desktop-only convenience)
Use this if you want to quickly find the latest version without browsing the primary listings.
Latest builds typically appear at the bottom.
Quick-search results may not include all older builds and can prioritise newer releases. If you need an older version, open the Individual app listing in the Primary Listings section and use the built-in search there instead.
🔗 Monkrus Individual - Acrobat Pro (TG)
🔗 Monkrus Individual - After Effects (TG)
🔗 Monkrus Individual - Illustrator (TG)
🔗 Monkrus Individual - InDesign (TG)
🔗 Monkrus Individual - Lightroom Classic (TG)
🔗 Monkrus Individual - Media Encoder (TG)
🔗 Monkrus Individual - Photoshop (TG)
🔗 Monkrus Individual - Photoshop Remove Tool AI (TG)
🔗 Monkrus Individual - Premiere Pro (TG)
🔗 Monkrus Individual - Speech to Text Add-on for Premiere Pro (TG)
🔗 Monkrus Individual - Substance 3D apps (TG)
🔗 Monkrus Individual - XD (TG)
🔗 Monkrus Collection - All Apps (TG)
Compatibility Notes:
-
Character Animator Pro is not supported.
-
Media Encoder must match the same major release year as Premiere Pro and After Effects.
-
Photoshop Remove Tool AI add-on requires Photoshop
v27.7+. -
Speech to Text add-on (for Premiere Pro) must be compatible with the installed Premiere Pro version. Refer to the compatibility notes at the top of the torrent tracker for full details.
IMPORTANT:
🔴 DO NOT RUN GenP ON MONKRUS - If switching completely from CC+GenP to Monkrus, please run Guide #4 to clean everything. You want a clean slate to avoid problems.
Instructions to install Monkrus Individual / Collection:
1. Download and install qBittorrent
(qBittorrent is recommended because it is free, open-source, ad-free, and widely supported. Other torrent clients may be used if you prefer, but are outside the scope of this guide.)
2. Choose an app from Monkrus Individual or the Collection
Use the download options listed above to access Monkrus Individual apps or the Collection.
⚠️ If the website or mirror fails to load or you encounter connectivity issues, it's likely being blocked by your ISP, network provider, or DNS filtering. Try switching to a different DNS service or using a VPN to bypass these restrictions.
To view the page in your language, use your web browser's built-in translation feature, or translate the text manually.
For individual apps, scroll the listing until you find the app name and version you want, then open its app listing.
Each app opens within the same page as a scrollable listing.
For the collection, open the provided link to access the collection's release page.
Scroll down the release listing until you reach the torrent download section (links to multiple torrent trackers).
This section may appear as either:
-
СКАЧАТЬ С ТОРРЕНТ-ТРЕКЕРА НА ВЫБОР: / DOWNLOAD FROM A TORRENT TRACKER OF YOUR CHOICE:
-
СКАЧАТЬ С ТОРРЕНТ-ТРЕКЕРОВ: / DOWNLOAD FROM TORRENT TRACKERS:
We recommend that you use PB.WTF or UzTracker, as neither requires registration to download Monkrus torrents.
On PB.WTF:

Click on "Скачать" ("Download") highlighted with the red arrow and frame, in the next window above the captcha box, it will be counting down 10 secs saying "Download torrent - Searching for file to download: 10 seconds".
Wait for the countdown to complete, check the captcha box and you can click on download to get the small magnet link downloaded, then you can open it in your own torrent software.
Don't click on "Magnet ссылка" ("Magnet link") underneath as that is now restricted to logged-in users only.
On UzTracker:

Click on "Скачать torrent" ("Download torrent") highlighted with the red arrow and frame, to get the small magnet link downloaded, then you can open it in your own torrent software.
Otherwise, click on the "Magnet Icon" itself highlighted with the blue arrow and frame, to have your web browser prompt you about opening it as below.
Once you click on the "Magnet Icon", you should get these prompts or similar, which you'll want to allow, then choose "qBit" to open the link.

Now you should choose where you want the files to be downloaded to, make sure everything of the files is selected and click "OK" to start.

Let it download. (when it reaches 100%, it changes from "Downloading" to "Seeding"; the files have been downloaded, you can right-click it and press remove).

3. Go to the downloaded folder, find the disk or .iso file, double-click to open and run autoplay.exe as ADMINISTRATOR.
For individual: Proceed with the install setup.
For collection: Select the apps you want to install.
⚠️ Attention - Majority of the apps should work without any account signed in (cloud-based might need)
If the install window doesn't show up or Errors (failed to...)
Fully disable your used antivirus for the installation process. This may be due to Windows Defender or any third‑party antivirus preventing the window from appearing. You can re-enable it after installation.
4. Once everything is installed and working correctly, you can eject the DVD drive found under "My Computer" or "This PC".
The drive is created when you open the .iso file, it functions as a virtual installation disc and has no other purpose.
Note: .iso files are disk image files that temporarily mount as virtual drives during installation. Once the installation is complete, you can safely unmount or eject the virtual drive.
You may choose to delete or keep the files extracted from the torrent (installer); it’s entirely up to you.
🪙 To update Monkrus, simply install the newer version over the existing one.
💡 Need More Help?
If something isn't working properly or you're getting popups, first check the Monkrus FAQ Section on the torrent tracker (where you obtained the magnet link for the app).
Most issues with Monkrus versions are already covered in the FAQ Section or in the comments for the specific app or its previous versions. Always read these first to avoid unnecessary troubleshooting.
If the issue isn’t covered there, or for more detailed help, check the TROUBLESHOOT SECTION toward the bottom of the guides page. (Note: Not all fixes will apply to Monkrus.)
For anything not covered there, or for more advanced fixes and usage tips, visit: Monkrus Setup, Troubleshooting, and Best Practices Guide for a deeper resource on using Adobe apps through the Monkrus method.
🚫 GUIDE #8 - BLOCKING UNNECESSARY ADOBE BACKGROUND PROCESSES (PS/DC)
Do not block background processes apart from the ones mentioned here, blocking other background processes is not advisable or required.
Note: On modern devices, these background processes generally do not impact performance, so renaming them is usually unnecessary. This guide is primarily for users with older devices or those experiencing performance issues due to Adobe background processes. If you still wish to block them, follow the instructions below.
Thanks to Verix
For Photoshop:
All you have to do is rename these four .exe files.
-
C:\Program Files (x86)\Adobe\Adobe Sync\CoreSync\CoreSync.exe -
C:\Program Files\Adobe\Adobe Creative Cloud Experience\CCXProcess.exe -
C:\Program Files (x86)\Common Files\Adobe\Adobe Desktop Common\ADS\Adobe Desktop Service.exe -
C:\Program Files\Common Files\Adobe\Creative Cloud Libraries\CCLibrary.exe
--> Just add .bak after the .exe.
For example: CoreSync.exe --> CoreSync.exe.bak
(If you don't see .exe in the file name, you need to make the file name extensions visible in your explorer).
For Acrobat DC:
All you have to do is rename this .exe. file.
C:\Program Files\Adobe\Acrobat DC\Acrobat\AdobeCollabSync.exe
--> Just add .bak after the .exe.
For example: AdobeCollabSync.exe --> AdobeCollabSync.exe.bak
(If you don't see .exe in the file name, you need to make the file name extensions visible in your explorer).
⚠️ FOR INSTALLS AND UPDATES:
To perform any new installs or updates in Creative Cloud, you must revert at least the name change of:
C:\Program Files (x86)\Common Files\Adobe\Adobe Desktop Common\ADS\Adobe Desktop Service.exe
This file is a core Creative Cloud service that manages installation and update processes. If it is renamed or disabled, installs and updates will fail or be blocked.
When CC is patched with GenP, a .bak version of this file is created as the original, unmodified copy. Do not delete this .bak file, as it is the only untouched version you can restore without repairing or reinstalling CC.
If you have previously renamed the patched .exe to block it, restore that patched file's name to Adobe Desktop Service.exe before installing or updating. Do not simply rename the .bak file to .exe unless the patched version is missing, as this will revert CC to its unpatched state.
Warning: Restoring the .bak file will replace the patched version with the original, meaning CC will no longer be patched. If you do this, you must repatch CC with GenP after completing the install or update.
If the original file is missing or corrupted, use the CC App Uninstaller Tool to restore it, then repatch CC afterwards. This process is described in the Troubleshoot Section under CC App Errors.
For full compatibility and to prevent installation or update issues with other Adobe apps, revert all renamed .exe files to their original names before proceeding.
✨ GUIDE #9 - FIX NEURAL FILTERS NOT AVAILABLE IN PHOTOSHOP
This method applies to GenP users only. Monkrus users should check and use the method mentioned in the FAQ Section instead.
If this method does not work for you, use the alternative method described in the GenP Setup, Troubleshooting, and Best Practices Guide.
Thanks to Verix
-
Navigate to
C:\Users\YourUsername\AppData\Roaming\Adobe\UXP\or pressWin+Rand type in%appdata%. -
Delete the
PluginsStoragefolder. -
Restart Photoshop and run it as Administrator.
-
Download the Neural Filters you need.
If the button is greyed out, continue with the steps below.
-
Close Photoshop and Creative Cloud if they are open.
-
Open Task Manager and ensure no Adobe-related processes are running in the background. If there are, end them.
-
Open Creative Cloud and log out of your account.
-
Close Creative Cloud and ensure it is no longer running in the background.
-
Open Creative Cloud again and log back in to your account.
-
Close Creative Cloud and ensure it is no longer running in the background.
-
Open Photoshop and load an image, as the Neural Filters option will remain greyed out until an image is open. Once loaded, check if the Neural Filters option is now available.
🔍 TROUBLESHOOT SECTION
⚠️ IMPORTANT NOTE:
Before you begin, confirm that the fix you are applying matches the specific popup you are trying to resolve.
Some of the popups listed below in this section will look similar but are different problems with different fixes, so applying the wrong one will not help.
When all apps are correctly patched using GenP-v4.2.1, most users will not see any non-AGS-related popups. If one does appear, most commonly on Illustrator and Photoshop, and on Beta builds, it means the app is not reading as licensed on your system.
The reliable fix is to "Trust" the affected apps with the WinTrust method first, as this is what makes the app treat itself as genuine so the popup has nothing left to display.
If WinTrust is unavailable or unsuitable on your system, use the Good patch as the alternative. If a popup still appears, fall back on the established network methods, the "Hosts", "Proxy", or "Firewall" tabs in GenP, as a backup.
This may not cover every case, especially as Adobe continues shifting more of its verification onto its own servers. Newer checks are increasingly decided online rather than in the app files, so no single local method is guaranteed to work forever.
If one approach stops working after an Adobe update, try the others in combination.
⚠️ Ensure You Use The Correct Method For The Popup Displayed:
The Unlicensed popup (non-AGS-related) and the Adobe Genuine Service popup (AGS-related) look similar but are different problems that each require a different fix. Applying the wrong method will not resolve the issue.
-
Unlicensed popup (non-AGS): "Trust" the affected apps with the "WinTrust" tab first (or the
Goodpatch if WinTrust is not suitable). If the popup persists, add the "Hosts", "Proxy", or "Firewall" tabs in GenP as a network-level backup. -
Adobe Genuine Service popup (AGS): Use the "AGS" tab in GenP (Remove AGS or Dummy AGS).
⚠️ Important: The one-click automated options in GenP (Update Hosts, Add Firewall Rules, Remove AGS, etc.) are provided for convenience but are not guaranteed to work for every system. If an automated method does not resolve your issue, use the manual methods described in this section instead.
💡 IF YOU SEE A .nfo FILE INSTEAD OF A .txt FILE
-
.nfofiles are plain text files, but some systems associate them with the Windows "System Information" app instead of Notepad. -
This is a Windows file-association issue and doesn't affect GenP.
-
To resolve the issue, use one of the following methods:
-
Method 1: Right-click the
.nfofile, selectOpen with > Choose another app, choose "Notepad", and click "Always" to set it as the default. -
Method 2: Right-click the
.nfofile, choose "Properties", click "Change" next toOpen with, select "Notepad", and click "Set default" to apply the change.
🛠️ RUNNING GENP AS ADMINISTRATOR (INCLUDING VPN & PROXY GUIDANCE)
GenP must be run as Administrator for all of its features to function properly.
Without Administrator privileges, critical functions, such as patching Adobe apps, editing the hosts file, modifying Windows Firewall rules, managing registry keys, unpacking DLLs, and applying WinTrust settings may fail or behave unexpectedly.
Always launch GenP with Administrator privileges.
Do not use a virtual IP address from a VPN or Proxy, as it will circumvent local settings such as the hosts file or firewall rules.
If using a firewall, ensure it is enabled, or any rules set up through Windows Defender or third-party programs will not be applied.
⚠️ VPN and Proxy Usage - Important Reminder:
Avoid using VPNs or Proxies when running GenP. These bypass local rules (hosts file, firewall) and can cause popups or connectivity issues. If you must use them, you are responsible for adjusting your own configuration:
-
Split Tunnelling: Route only specific apps through the VPN/Proxy, keeping GenP and Adobe apps on the regular network.
-
Custom DNS: Use services like Google DNS or Cloudflare to avoid DNS-related blocks.
-
App Exclusions: Exclude GenP and relevant Adobe apps from VPN/Proxy tunnels.
⚠️ Important: GenP does not provide support for VPN or Proxy configuration or related settings. Any changes or adjustments you make in your network setup are your responsibility. We will not assist with issues arising from using a VPN, Proxy, or modifying your network configuration.
WINTRUST
The WinTrust method is a specialised and highly effective solution for eliminating non-AGS-related popups, particularly those encountered in CC apps. It operates by redirecting system-level DLL behaviour through the use of a customised wintrust.dll, in combination with a Windows registry modification (DevOverrideEnable). This setup allows apps, especially Adobe software, to bypass internal verification checks by simulating successful integrity and licensing validation. As a result, popups that would typically interrupt the user experience are suppressed, often without the need for traditional anti-popup patches.
How It Works:
At the core of the WinTrust method is DLL redirection. The DevOverrideEnable registry key acts as a global master switch; when set to 1, it instructs Windows to look for the "trusted" DLL inside the app's own folder instead of the default system folder. In this case, the customised wintrust.dll replaces the system version for that specific app and always returns successful verification results. This fools the app into assuming that all integrity and licensing checks have passed. The process is silent and highly effective across most Adobe apps.
Crucially, WinTrust is applied on a per-app basis, allowing users to "trust" only selected programs that are prone to popups while leaving the rest of the system unaffected. This targeted approach enhances control, avoids unnecessary interference, and maintains overall system stability.
If you wish to use WinTrust, scroll down to "WINTRUST TAB ON GENP" and follow the provided instructions.
Compatibility and Use Cases:
WinTrust has demonstrated strong compatibility across nearly all apps. However, a notable exception is Acrobat Pro, which does not support DLL redirection and is therefore fundamentally incompatible with this method. While most modern apps still support standard popup patches, older versions, particularly those released prior to 2023, often lack compatibility with newer patching techniques, making WinTrust an essential alternative.
In practice, the WinTrust method is especially beneficial for apps like After Effects (≤v25.4), Illustrator, Photoshop, and Premiere Pro, where users frequently encounter licensing popups. For instance, older versions of Photoshop may trigger popups when integrity checks fail, and the WinTrust method can effectively suppress these interruptions.
In such cases, WinTrust serves as a critical fallback or full replacement, often sufficient to suppress all licensing-related popups on its own.
WinTrust is particularly useful in scenarios where:
-
Persistent popups disrupt workflows in legacy Adobe apps.
-
Standard patches fail due to software incompatibility or limitations.
-
Users need a patch-free alternative to improve reliability in older software versions.
Considerations and Limitations:
Despite its many advantages, the WinTrust method requires careful and informed implementation:
-
System Reboot Required: Any change to the
DevOverrideEnableregistry key, whether enabling, disabling, or removing it, requires a full system reboot for the redirection to take effect. Without rebooting, the operating system will not recognise the updated DLL path, and the WinTrust method will fail to function correctly. This step ensures the modified settings are fully applied, stabilising the app environment and guaranteeing results. -
Anti-Cheat Conflicts: Some games and security-sensitive apps use anti-cheat mechanisms that detect and flag DLL redirection as suspicious activity. In such cases, having the
DevOverrideEnablekey enabled may trigger false positives or prevent the software from launching. To resolve such issues, simply setting the key to0or removing it entirely is usually sufficient. GenP incorporates WinTrust in the "WinTrust" tab, which includes advanced logic to dynamically manage this key, allowing users to toggle compatibility with ease and avoid manual registry edits.
WinTrust is a robust, flexible, and targeted method for suppressing licensing and verification popups in Adobe apps by combining DLL redirection with selective registry manipulation to enhance reliability, particularly where standard patches fail, while minimising system-wide interference, maintaining compatibility and stability, and, when applied thoughtfully with awareness of reboot needs and potential anti-cheat conflicts, significantly improving usability, reducing interruptions, and contributing to a smoother, more productive user experience across both legacy and modern software environments.
Versioning and Authenticity:
wintrust.dll is a core Windows system library and is not a static or standalone dependency. Its file size, hash, and internal version vary depending on the Windows release, cumulative update level, architecture, and servicing state. As a result, there is no single canonical or globally verifiable hash for wintrust.dll.
Microsoft does not distribute this DLL separately; original copies are only provided as part of official Windows installation media or Windows Update packages. Any hash values found online correspond solely to the specific Windows build they were extracted from and are not universally applicable.
For WinTrust usage, a wintrust.dll sourced from a genuine Windows installation or official Microsoft media is considered original and unmodified within the context of that Windows build by definition, even if it differs from versions present on other systems or builds.
Any wintrust.dll tied to a valid Windows build is generally suitable for WinTrust usage; however, the provided DLL is known to be compatible and tested. Substituting a different version is supported but may not always produce identical results due to internal implementation differences between Windows builds.
How Long Does WinTrust Remain Effective?
In most cases, the WinTrust method remains effective over the long term once correctly applied. It does not need to be reapplied after every reboot and will persist unless:
-
You manually reverse it (e.g. by "untrusting" an app or deleting the
DevOverrideEnableregistry key). -
You install a new Adobe app, which will not be automatically covered and must be trusted separately.
-
Adobe or Microsoft release updates that affect DLL redirection behaviour, which can occasionally disable or bypass WinTrust functionality.
If non-AGS-related popups return after a Windows or Adobe update, even after repatching, simply untrust the affected app, reboot, then trust it again and reboot once more. This reapplies the necessary DLL redirection in most cases.
While not immune to changes in Adobe's software architecture or Windows security models, WinTrust has proven to be a stable and durable solution across multiple versions and scenarios, especially when used as a targeted fix for persistent non-AGS-related popups.
Note: Acrobat Pro is the only app that cannot have WinTrust applied, as it does not support DLL redirection. This is because Acrobat uses an internal manifest that forces it to load original system DLLs, bypassing any local overrides. Therefore, it must be patched using traditional methods. For Acrobat Pro, it is recommended to use GenP-v4.2.1.exe with the Good patch enabled.
⚠️ Note: Due to Adobe changes, After Effects ≥v25.4 may fail to open or crash on startup if WinTrust has been applied to the app (either currently or previously). For more details and troubleshooting, refer to "GENERAL POPUPS EXCEPTION" in the Troubleshoot Section.
Note: Users who prefer not to use WinTrust may instead enable the Good patch in GenP-v4.2.1.exe. However, this may not work for some users, who may need to use the alternative methods already listed in the guides, such as modified hosts files with any additional domain found, the "Proxy" tab method, or firewall rules.
UNLICENSED POPUPS / ACCEPT TERMS POPUP - (BOTH NON-AGS-RELATED)
Both of these popups are fixed using the same method, follow the instructions provided after the sample images.
UNLICENSED POPUPS - (NON-AGS-RELATED)

ACCEPT TERMS POPUP - (NON-AGS-RELATED)

These popups are fixed by ensuring that you have properly patched the apps with GenP. If the popups are still showing, run WinTrust afterwards to trust either a specific app, a choice of multiple apps, or all of the apps in one go.
⚠️ Note: Due to Adobe changes, After Effects ≥v25.4 may fail to open or crash on startup if WinTrust has been applied to the app (either currently or previously). For more details and troubleshooting, refer to "GENERAL POPUPS EXCEPTION" in the Troubleshoot Section.
Users who prefer not to use WinTrust may instead enable the Good patch in GenP-v4.2.1.exe. However, this may not work for all users, who may need to use one of the alternative methods described below.
However, if that still fails, you can revert to the alternative methods, such as adding the latest lines to your hosts file, or using the "Proxy" tab in GenP. If the popup continues to appear in your app, block the app's .exe in your used firewall.
If the popup persists after updating your hosts file with the latest entries, try locating the missing additional domain manually using the method outlined in the "Hosts File / Firewall Rule Manual Setup" section, or by adding it via the "Proxy" tab in GenP.
You can make use of "Update hosts" on the "Hosts" tab to automate the process of updating your hosts file.
Before using the Update hosts button, your hosts file needs to be cleared of any existing Adobe related lines to avoid any issues, you also need to remove any existing GenP-related firewall rule for Adobe too - if you have "Adobe Unlicensed Pop-up rule" remove it.
The Update hosts button should only be used as a one-off fix. If you have already used it and just want to update your hosts file with the latest lines, you should use the auto-update method by clicking "Schedule Updates" on the "Hosts" tab, or scroll down to "HOSTS FILE AUTO-UPDATE" and follow the provided instructions. Alternatively, you can use the manual method instead and if you are not confident in doing this yourself, go to the "Hosts" tab and click on "Edit Hosts" to open your hosts file, then scroll down to "HOSTS FILE / FIREWALL RULE MANUAL SETUP" and follow the provided instructions for Option 1. You can also use third-party apps such as SwitchHosts or HostsMan to automate the update process if you'd prefer that it be done for you.
For further information about using Update hosts, or to change the used hosts list URL, scroll down to "HOSTS TAB ON GENP" and follow the instructions from there.
The Update hosts button is not a guaranteed automated solution that works for everyone all the time. There will be instances when it doesn't function properly, and in such cases, using the manual method will be the only available fix.
ADOBE GENUINE SERVICE (ALERT) POPUP - (AGS-RELATED)

Note that this popup is very similar to the Unlicensed popup, however it is distinguished by this popup having "Adobe Genuine Service Alert" at the top of the popup window.
This popup is fixed by making use of the "Remove AGS" or "Dummy AGS" button found in the "AGS" tab.
If it is still appearing after using the "Remove AGS" or "Dummy AGS" button, then make use of one of the old fallback methods listed below.
➜ Uninstall AGS (Manual Method) - Adobe Genuine Service and removal of AdobeGCClient folder
Open Windows Settings > Apps > Installed Apps, find Adobe Genuine Service and uninstall it.
Go to C:\Program Files (x86)\Common Files\Adobe and delete AdobeGCClient folder.
➜ Uninstall AGS (Automated Method) - Adobe Genuine Service
Open PowerShell as Admin and enter:
[System.Diagnostics.Process]::Start("C:\Program Files (x86)\Common Files\Adobe\AdobeGCClient\AdobeCleanUpUtility.exe")
Follow the on-screen instructions.
If that directory is absent, then the service won't be installed.
➜ Block AGS via Firewall
Create Outbound rules on Adobe Genuine Service
Path of AGS:
C:\Program Files (x86)\Common Files\Adobe\Adobe Desktop Common\AdobeGenuineClient\AGSService.exe
C:\Program Files\Adobe\Acrobat DC\Acrobat\GC\AGSService.exe
If AGSService.exe is not present in one of the two provided locations, copy and paste it from the other location to add it to your firewall; you may then manually remove both files if desired, though note that they can and will be re-added with future updates for either the CC app or individual apps.
⚠️ If the issue persists, you can create the same rules for "Inbound"
The Remove AGS and Dummy AGS buttons are not guaranteed automated solutions that work for everyone all the time. There will be instances when they do not function properly, and in such cases, using one of the three old fallback methods will be the only fix available to you.
SORRY, THIS APP IS UNAVAILABLE POPUP - (NON-AGS-RELATED)

This popup is fixed by ensuring that you have properly patched the apps with GenP. If the popup is still showing, run WinTrust afterwards to trust either a specific app, a choice of multiple apps, or all of the apps in one go.
However, if that still fails, you can revert to the older methods by adding the latest lines to your hosts file.
If the popup persists after updating your hosts file with the latest entries, try locating the missing additional domain manually using the method outlined in the "Hosts File / Firewall Rule Manual Setup" section, or by adding it via the "Proxy" tab in GenP.
⚠️ Note: Acrobat Pro is the most commonly affected application by this popup. Since Acrobat does not support WinTrust, your options for resolving the issue in Acrobat, if popups persist, are, in order of preference, using GenP-v4.2.1.exe with the Good patch enabled (instead of WinTrust), updating the hosts file with any additional domain found, using the "Proxy" tab in GenP, or applying firewall rules.
CAN'T VERIFY YOUR SUBSCRIPTION POPUP - (NON-AGS-RELATED)

This popup can be fixed by doing one of the following as listed here:
Have you patched both the CC app and your individual apps with GenP after installation?
Or, have you repatched both the CC app and your individual apps with GenP following any updates?
If all done, then move on...
Have you used WinTrust on the specific app, or have you run it to cover all apps?
If all done, then move on...
Note that this next step only applies if you are using the older methods involving hosts file or firewall. This next step is not necessary for those using the latest GenP version along with WinTrust. If you're not using hosts file or firewall, you can skip this step.
Have you created any firewall rules that block the app’s .exe from accessing the internet?
If yes, do this…
Blocking the app through the firewall can cause this popup. Temporarily disable or remove the rule and try again.
If all done, then move on...
Have you modified the hosts file?
If yes, do this…
Hosts file entries usually only block telemetry domains and do not affect licensing. However, if you have added any licensing-related domains, remove them to restore subscription verification.
If all done, then move on…
Did you verify your Adobe account through the email verification from Adobe when you first created your Adobe account?
If no, do this...
You needed to have verified your used email address with Adobe when you first created your Adobe account.
If you used a temporary email, you needed to have the temporary email inbox open long enough to receive the email verification from Adobe, which you then opened to verify your account.
If you used a temporary email, you will need to create a new Adobe account, this time actually verifying your used email.
If you have used an existing email that you still have access to the inbox, you can sign into your free Adobe account online and get them to resend you the verification email from there.
Once you have your new or existing account all verified...
Close all apps and sign out of your CC app, sign back into your CC app with your now verified Adobe account.
After signing back in you always need to repatch your CC app with GenP and then repatch all your individual apps with GenP.
VERIFY YOUR IDENTITY WITH CODE POPUP - (NON-AGS-RELATED)

This popup can be fixed by doing one of the following as listed here:
You needed to have verified your used email address with Adobe when you first created your Adobe account.
If you have used an existing email that you still have access to the inbox, you can sign into your free Adobe account online and get them to resend you the verification email from there.
You won't be able to use the same six figure code on the original email as it is time sensitive due to security measures, you will always need to have a new code sent out to you.
If you do not have access to used email inbox anymore, do this...
If you used a temporary email, you needed to have the temporary email inbox open long enough to receive the email verification from Adobe, which you then opened to verify your account.
If you used a temporary email, you will need to create a new Adobe account, this time actually verifying your used email.
Once you have your new or existing account all verified...
Close all apps and sign out of your CC app, sign back into your CC app with your now verified Adobe account.
After signing back in you always need to repatch your CC app with GenP and then repatch all your individual apps with GenP.
FREE TRIAL POPUP - (NON-AGS-RELATED)

This popup can be fixed by doing one of the following as listed here:
Have you patched both the CC app and your individual apps with GenP after installation?
Or, have you repatched both the CC app and your individual apps with GenP following any updates?
If all done, then move on...
Have you used WinTrust on the specific app, or have you run it to cover all apps?
If all done, then move on...
Note that this next step only applies if you are using the older methods involving hosts file or firewall. This next step is not necessary for those using the latest GenP version along with WinTrust. If you're not using hosts file or firewall, you can skip this step.
Have you added the latest lines to the hosts file, tried locating the missing additional line manually or via the "Proxy" tab, and possibly blocked the app in the firewall you use?
If all done, then move on...
Create a new verified Adobe account, close all apps and sign out of your CC app, sign back into your CC app with your new Adobe account.
After signing back in you always need to repatch your CC app with GenP and then repatch all your individual apps with GenP.
If all done, then move on...
Can you click on the "x" on the top-right of the popup to close the free trial popup and restart the app?
If no, do this...
Accept the free trial and continue using it as usual; it won't affect anything within your app.
Since you've followed all the steps described above, it should no longer be checking the license status.
TRIAL BANNER (TOP-RIGHT OF APP WINDOW)

This is normally removed when patching with GenP, however on some new installs or updates it doesn't and is still being shown for a small minority of users.
If it appears for you then don't worry, it does not affect the performance of the app in any way at all and is purely cosmetic in appearance.
As long as you have followed the correct procedure of patching both the CC app and individual apps with GenP, and used WinTrust if needed (or, if using the older methods, added the lines to the hosts file and, if required, blocked them in the firewall), it will be non-functional and can be ignored.
We take no responsibility if you try to remove it yourself and anything goes wrong as that is all on you, especially if you are just pedantic or using non-genuine versions for commercial use and you can't have it showing as "x" trial days left / Trial ended / Subscription suspended.
ADOBE ACROBAT PRO EXCEPTION
Popups in Acrobat can often be resolved simply by making sure the app has been properly patched with GenP.
- Note that Acrobat Pro does not support the WinTrust method.
If patching alone doesn’t resolve it, including when using the recommended method of running GenP-v4.2.1.exe with the Good patch enabled, you can fall back to the older method by adding the latest entries to your hosts file.
If you still prefer to block it at the firewall level, block the following files:
Acrobat.exe - C:\Program Files\Adobe\Acrobat DC\Acrobat
AcroCEF.exe - C:\Program Files\Adobe\Acrobat DC\Acrobat\AcroCEF
AcroCEF.exe - C:\Program Files\Adobe\Acrobat DC\Acrobat\acrocef_1
Note: If you see an additional folder such as acrocef_2 in C:\Program Files\Adobe\Acrobat DC\Acrobat, this usually indicates leftover files from multiple Acrobat installs or upgrades. A standard installation should only contain AcroCEF and acrocef_1. Perform a full uninstall and reinstall of Acrobat before applying the patch.
GENERAL POPUPS EXCEPTION
Adobe has introduced new methods to trigger recurring popups across multiple apps. These aren’t always blocked by GenP or your existing setup.
-
This issue has hopefully been fixed, but since Adobe can change their checks again, further updates might be needed.
-
Don’t create new posts or spam the channels as you’ll be redirected back here instead.
-
If you still have issues opening apps or see popups after patching, using WinTrust, Remove/Dummy AGS options, updating your hosts file along with any additional domains found, using the "Proxy" tab, or firewall rules as a last resort, follow the notes below.
⚠️ App-Specific Notes:
After Effects ≥v25.4:
Startup Issues: If After Effects ≥v25.4 fails to open or crashes on the splash screen, WinTrust may have been previously applied. You must Untrust the app to remove the redirection.
Patching Workflow: The standard process is simply Search > Patch > Run as GenP automatically handles RuntimeInstaller.dll unpacking, so no manual steps are required.
⚠️ After Effects ≥v25.4 WinTrust Disabled Automatically:
WinTrust is automatically disabled for these versions because Adobe added internal AI Protection signature checks that conflict with the wintrust.dll redirection method. After Effects entries appear in the Trust list with the suffix (No WinTrust - v25.4+) and cannot be checked. Use the "Enable Good patch", hosts file entries, proxy method, or firewall rules as alternatives, see the relevant sections.
Notice: After Effects / WinTrust Compatibility
- WinTrust for After Effects is now disabled by design. Starting from
≥v25.4(General and Beta), we have disabled these options to protect your installation and ensure all advanced AI features remain functional.
Why this is necessary:
- Recent Adobe updates introduced a strict security handshake between the application core and the
Microsoft.AI.MachineLearning.dlllibrary. This library is the engine behind After Effects most powerful local tools, such as Roto Brush 3.0, Content-Aware Fill, and Scene Edit Detection.
When a redirected wintrust.dll is applied to these versions:
- Startup Hangs: The app stalls indefinitely on the "File Formats" splash screen because the security handshake fails to validate the AI libraries.
AI Feature Loss:
- While some suggest swapping or deleting files as mentioned below, we do not recommend this. Doing so permanently disables your local machine-learning acceleration and AI-driven tools.
Our Solution For Technical Stability:
To ensure maximum stability, GenP utilises a specifically verified, "universal" version of the WinTrust library. Modern Windows 11 (24H2/25H2) versions have moved to a significantly more complex architecture (growing from 373KB to 530KB) containing over 600 identical function entry points, making system-level overrides increasingly unstable for specialised AI workflows.
By disabling this toggle, we are protecting your features. This ensures your workspace remains stable and your AI libraries stay intact.
Note: If you use a standard GenP workflow, your application will continue to function normally as those methods do not require the WinTrust system-level override.
⚠️ Important Notice:
Currently, issues related to After Effects are known to occur. Other apps may be affected in future updates, so always check this section first before assuming your patch has failed.
For now, the methods mentioned earlier remain the best approach to continue using the latest versions of After Effects. Future GenP releases may address ongoing issues, though no specific release timeline will be announced.
If you want to continue using After Effects without issues, ensure that WinTrust is not applied to the app. If you've previously used WinTrust, you must untrust the app to avoid conflicts.
For those looking for a more advanced removal method, you can use the built-in "Proxy" tab in GenP - thanks to Mean-Plantain-7909 for contributing this additional method.
⚠️ DLL Swap Warning:
Copying RuntimeInstaller.dll from Media Encoder into After Effects or Premiere Pro has been suggested as a quick fix. While it may seem to work in some cases, it is not a reliable or permanent solution.
-
DLL Mismatch: Even though the DLLs may have the same file size, they are not identical. Each DLL is compiled specifically for its respective app and contains unique code. Swapping them can cause version mismatches, broken features, and crashes.
-
Temporary Workaround, Not a Solution: At best, swapping DLLs might seem to work temporarily. However, it does not address the root cause and can lead to long-term instability. The safest and most reliable solution is to either use
GenP-v4.2.1.exewith theGoodpatch enabled as an alternative to WinTrust, block the app using firewall rules, or use the "Proxy" tab in GenP.
Why DLL Swaps Aren’t Ideal:
-
Not the Root Cause: The problem often lies with WinTrust conflicts, not the DLLs themselves. In After Effects, for instance, disabling or renaming
Microsoft.AI.MachineLearning.dlldoesn’t fix the issue. It’s simply bypassing WinTrust’s system-level override, which is the actual cause of the crashes. The DLL renaming is just a side effect that can seem like a fix, but it doesn't solve the core problem of WinTrust's conflict with Adobe’s internal trust validation. -
GenP Users Don’t Need This Fix: When patched properly using the standard GenP workflow (
Search > Patch > Run), After Effects and Premiere Pro will run without issues, and no DLL swapping is required. -
Monkrus Users: Users with Monkrus versions might mistakenly swap DLLs thinking it fixes crashes. In reality, this only works by bypassing the WinTrust conflict and does not address the actual cause of the issue.
The Safer Alternatives:
-
Use
GenP v4.2.1.exewithGoodpatch enabled: This method uses theGoodpatch as a replacement for WinTrust, removing the need to apply it at all. Do not use WinTrust with this approach, as it can cause crashes and conflicts.GenP-v4.2.1.exewithGoodpatch provides a more stable setup without modifying core DLLs. -
Block the App with Firewall Rules: This is a safer method than swapping DLLs and prevents the popups without risking the stability of your apps.
-
Use the Proxy Tab: Using the "Proxy" tab in GenP is another reliable option.
-
Avoid DLL Tampering: Renaming or deleting core DLLs is a fragile workaround that can lead to further instability, missing features, or corrupted projects. Stick to the safer alternatives for the best results.
⚠️ UWP / STORE APPS / XBOX NOT LOADING WITH PROXY ON
Microsoft Store, Xbox, Mail and similar UWP apps can stop loading or connecting while the Proxy tab's system proxy is enabled. That's Windows UWP network isolation reacting to the proxy, not a GenP fault. See the note in the "Proxy Tab" section for the fix (toggle the proxy off when you're not actively blocking popups, or add a loopback exemption for the affected app).
CC APP ERRORS
Ensure that the latest version of CC is installed to resolve any of the following issues. CC Release Notes
CC should always be patched using the latest available version of GenP or, at minimum, GenP v3.5.0 or newer, as stated at the beginning of the GenP Guides.
If the CC app itself requires an update, you can go ahead and update it, but make sure the update fully completes. In some cases, the CC app doesn’t finish updating until it is reopened.
Once the CC app has been opened and fully updated, go to Menu > File > Quit Creative Cloud to close it completely. After that, repatch the CC app with GenP.
If you patch it before that final update completes (or without quitting properly), the app may self-repair and override the patch, meaning you’ll have to patch it again.
TRIAL / BUY IS DISPLAYED INSTEAD OF INSTALL
If you encounter this error when opening CC, follow these steps:
-
Confirm that you have toggled off "Automatically keep Creative Cloud up to date" in CC preferences.
-
Ensure that you have patched CC with GenP, or repatched it after updating CC with GenP.
FAILED / RETRY / ERROR CODE 304
ℹ️ Did this appear right after patching with GenP?
- If you try to install or update an app immediately after a patch in the same session, before restarting, Creative Cloud may return a 304 error. This is caused by Adobe's own update cache, not the patch; the patched files on disk are fine. A quick device restart clears it instantly, then installs or updates will work normally. If that's your situation, do this first before any of the steps below. (If you're not installing or updating right after a patch, you won't hit this, the automatic Adobe reload is enough.)
To resolve any of these errors when attempting to install an app, follow these steps:
-
Ensure that you are logged in as an Administrator and that CC is running with Administrator privileges.
-
Go
Menu > File > Quit Creative Cloud, then reopen CC as Administrator and attempt the installation again -
Alternatively, restart your device, reopen CC as Administrator, and try installing the app again.
-
Check the Cloud Activity icon, if it has a red dot, this may indicate the cause of your error.
-
Ensure that you have enough disk space to install the required app. This means not only meeting the minimum system requirements but also allowing for additional disk space that temporary installation files will use, as well as for stored app data which Adobe places on your main C: drive regardless of the chosen installation location.
-
Confirm that you have the latest version of Visual C++ installed, both x86 and x64 versions must be installed. If you already have the latest versions, repair your existing installs and restart your device when prompted. Visual C++
-
If the issue persists, use the CC App Uninstaller Tool to either repair or uninstall and reinstall CC. CC App Uninstaller Tool
-
You don't need to uninstall any apps, ignore that initial part of Adobe's instructions. Instead, open the tool, select "Repair" and let it run, then restart your device and repatch CC with GenP.
-
If the error persists, use the Uninstall option instead. Let the process complete, restart your device, reinstall CC, and repatch CC with GenP.
UPDATES NOT DOWNLOADING / ADD-ONS OR EXTENSIONS NOT INSTALLING
This is a temporary measure only. Do not leave the CC app unpatched after you are done.
If app updates are not downloading through the CC app, or you are having trouble installing add-ons, plugins, or extensions, try the following:
-
Open GenP, find and check all CC app files only, and click "Restore".
-
Once restored, open the CC app and attempt the update or add-on install as normal.
-
Once complete, go to
Menu > File > Quit Creative Cloudto close the CC app fully, then open GenP and repatch the CC app.
Note: This won't work on new installs as being unpatched will limit you to "Free Trial" or "Buy" options only, which should be ignored and not acted on.
ℹ️ Why Does Creative Cloud Setup Skip the Login Screen During Reinstallation?
If you're reinstalling Creative_Cloud_Set-Up.exe, you may notice the installer skips the login screen entirely, even when run as Administrator.
That's expected behaviour. Adobe stores previous sign-in data on your system, and if those credentials are still present, the setup will bypass the login prompt and go directly to the install interface. Just click "Start Installing" to proceed as normal.
This is not an error, and no action is required, unless you want to use a different Adobe account. In that case:
-
Sign out of the CC app after installation.
-
Sign back in with the new credentials.
-
Repatch both the CC app and any existing individual apps with GenP.
Even if the apps appear patched already, it's important to run GenP again to ensure everything is fully covered.
CAN'T REACH ADOBE SERVERS / STUCK INITIALISING OR LOADING / ERROR CODES 204, 205 OR 206
If you encounter any of the above errors when opening CC, follow these steps:
-
Go
Menu > File > Quit Creative Cloud, then remove any Adobe-related entries from your hosts file and also delete any corresponding Adobe-related rules in your firewall settings. -
If you have modified any Adobe background processes, revert them to their original state. The easiest way to do this is by using the CC App Uninstaller Tool to repair your CC app and repatch it, as mentioned earlier in this section.
-
Reopen CC. If it still doesn't load, check your internet connection or try a different connection type, for example, switch from WiFi to wired. Additionally, temporarily disable your used antivirus and firewall to check if they are blocking access.
-
Once CC is working again, if anti-popup patches or WinTrust are not functioning and you still require modifications to your hosts file or firewall rules, you can reinstate the lines in your hosts file or reapply any necessary firewall rules.
CC IS MISSING OR DAMAGED
If you encounter this error when opening CC, follow these steps:
-
Go
Menu > File > Quit Creative Cloud, then reopen CC as Administrator and check if the issue persists. -
Alternatively, restart your device, then reopen CC as Administrator to see if the error has been resolved.
-
If the error persists, use the CC App Uninstaller Tool to repair CC and repatch it, as mentioned earlier in this section.
CC FAILS TO OPEN
If you encounter this error when opening CC, follow these steps:
-
Ensure that you are logged in as an Administrator and that CC is running with Administrator privileges.
-
Check for any conflicting processes or security software that could be blocking CC from launching. Disable any used antivirus or firewall temporarily and try launching again.
-
Use the CC App Uninstaller Tool to uninstall CC, then restart your device, reinstall CC, and patch it with GenP, as mentioned earlier in this section.
-
Create a new Administrator profile, log into that account, and attempt to install CC from there.
SYSTEM INCOMPATIBLE / NO ACCESS TO OTHER VERSIONS
If you encounter either of these errors while installing an app or rolling back to an earlier version, whether from the current or a previous major release, follow the steps below to resolve the issue.
Check System Requirements:
- Ensure that your device meets the recommended system requirements for either the latest or previous major release of the apps. If your device is not compatible with either, no other versions may be shown to you. Recommended specs are always better than the bare minimum, or anything close to it.
Disable Compatibility Mode:
- Verify that CC is not running in compatibility mode, as this can cause both your system and the CC app to incorrectly identify your device as older than it actually is, including both hardware and the Windows OS version.
Less Common Causes:
If the issue persists even when requirements are met and compatibility mode is disabled, check the following:
-
Make sure Windows is fully updated, including .NET framework and Visual C++.
-
Confirm your system date and time are correct.
-
Reinstall CC with a clean setup to rule out corrupted cache or installer files.
ROLLBACK TO OLDER ADOBE VERSIONS
When you install Adobe software using the GenP method, it functions just like the Adobe software.
The "Other versions" option in Creative Cloud should now be available to all users again, including those without a paid plan, so in most cases you can roll back directly from within the CC app itself.
If "Other versions" does not appear for you, GenP includes a built-in downloader as a fallback (see the OLDER ADOBE VERSIONS ALTERNATIVE METHOD section below). It fetches installers for older versions directly from Adobe's own servers, so you are never dependent on the in-app list being shown.
There are also some limitations regarding rolling back to older versions:
Version Limitations:
- GenP users can only roll back to versions within the current major version (e.g. CC2026) or the previous major version (e.g. CC2025), as this is typically the range Adobe makes available for download.
How to Access Older Versions:
-
Creative Cloud "Other versions" (try this first): In most cases the "Other versions" option under each app in the CC desktop app should now be shown to everyone. Use it to roll back directly, with no extra tools required.
-
Official Adobe Account: If you have a legitimate Adobe account, you can download older versions (where Adobe still offers them) from Adobe's web download page while signed in.
-
Contact Adobe Support: If you don't have an Adobe account, you can reach out to Adobe Customer Support and request access to older versions of their software. Keep in mind, Adobe may only provide these versions to users with a paid subscription or a legitimate license.
-
Using GenP's Built-in Downloader (fallback): If "Other versions" is not shown for you, use the Older versions download option in
Options > Patch Optionsto fetch a specific older version directly. See the OLDER ADOBE VERSIONS ALTERNATIVE METHOD section below for full instructions.
Important: Never mix GenP and Monkrus installations. This can cause issues with activation and functionality. You should not run GenP on a Monkrus installation, and vice versa.
📥 OLDER ADOBE VERSIONS ALTERNATIVE METHOD
Adobe's own "Other versions" list should now appear for all users again, so try that first from within the Creative Cloud desktop app. If it isn't shown for you, GenP includes a built-in downloader as a fallback that fetches installers for any available version of any Adobe CC app directly from Adobe's own servers, no account, no trial sign-up, and nothing else required.
⚠️ Note: This downloader pulls packages from Adobe's CDN. Adobe can change or restrict access at any time without notice. If a version no longer appears in the list, it has been removed from Adobe's servers.
ℹ️ Reliability: The downloader checks every reply from Adobe and every file it saves. A blocked or non-standard response (usually region, ISP, VPN or proxy) shows a plain-English message instead of crashing. Each package is size-verified and the full set confirmed complete before the installer is staged, so a partial download is reported rather than passed on. Language packs are matched to the version being installed, preventing installs failing on a missing language.
Before you begin:
-
Quit the Creative Cloud desktop app fully before running the installer.
-
Different major versions install side by side, so rolling back to an earlier major release is added alongside your current one, you can keep both, or uninstall the newer one through the CC app first if you'd rather replace it. Minor rollbacks within the same major version (e.g.
v26.1>v26.0) install over the existing one.
1. In GenP, go to Options > Patch Options, check "Older versions download", and click "Save Options". A window will appear allowing you to choose the install location, after which the downloader console opens.
2. The downloader defaults to manifest version 6 (newest releases). Press "Enter" to confirm, or type 4 or 5 for an older release. Adobe normally only serves the current and previous major release, so older versions aren't guaranteed and may fail to download. (See the manifest version guide below.)
3. A numbered list of all available apps appears, including Beta versions. Enter the number for the app you want.
4. The available versions for that app are then listed. Enter the number of the version to download.
5. The downloader fetches all required packages, verifies each one is complete, and saves them to an Adobe Downloads folder inside your GenP folder, organised as Install_{App}_{Version}_{Language}\ (en_US by default). Once verified, it stages the Adobe installer (Set-up.exe) in that folder automatically.
6. Open the Adobe Downloads\Install_{App}_{Version}_{Language}\ folder, right-click Set-up.exe and choose Run as administrator.
7. Once the installation completes, run GenP and patch the newly installed app as normal. The downloaded Install_{App}_{Version}_{Language}\ folder can be deleted afterwards if you no longer need it.
⚠️ System requirements still apply:
GenP downloads and runs Adobe's genuine installer, it does not modify the app or bypass Adobe's own system requirements. If your device doesn't meet the requirements for the version you picked, whether that's the required Windows version, CPU instruction sets such as AVX2, Graphics/GPU support, or minimum memory and disk space, Adobe's installer will refuse it, usually with a generic "An error occurred during installation" message. This is Adobe's requirement, not a fault in the downloader. For example, newer Adobe apps that require a CPU with AVX2 instruction support won't install on older non-AVX2 processors. Where a requirement was only introduced in later builds, choosing an earlier version that predates it will often install and run fine.
If your device can't meet Adobe's requirements at all, use Monkrus instead, which removes the installer-level checks so the setup will run. Note this only unlocks the installer, it does not upgrade your hardware or add any missing CPU, GPU, or system features (such as AVX2), so the app may still fail to launch, crash shortly after startup, or be unstable in use. Read the Monkrus Guide and the Monkrus Setup, Troubleshooting, and Best Practices Guide for full details, caveats and possible side-effects.
ℹ️ Manifest version guide:
Adobe only reliably serves the current and previous major release. The manifest selector picks Adobe's catalog: 6 is the newest, and 4/5 reach older catalogs. Anything older than the previous release is not guaranteed to still be hosted by Adobe and may fail to download, even though it's listed. If an older version won't download, that's Adobe no longer serving it, not a fault in the tool.
-
Version 6 - newest, current releases. Use this for anything recent.
-
Version 5 - the previous release period.
-
Version 4 - older releases. Use this if version 5 doesn't list what you need.
ℹ️ Tip: Older versions can also help if your hardware doesn't meet a newer release's requirements. See "System requirements still apply" above.
Original downloader tool by MP7909, integrated into GenP.
INDIVIDUAL APP ERRORS
GenP only affects an app when it is launched; therefore, only launch-related issues are listed below.
Apps should always be patched with the latest available version of GenP, as stated at the beginning of the GenP Guides.
APP OPENS AND CLOSES IMMEDIATELY
If you encounter this error when opening an app, follow these steps:
-
Confirm that "Auto-update" is disabled for individual apps in CC preferences.
-
Ensure the installed app is patched with GenP, or repatched with GenP after updating.
-
Verify that your device meets all recommended system requirements for the app.
-
Additionally, make sure your OS and all required drivers are up to date, including GPU and Visual C++.
-
Check the Compatibility List to confirm that the installed app version is currently supported.
-
If the latest version is unsupported or broken, roll back to a supported version and repatch with GenP.
IN-APP ERRORS OR ISSUES
These are not a GenP-related issue. You will need to seek external help, as we are not an additional form of Adobe Support.
If you encounter in-app errors or issues while using any app, follow these steps:
-
Use the "Search" function in Adobe Community to find posts or discussions about similar issues reported by other users. Adobe Community
-
Post about your issue in the appropriate Subreddit listed below:
-
Acrobat / Adobe / After Effects / Animate / Audition / Character Animator / Creative Cloud / Fresco / Illustrator / InDesign / Lightroom / Photoshop / Premiere Pro1 / Premiere Pro2 / Substance / XD / Maxon Cinema 4D
💡 TIP - LAUNCH APPS DIRECTLY, BYPASSING CC CHECKS:
GenP's optional "App Launch Toolbar" (Options > Patch Options > Show app launch toolbar) provides a convenient single panel to launch all your patched apps directly, bypassing CC checks, without needing to navigate to each app's .exe, shortcut, or taskbar icon separately. This does not replace the hosts or proxy setup but provides a quick alternative for launching apps.
All the following options are to help avoid either Credit Card / Unlicensed or Disabled / Accept Terms / Free Trial / Verify your subscription / Sorry, this app is unavailable popups.
GENP TABS OVERVIEW
GenP must be run as Administrator for all features in the "Hosts" tab to function properly.
Without Administrator privileges, critical functions such as editing the hosts file, modifying Windows Firewall rules, managing registry keys, unpacking DLLs, and applying WinTrust settings may fail or behave unexpectedly.
Always ensure GenP has been launched with elevated permissions before using any tools on this tab.
Do not use a virtual IP address from a VPN or Proxy, as it will circumvent local settings such as the hosts file or firewall rules.
Reminder: If using a VPN or Proxy, it is your responsibility to configure features like split tunnelling, custom DNS, or app exclusions within your VPN or Proxy software. These configurations ensure that the hosts file and firewall rules are not bypassed, and that your system's local network settings, including those critical to app behaviour, remain unaffected. Otherwise, you may continue to encounter popups caused by VPN or Proxy interference.
Below is a detailed breakdown of the available tools and tabs, including their functionality and instructions on how to use them.
MAIN TAB
Main:
The "Main" tab is the primary workspace used to locate and patch supported Adobe applications. From here you can select the Adobe installation path, scan for installed applications, and apply patches where required.
Path:
Click "Path" to select the root Adobe installation folder. GenP uses this location when scanning for supported Adobe applications and files.
If Adobe was installed using the default location, this should normally be C:\Program Files\Adobe.
If you installed Adobe to a different drive or custom location, select the root Adobe folder from that location instead.
Search:
Click "Search" to scan the selected Adobe installation path for supported applications and patchable files. The results will be displayed in the "Main" tab and recorded in the "Log" tab.
Patch:
Click "Patch" to apply patches to the files discovered during the scan process. GenP will process each supported file and report the results in the "Log" tab.
For detailed instructions on using the "Main" tab, including the recommended patching workflow and troubleshooting steps, refer to Guide #2 - GenP or the Troubleshoot Section.
Modified:
Click "Modified" to scan the selected Adobe installation path for patchable files only. The results will be displayed in the "Main" tab and recorded in the "Log" tab.
This allows you to quickly find all unpatched files only before running the patch process.
Restore:
Click "Restore" to revert all selected files back to their original unpatched state.
This should normally only be used for individual Adobe applications. If restoring CC app files causes stability issues, use the CC App Uninstaller Tool to perform a repair.
List Selection Buttons:
The five buttons beneath the file list (Uncheck All, Check All, Unpatched, Patched, and Refresh) are only enabled once a scan has been completed and supported files are shown. They are disabled at all other times.
They are provided to make it quicker to manage which files are selected for patching or restoring without having to check each row by hand.
Uncheck All:
Click "Uncheck All" to clear the checked state of every file currently shown in the list.
Check All:
Click "Check All" to check every file currently shown in the list.
Unpatched:
Click "Unpatched" to check only the files whose status is not Patched. Any files already marked as Patched will be unchecked at the same time, so the resulting selection contains unpatched files only.
The number of files selected will be reported in the "Log" tab.
Patched:
Click "Patched" to check only the files whose status is Patched. Any files that are not Patched will be unchecked at the same time, so the resulting selection contains patched files only.
The number of files selected will be reported in the "Log" tab.
Refresh:
Click "Refresh" to re-scan the currently set Adobe Path and rebuild the displayed list.
This lets you update the list to reflect any changes on disk without having to go back through Path and Search again.
OPTIONS TAB
Options:
The "Options" tab allows you to configure how GenP searches for Adobe applications, how patching behaves, and how the hosts list is retrieved. Changes made in this tab do not take effect until they are saved.
First Run Options:
These settings control how GenP uses patch_states.ini.
Create new patch_states.ini (using location set by Path only):
This is the recommended path for most users.
When checked and on Save, GenP scans your set Path location, restores every file that has a .bak back to its original Adobe state, computes baseline MD5 checksums, then automatically patches everything afresh.
The end result is a fully populated patch_states.ini with correct MD5_Original and MD5_Patched values for every file, with no further action needed.
ℹ️ Note: The run ends with an automatic Adobe reload, so normal use needs nothing more. If you intend to install or update another Adobe app immediately afterwards, restart your PC first, otherwise Adobe may return a 304 error (its update cache) on that first install/update attempt. This is an Adobe-side quirk, not the patch; a restart resolves it.
Use this when you have no existing patch_states.ini (e.g. fresh install, after using Reset patch_states.ini, or whenever you want a clean baseline).
The full scan + restore + patch process can take a couple of minutes depending on install size, GenP will switch to the "Log" tab automatically when complete.
Reconcile imported patch_states.ini (using location set by Path only):
When checked and on Save, GenP scans your set Path location, validates every file's live MD5 against the imported ledger's MD5_Original / MD5_Patched records, removes entries for files that no longer exist on disk, and adds any new files found that aren't yet in the ledger.
After Reconcile finishes, GenP switches to the "Main" tab with any drifted or unpatched files visible and pre-checked, so you can review the results and decide whether to click "Patch" (or "Restore") yourself. Unlike Create, Reconcile is diagnostic, it won't auto-patch.
Use this when migrating an existing patch_states.ini from an older GenP release that you specifically want to preserve. If unsure, use "Create new..." instead.
Scan Options:
These settings control how GenP scans your system when searching for Adobe applications and files to patch.
Always search for ACC:
When checked, GenP will always search for Adobe Creative Cloud (ACC) components in addition to standard Adobe application folders during scans.
If unchecked, Adobe Creative Cloud (ACC) components will not be searched for and will not appear in scan results.
Search in default named folders only:
When checked, GenP limits scanning to commonly used Adobe installation folder names. This helps reduce scan time and avoids searching unrelated directories.
If unchecked, GenP may search a wider range of directories. This can increase scan time but may help locate non-standard installations.
Use custom default search path:
When checked and an additional folder selected, GenP will use this over the default path.
If the custom path is not set when saved, GenP will automatically set itself back to the default search path.
Changes apply immediately. Click "Search" again to scan the new path.
Patch Options:
These settings control how GenP handles patching operations.
Show Beta Apps:
When checked, Adobe applications marked as Beta will be included in the scan results and patch list.
If unchecked, Beta versions will be hidden and only General Availability (GA) versions will appear.
Enable Good Patch:
When checked, GenP will apply the Good patch method for supported Adobe files when available.
If unchecked, the standard patching method will be used instead.
This option is recommended when patching Adobe Acrobat Pro.
Clear license caches after patching (checked as default):
When checked, GenP will clear any cached license state after a successful patch run. This can help resolve issues where Adobe apps still show license errors immediately after patching, caused by stale cached data from a previous session (recommended to leave checked as default).
Show app launch toolbar:
When checked and saved, GenP displays a small floating toolbar for launching your patched Adobe apps directly, bypassing CC entirely, handy if Adobe has shifted something and prompts have crept back in.
When first enabled the toolbar starts blank; click "Configure" on the toolbar itself to select which of your patched apps to show (up to 10 at a time). The toolbar stays on top of other windows, remembers its position between sessions, and includes a "Minimise GenP" button to tuck the main window away while keeping the toolbar visible.
The toolbar requires either "Create new patch_states.ini" or "Reconcile imported patch_states.ini" to have been completed first. If neither has been run when you save this option, GenP will warn you. Note that if you reset patch_states.ini, your toolbar app selection is cleared and you will need to reconfigure.
Older versions download:
ℹ️ Note: Adobe's Creative Cloud app normally lets you roll back via the "Other versions" option on each app, try that first. This downloader is the fallback for when that option is missing, limited, or won't work on your setup.
When checked and saved, GenP launches the built-in "Adobe Older Versions Downloader", a console-based tool (credit to MP7909) for fetching older releases of Adobe apps directly, rather than only the latest version Creative Cloud offers. It opens in its own window and runs independently of patching.
The option auto-unchecks itself after Save, so it only runs the once when you tick it, not on every subsequent save. Handy when the newest version of an app is broken, incompatible with your system, or when you specifically need an earlier release to patch.
Enable NGL Firewall rule:
When checked, GenP adds Windows Firewall outbound block rules for NGL-based Adobe applications at the start of the patch run, before the files are patched, so NGL is network-isolated as soon as patching begins. GenP finds the NGL licensing components on disk and adds an outbound block rule for each one (under the "GenP NGL Firewall" group), stopping those modules from contacting Adobe's servers. This keeps the firewall rules in sync with your patched install without needing to use the "Firewall" tab separately. If a third-party firewall is detected, GenP can't add the rules automatically, it lists the files to block in Notepad so you can add the outbound block rules in your own firewall, then carry on patching.
Hosts Options:
These settings control how GenP handles the hosts list URL and capture behaviour.
Hosts List URL:
This field defines the URL used by GenP when retrieving the hosts list for updates.
It is used by the "Hosts" tab when manually updating the hosts file, and by automated hosts updates configured via Schedule Updates on the "Hosts" tab.
By default, it points to the hosts list used by GenP. Advanced users may change this URL to use a custom domain list if required.
If the field is left empty when saved, GenP will automatically restore the default hosts list URL. The URL must be a valid HTTP or HTTPS address to be accepted.
Trigger one-off capture and launch on save:
When checked and after clicking on "Save Options", GenP prompts you to select an Adobe app, then starts the proxy and launches it silently in the background to capture and add to your hosts file any additional Adobe domains not yet listed. Useful during first-time setup when you want to force a fresh capture cycle. The option auto-unchecks itself after "Save Options" so it does not repeat on subsequent saves.
Clean Options:
These settings allow you to clean up GenP data and verify your Adobe installation.
Reset patch_states.ini:
When checked and on Save, GenP will delete your existing patch_states.ini from your GenP folder.
Before the next time files are patched, a fresh patch_states.ini will need to be built.
You can use the First Run Options above to seed a new ledger from your current install state.
Final Adobe Clean Check:
When checked and on Save, GenP runs a comprehensive clean in a live progress window, showing each step as it executes with a result summary at the end. It verifies and removes GenP/Adobe leftovers: hosts entries, firewall rules, scheduled tasks, WinTrust registry keys, other Adobe registry entries, and stray .bak backups.
As part of this it also performs a full reset: it wipes Adobe's license caches (SLStore, NGL, caps, and related) and restores the CCX Start "home" component to Adobe defaults. Because that resets Adobe's license and inventory state, your apps will show as "Install" again afterwards. So only run this as part of a full uninstall or a deliberate clean reset (see Guide #4 - Full Clean), not on a working patched install you want to keep.
Save Options:
Click "Save Options" to apply and store any changes made in this tab.
All options are saved to the GenP configuration file and will persist between sessions. Changes must be saved before they take effect.
Once saved, the new settings are applied immediately and persist between sessions. Most options take effect without restarting GenP or rescanning.
The First Run Options (Create / Reconcile) are exceptions, saving with either checked triggers their scan-and-process workflow before returning control to you.
The message "Changes will not take effect until saved" will be displayed until the settings are saved successfully.
WINTRUST TAB
WinTrust
Note: Ensure you have fully read and understood the WinTrust section before using these two options.
Toggle WinTrust:
Click "Toggle WinTrust" and in the dialog box that appears, choose to either Trust or Untrust the apps.
If you choose Trust, you will get a further dialog box appear giving you the chance to trust all individual apps currently installed on your system. Check the boxes for all the required apps, whether it be just the one, a selection, or all of them and click "OK" to begin the process. You will then be moved to the "Log" tab which will now be showing a "Enabled registry key DevOverrideEnable for WinTrust override." message, along with a window informing you that a system reboot is required for the changes to take effect.
Click "OK" and the "Log" tab will then change to show you that your chosen apps have been successfully trusted with each app having a "Successfully trusted: App.exe" message, all followed by a main message of "Trust completed. Successfully processed x of x applications". Once all your required apps have been successfully trusted, you must restart your device to apply the necessary changes. This step is imperative, without it, the changes will not take effect.
⚠️ Toggle WinTrust (Trust) doesn't show apps and goes straight to Log tab:
This feature only works correctly if GenP is set to the correct Adobe installation path.
If clicking "Trust" does not list any apps and instead goes straight to the "Log" tab showing: "No applications found to trust at: x:\Adobe\app-name-folder". This means the path is incorrectly set to an individual app folder rather than the main Adobe folder. You must use the Path option again and select the root Adobe folder only.
If you installed Adobe to the default location, the path must be: C:\Program Files\Adobe.
If you changed the installation location (for example, to D:\), you must select: D:\Adobe.
Once the correct Adobe folder is shown in GenP, click "Toggle WinTrust" and choose Trust again.
If you choose Untrust, you will get a further dialog box appear giving you a list of all currently trusted apps. Check the boxes for all the required apps, whether it be just the one, a selection, or all of them and click "OK" to begin the process. Click "OK" and it will take you to the "Log" tab where it will show you that your chosen apps have been successfully untrusted with each app having a "Successfully untrusted: App.exe" message, all followed by a main message of "Untrust completed. Successfully processed x of x applications". Once all your required apps have been successfully untrusted, a system reboot is not necessary. However, restarting your device may be beneficial for some users.
If the Log returns "No trusted applications found to untrust", ensure the correct Adobe root folder is selected as described above.
This button will enable or disable application trust by modifying the necessary registry settings, allowing you to efficiently manage the trust status of your DLLs. Trusting each app helps avoid non-AGS-related popups, and the registry key is automatically added when apps are trusted, facilitating proper DLL redirection.
Toggle Reg Key:
Click "Toggle Reg Key" and in the dialog box that appears, choose to either Enable Reg Key or Remove Reg Key from your system.
Note: If it says "Registry key not found", ensure that you have toggled WinTrust on for at least one app first, otherwise you will need to do the Enable Reg Key step. If it says "Registry is enabled", you can do the Remove Reg Key step.
Regardless of if you choose either Enable Reg Key or Remove Reg Key, you will get a window informing you that a system reboot is required for the changes to take effect. Click "OK" and restart your device to apply the necessary changes. A system reboot is required for the changes to take effect. If you check the "Log" tab before restarting you will get the following shown, for Enable Reg Key, you will get a "Enabled registry key DevOverrideEnable for WinTrust override" message, while for Remove Reg Key, you will get a "Disabled registry key DevOverrideEnable" message.
This button will add or remove the specified registry key, allowing for the management of DLL redirection and ensuring a smoother application experience by minimising conflicts and issues during patching.
Set Trust Path:
Click "Set Trust Path" and set the default path that GenP will use for the WinTrust function to find and trust or untrust all your individual Adobe apps.
This allows users to set a default path that GenP can use separately from the main search path, so it can be set to where your Adobe apps are stored permantly.
Note: Acrobat Pro is the only app that cannot have WinTrust applied, as it does not support DLL redirection. This is because Acrobat uses an internal manifest that forces it to load original system DLLs, bypassing any local overrides. Therefore, it must be patched using traditional methods. For Acrobat Pro, it is recommended to use GenP v4.2.1.exe with the Good patch enabled.
⚠️ Note: Due to Adobe changes, After Effects ≥v25.4 may fail to open or crash on startup if WinTrust has been applied to the app (either currently or previously). For more details and troubleshooting, refer to "GENERAL POPUPS EXCEPTION" in the Troubleshoot Section.
🆕 Note: After Effects ≥v25.4 is auto-blocked to avoid this issue. Starting with After Effects v25.4 (General and Beta), Adobe added internal AI Protection signature checks that conflict with the WinTrust DLL approach. GenP now detects this automatically, affected entries appear in the Trust list with the suffix (No WinTrust - v25.4+) and cannot be checked. Use Enable Good Patch, hosts file entries, firewall rules or "Proxy" tab in GenP as alternatives for these versions. All other apps and earlier After Effects versions work normally with WinTrust.
HOSTS TAB
Hosts
Update hosts:
Click "Update hosts" to automatically update your hosts file with entries from the specified Hosts List URL. This may include adding new domains that are not yet listed. GenP may also attempt to identify and add domains that exist in your DNS cache but are missing from the remote list.
GenP will make a backup of your existing hosts file before updating it (hosts.bak), so if there are any errors and you need to go back, you can just click on "Restore Hosts" to revert back to the saved copy instead. Once completed, the "Log" tab will return a "Hosts file updated successfully" message. If it instead returns a "No entries to remove" message, this usually means your hosts file is already up to date and no changes were needed. If you expected changes but none were made, ensure you have internet access and your device can reach the designated URL.
If you are wanting GenP to use an alternative hosts list URL instead of the used default URL, go to the "Options" tab and change the URL field from the default to your own preferred choice, click on "Save Options" to save your change.
If you want to revert to the default URL, simply clear the URL field and click "Save Options". GenP will automatically restore the default URL and display an "Empty URL" popup confirming the reset.
If the popup persists after updating your hosts file with the latest entries, and GenP did not add any new domains found in your DNS cache, try locating the missing additional domain manually using the method outlined in the "Hosts File / Firewall Rule Manual Setup" section, or by adding it via the "Proxy" tab in GenP.
The Update hosts button should only be used as a one-off fix method, rather than kept being applied every time you want to just update your own hosts lines. There is a rare possibility that repeated use may result in the hosts file being cleared instead of updated.
To keep your hosts file updated with the latest release, you have three options: use the auto-update method by clicking "Schedule Updates" on the "Hosts" tab, or scroll down to "HOSTS FILE AUTO-UPDATE" and follow the instructions. Alternatively, you can use the manual method and if you're not confident in doing this yourself, go to the "Hosts" tab and click on "Edit Hosts" to open your hosts file, then scroll down to "HOSTS FILE / FIREWALL RULE MANUAL SETUP" and follow the instructions for Option 1. You can also use third-party apps such as SwitchHosts or HostsMan to automate the update process if you'd prefer that it be done for you.
Before using the Update hosts button, your hosts file needs to be cleared of any existing Adobe related lines to avoid any issues, you also need to remove any existing GenP-related firewall rule for Adobe too - if you have "Adobe Unlicensed Pop-up rule" remove it.
Edit hosts:
Click "Edit hosts" to open your own hosts file in Notepad. GenP will make a backup of your existing hosts file before opening it (hosts.bak), so if you make any errors and need to go back, you can just click on "Restore Hosts" to revert back to the saved copy instead.
Clean hosts:
Click "Clean hosts" to remove all Adobe related hosts added by GenP from your hosts file. Once completed, the "Log" tab will return a "Hosts file cleaned of existing entries" message.
This button is greyed out initially and only becomes available after the hosts file has been updated through GenP.
Restore hosts:
Click "Restore hosts" to restore your hosts file from the saved hosts.bak. Once completed, the "Log" tab will return a "Restoring the hosts file from backup: Success!" message and hosts.bak should be removed. This button will be greyed out and only become available if you have previously edited your hosts file through GenP.
Schedule Updates:
Click "Schedule Updates" to open the Hosts Schedule Updates dialog. The dialog checks immediately whether a scheduled task is already installed and shows the result in the status label at the top ("Not installed" if none found, or the installed method if one exists). Run Now and Remove are disabled until a task is installed via Setup.
The "Basic" method runs GenP once a day to update the hosts file with the latest blocklist entries. No backup or recovery is included. The "Advanced" method runs every three hours via PowerShell, backs up your hosts file before each update, verifies the new list, reverts on failure, logs all activity, and merges entries from hosts.plain (if present) so custom entries survive updates.
Select your preferred method and click "Setup" to install the scheduled task. "Run Now" and "Remove" then become available. To remove the task later, reopen Schedule Updates and click "Remove".
If you have done all of the above steps and still have issues with Update hosts button after using "Edit hosts" option on GenP, then it is recommended to use the manual method instead and to repeat the same steps of editing your own hosts file yourself.
The Update hosts button is not a guaranteed automated solution that works for everyone all the time. There will be instances when it doesn't function properly, and in such cases, using the manual method will be the only available fix.
PROXY TAB
Proxy
The "Proxy" tab uses mitmproxy to intercept and neutralise Adobe heartbeat traffic, preventing licensing popups at the network level. A status label on the tab shows the current proxy state. Credit to MP7909.
Setup:
Click "Setup" to configure and install the popup-blocking proxy on your system. This installs mitmproxy, trusts the required certificate, and sets up the local proxy components. Run this once before using the other "Proxy" tab buttons.
Targeting:
Click "Targeting" to choose what the proxy acts on. Global (the default and recommended mode) intercepts all Adobe traffic, it is the only mode that also covers Adobe's shared licensing services, so most users should leave it here. Targeted mode lets you tick up to four installed apps so the proxy only acts on those; it is best-effort and mainly useful for narrowing scope. If you select more than four apps, or none, it falls back to General. Your choice is saved automatically, if you change it while the proxy is running, use "Start / Stop Proxy" to restart it and apply the change.
Start / Stop Proxy:
Click "Start / Stop Proxy" to turn the proxy on or off. Starting it launches the proxy service and enables the Windows system proxy that routes Adobe traffic through it; stopping it disables the system proxy and shuts the service down. The status label reflects the current state.
Open Log:
Click "Open Log" to view the proxy activity log, showing intercepted requests and any errors encountered during operation. The log window includes an "Add hosts" button that scans the log for Adobe telemetry domains detected during capture and injects them into your hosts file, providing a quick way to block newly discovered domains without leaving GenP.
Remove:
Click "Remove" to fully uninstall the proxy, removing all components, certificates, and system proxy settings from your device.
⚠️ Note: Disable any active VPN before using the "Proxy" tab. VPNs route traffic outside your local network stack, which means Adobe traffic may bypass the proxy and popup blocking will not work.
⚠️ Note: While the system proxy is enabled, Windows Store, UWP apps, Microsoft Store, Xbox, Mail, and similar, may stop loading or connecting. This is a Windows network-isolation behaviour, it is not a GenP fault: UWP apps block the local loopback connection the proxy relies on.
Two options if it affects you:
-
Simplest: Turn the proxy off with "Start / Stop Proxy" when you're not actively blocking popups - it only needs to run during capture/blocking, not permanently. UWP apps return to normal immediately.
-
Keep both running: Grant the affected app a loopback exemption. In an elevated Command Prompt run
CheckNetIsolation LoopbackExempt -a -n=<PackageFamilyName>(or use a free "loopback exemption" GUI utility to tick the app on). This lets that UWP app work while the proxy stays active.
FIREWALL TAB
Firewall
Add Rules:
Click "Add Rules" and GenP will scan your Adobe folder to know which firewall paths are needed and add them to Outbound Rules as required. The "Log" tab will display all actions performed during the process, beginning with "Starting firewall rule creation process" message, and once completed, it will return a "Firewall rule creation process completed" message.
If you are using a third-party firewall it will return a "Third-party firewall detected (Product Name may be stated here). Please manually add these paths to your firewall" message. If this appears, you will need to manually add the rules to your own used firewall instead.
Toggle Rules:
Click "Toggle Rules" and in the dialog box that appears, choose to either "Enable All" or "Disable All" rules for Adobe. It will then move you to the "Log" tab and it will start with a "Starting process to..." message, and dependent on choice made, either followed by "enable all GenP firewall rules" or "disable all GenP firewall rules" message. Once completed, it will return either a "Enable rules process completed" or a "Disable rules process completed" message.
If you are using a third-party firewall it will return a "Third-party firewall detected (Product Name may be stated here). This option only supports Windows Firewall" message. If this appears, you will need to manually add the rules to your own used firewall instead.
Remove Rules:
Click "Remove Rules" and it will then move you to the "Log" tab and it will start with a "Starting firewall rule removal process" message. Once finished, it will return a "Firewall rule removal process completed" message.
If you are using a third-party firewall it will return a "Third-party firewall detected (Product Name may be stated here). This option only supports Windows Firewall" message. If this appears, you will need to manually add the rules to your own used firewall instead.
Open Windows Firewall:
Click "Open Windows Firewall" to open the Windows Defender Firewall with Advanced Security window.
Note: These rules are only applied to Windows Defender Firewall, if you are using a third-party firewall, you will need to add your own rules there instead. If you are using Windows Defender and GenP has detected old antivirus firewall listings, you will need to manually remove them yourself from your WMI, using the provided instructions in "Remove old listings in root\SecurityCenter2 namespace in Windows Management Instrumentation" section.
AGS TAB
Adobe Genuine Services
Remove AGS:
Click "Remove AGS" to remove the Adobe Genuine Service popup by disabling the associated services and removing related files.
The "Log" tab will display all actions performed during the process. Once completed, it will return a "AGS removal completed. Services: x/2, Files: x/9" message.
Dummy AGS:
Click "Dummy AGS" to remove the Adobe Genuine Service popup by making dummy files of specific files to redirect and prevent background activity.
The "Log" tab will display all actions performed during the process. Once completed, it will return a "AGS Dummy Mode completed. Files: x, Reg: x, File: x" message.
If the popup fails to be removed, revert to using one of the three fallback methods as mentioned in the Adobe Genuine Service popup removal method.
Restore AGS:
Click "Restore AGS" to remove all dummy files and restore the original Adobe Genuine Service components back to their original state.
The "Log" tab will display all actions performed during the process.
Note: "Restore AGS" is only available after using "Remove AGS" or "Dummy AGS" - the button is disabled until one of these actions has been applied. This option applies only to popups with the "Genuine Service Alert" header.
LOG TAB
Log
The "Log" tab displays the activity output for GenP and records all actions performed by the tool. This includes processes such as scanning for files, patching operations, firewall rule changes, hosts file updates, WinTrust actions, and any warnings or errors encountered during execution.
Many tools automatically switch to the "Log" tab while running so you can monitor progress in real time. Once a process has finished, the Log will usually return a completion message confirming the outcome of the operation.
Click "Copy" to place the full contents of the Log onto your clipboard. This can be useful when reviewing completed actions or when sharing logs for troubleshooting purposes.
If you encounter issues with patching or believe GenP is not functioning correctly, providing the Log output can help identify the cause or confirm whether the process completed successfully.
Note: When sharing logs for troubleshooting, always include the full Log output rather than only the final lines, as important details about scanning and patching are often recorded earlier in the process.
🛠 HOSTS FILE AUTO-UPDATE
This can only be used with GenP method.
Do not use a virtual IP address from a VPN or Proxy, as it will circumvent local settings such as the hosts file or firewall rules.
Reminder: If using a VPN or Proxy, it is your responsibility to configure features like split tunnelling, custom DNS, or app exclusions within your VPN or Proxy software. These configurations ensure that the hosts file and firewall rules are not bypassed, and that your system's local network settings, including those critical to app behaviour, remain unaffected. Otherwise, you may continue to encounter popups caused by VPN or Proxy interference.
If the popup persists after updating your hosts file with the latest entries, try locating the missing additional domain manually using the method outlined in the "Hosts File / Firewall Rule Manual Setup" section, or by adding it via the "Proxy" tab in GenP.
Hosts file scheduling is now built directly into GenP. Open the "Hosts" tab and click "Schedule Updates" to install a Windows scheduled task named UpdateHostsFile that automatically keeps your hosts file up to date.
If the scheduled task is missed because your device is off, the task is configured to run as soon as possible after the missed scheduled start.
Before running the scheduled task for the first time, you will need to clean your hosts file and remove all existing Adobe-related lines.
To edit your hosts file, open Notepad (as Admin), go to FILE > OPEN > C:\Windows\System32\drivers\etc <- Copy and paste this directory to the file explorer bar, press "Enter" and select the file "hosts".
⚠️ (If you do not see it, make sure you're looking for All file types (*.*) and NOT Text files (*.txt))
Note that when saving your hosts file from Notepad, you need to change the Save as type to All file types (*.*) and NOT Text files (*.txt) or Notepad will always try to tack on a .txt extension.
If you are told that you don't have permission to save the hosts file back into your etc folder because you didn't follow the steps and open Notepad (as Admin), you will have to save it to your desktop instead.
There you should check it has been saved as file and NOT .txt by going to your Explorer window and View > Show > File Name Extensions. Check your hosts file name, if it says hosts.txt you need to remove the .txt and agree to the changes. You then cut and paste it back into your etc folder, saying yes to replace your existing hosts file.
⚙️ SETTING UP THE SCHEDULED TASK
You have a choice between two methods: Basic and Advanced.
-
Basic Method: Updates the hosts file with the latest lines.
-
Advanced Method: For users with additional custom entries in their hosts file unrelated to Adobe. Uses a separate
hosts.plainfile to preserve those entries across updates. Note:hosts.plainmerging is not handled by the built-in GenP "Hosts" tab, see the Advanced Method section below.
Note: The Basic Method provides a simple update without additional configuration. If you use your hosts file for additional entries unrelated to Adobe, use the Advanced Method and add those entries to hosts.plain as instructed below.
BASIC METHOD:
1. Open GenP and navigate to the "Hosts" tab.
2. Click "Schedule Updates" - this opens the Hosts Schedule Updates dialog. Select "Basic", then click "Setup" to install the UpdateHostsFile scheduled task in Task Scheduler.
3. The UpdateHostsFile task is now set up and in "Ready" status, waiting for the scheduled time to run.
Note: If you have Task Scheduler open when the task is created, you may need to close and reopen it to see the newly created task.
Note: If the task fails, first check that your internet connection allows access to the required URL, as mentioned in Option 1 of the Hosts File / Firewall Rule Manual Setup. If connectivity is fine, manually run the UpdateHostsFile task in Task Scheduler. If the hosts file fails to save properly, delete it, rename hosts.bak to hosts, and re-run the task. If it still fails, manually add the lines as described in Option 1.
Compatibility Considerations:
The scheduled task runs as the SYSTEM account. SYSTEM cannot access user-specific directories such as the Desktop, if your GenP folder is saved there (e.g. C:\Users\YourName\Desktop\GenP-v4.2.1\), the task will fail silently. Move the GenP folder to a root directory such as C:\ or D:\, then set up the scheduled task again via Schedule Updates.
Security software may also interfere with scheduled modifications to the hosts file. If updates are not being applied, check your antivirus quarantine or exclusions and add an exception for the GenP folder and C:\Windows\System32\drivers\etc\.
Performance Considerations: On older systems or those with strict security settings, the update may take longer than expected or require manual intervention via the "Run Now" button in the Schedule Updates dialog.
4. To test it immediately, open Task Scheduler, right-click on the UpdateHostsFile task, and select "Run".
First Use:
It will create a backup of your existing hosts file (hosts.bak). Do not delete it. Keeping this backup ensures you can revert to it if needed.
Ongoing Use:
Your hosts file will be updated automatically, with all the latest entries contained between two commented lines, like this:
# START - Adobe Blocklist
(Latest lines contained within here)
# END - Adobe Blocklist
Note: If your device is off during a scheduled execution, Task Scheduler will run the task as soon as possible after the system is powered back on.
Run Task On Demand:
You can manually run the UpdateHostsFile task in Task Scheduler at any time, or click "Update Hosts" on the "Hosts" tab in GenP, to refresh the lines if they have changed.
ADVANCED METHOD – SCHEDULED TASK WITH CUSTOM HOSTS ENTRIES:
Note: If your hosts file contains custom entries (e.g. for non-Adobe apps or services), remove them and instead add them to a new file named hosts.plain within your etc folder (C:\Windows\System32\drivers\etc\hosts.plain). This keeps your custom entries separate so they are not overwritten during updates.
⚠️ Important: The hosts.plain merging is not handled automatically by the built-in GenP Schedule Updates function. If you have custom entries in your hosts file, use "Edit Hosts" on the "Hosts" tab to manage them directly, and be aware that a scheduled update may overwrite those entries. If you require full hosts.plain support with automatic merging, you will need to manage the merge step manually.
If you do not use custom entries, you can skip this entirely, the Basic Method above applies directly.
Setting up the scheduled task:
Open GenP, go to the "Hosts" tab, and click "Schedule Updates" to open the Hosts Schedule Updates dialog. Select "Advanced", then click "Setup" to install the scheduled task.
First Use:
It will create a backup of your existing hosts file (hosts.bak). Do not delete it. Keeping this backup ensures you can revert to it if needed.
Ongoing Use:
Your hosts file will be updated on schedule, with all the latest blocklist entries maintained between:
# START - Adobe Blocklist
(Latest lines contained within here)
# END - Adobe Blocklist
Note: If your device is off during a scheduled execution, Task Scheduler will run the task as soon as possible after the system is powered back on.
Run Task On Demand:
You can manually run the UpdateHostsFile task in Task Scheduler at any time, or click "Update Hosts" on the "Hosts" tab in GenP.
🛠 HOSTS FILE / FIREWALL RULE MANUAL SETUP
These can be used across GenP or Monkrus methods.
-
1️⃣ Option 1: PowerShell Cmd / Manual Hosts File Block;
-
2️⃣ Option 2: FIREWALL RULE on App-in-question.exe (disconnecting access to or from the internet);
-
3️⃣ Option 3: RESTORE (Revert Options 1 and 2) (Fix CC not loading / loading continuously).
Do not use a virtual IP address from a VPN or Proxy, as it will circumvent local settings such as the hosts file or firewall rules.
If using a firewall, ensure it is enabled, or any rules set up through Windows Defender or third-party programs will not be applied.
Reminder: If using a VPN or Proxy, it is your responsibility to configure features like split tunnelling, custom DNS, or app exclusions within your VPN or Proxy software. These configurations ensure that the hosts file and firewall rules are not bypassed, and that your system's local network settings, including those critical to app behaviour, remain unaffected. Otherwise, you may continue to encounter popups caused by VPN or Proxy interference.
🔴 𝗣𝗟𝗘𝗔𝗦𝗘 𝗥𝗘𝗔𝗗 𝗔𝗡𝗗 𝗦𝗧𝗢𝗣 𝗔𝗦𝗞𝗜𝗡𝗚 𝗜𝗧 𝗢𝗩𝗘𝗥 𝗔𝗡𝗗 𝗢𝗩𝗘𝗥 𝗔𝗚𝗔𝗜𝗡 🔴
⚠️ If your antivirus software is managing your Windows Firewall (it should say "firewall is being managed by third-party" or something similar), then all the changes below must be applied in said antivirus firewall (it is up to you to figure out as each has different menus and locations; however, the paths to block are the same). Also, whichever is "the boss" must remain ON.
If you are still getting popups after following these steps, reread Guide 4 and try again. Otherwise, you're out of options.
🗂️ 1️⃣ HOSTS FILE BLOCK LIST (updated regularly)
1. Use the following command in PowerShell (as Admin) if your apps are warning you of unlicensed or non-genuine usage:
Stop-Process -Name "Adobe Desktop Service" -force

⚠️ The hosts lines in the GenP "Update hosts" button option may not always be up-to-date (due to when a new line is found). Therefore, always check to see if the lines added match the ones written in step 3 below. If some lines are missing, either wait for the update or add them manually afterwards.
2. Open Notepad (as Admin), go to FILE > OPEN > C:\Windows\System32\drivers\etc <- Copy and paste this directory to the file explorer bar, press "Enter" and select the file "hosts".
⚠️ (If you do not see it, make sure you're looking for All file types (*.*) and NOT Text files (*.txt))

3. Copy the whole text block from https://a.dove.isdumb.one/list.txt and paste it into a blank line on your hosts file. After that is done, save it.
Note that when saving your hosts file from Notepad, you need to change the Save as type to All file types (*.*) and NOT Text files (*.txt) or Notepad will always try to tack on a .txt extension.
If you are told that you don’t have permission to save the hosts file back into your etc folder because you didn’t follow the steps and open Notepad (as Admin), you will have to save it to your desktop instead.
There you should check it has been saved as file and NOT .txt by going to your Explorer window and View > Show > File Name Extensions. Check your hosts file name, if it says hosts.txt you need to remove the .txt and agree to the changes. You then cut and paste it back into your etc folder, saying yes to replace your existing hosts file.
Done.
Finding New IPs to Block Using GenP's Proxy Tab:
GenP includes two built-in methods for finding and blocking additional Adobe domains without any third-party tools. Both use the "Proxy" tab, which must be set up before use ("Proxy" tab > Setup).
Method 1: Trigger one-off capture (automated)
This is the fastest method. GenP handles the whole process automatically.
1. Go to the "Options" tab. Under "Hosts Options", check "Trigger one-off capture and launch on save".
2. Click "Save Options". A file dialog will open asking you to select the Adobe application that is showing the popup.
3. Select the Adobe app exe. GenP will automatically start the proxy, launch the app silently in the background, and monitor for any Adobe telemetry domains in the captured traffic.
4. When a domain is detected (up to 45 seconds), GenP injects it directly into your hosts file and closes the launched app. Check the "Log" tab for confirmation.
If no domain is captured within 45 seconds, the process will time out. The popup may need to be actively triggered from within the running app during the capture window.
Method 2: Open Log and Add hosts (manual)
Use this if the automated method does not capture the domain, or if you want to inspect the traffic yourself first.
1. "Proxy" tab > Setup (first time only), then "Start / Stop Proxy" to start the proxy and enable the Windows system proxy.
2. Open the affected Adobe application and trigger the licensing check or popup.
3. "Proxy" tab > Open Log to view the captured traffic.
4. Click "Add hosts" in the log window. GenP scans the log for Adobe telemetry domains and injects them directly into your hosts file.
5. Click "Start / Stop Proxy" to turn the proxy off when done.
Note: We do not provide help or support for mitmproxy beyond the built-in GenP integration.
Finding New IPs to Block Using Fiddler Classic:
You can learn how to find any new IPs to block using Fiddler Classic.
1. Download Fiddler Classic from its official site - Fiddler Download:
-
Choose "Personal Use" from the dropdown menu.
-
Enter a valid-looking email (e.g. adobe@fiddler.com). A temporary email is unnecessary.
-
Select any location for "Country/Territory".
-
Agree to the Fiddler End User License Agreement by checking the box.
-
Click "Download for Windows" to get the latest version.
2. Install and run Fiddler Classic to identify new IPs to block.
3. For additional guidance, watch the provided tutorial video - Fiddler Video
Reporting New IPs:
-
To report any new IPs not on the latest list, submit them here - Issues.
-
Do not post them in official GenP community spaces; they will be removed.
-
Check the same page periodically to see if others have contributed additional lines that haven't yet been added to the list.
Note: We do not provide help or support for Fiddler Classic, as it is unrelated to GenP.
🛡 2️⃣ FIREWALL RULE on App-in-question.exe
If the Hosts lines (updated and correctly applied) aren't enough to stop it, you can experiment with the following:
Go to Windows Firewall > Advanced Settings
⚠️ If you see this warning, all firewall rules must be made in your antivirus firewall settings, and not on Windows Defender Firewall (otherwise, they will have no effect) - But just in case, have both enabled.

Outbound Rules should be more than enough. Only do both if the first doesn't work.

Create Outbound rule on each app with issues
The structure is as follows:
File Type: Program
Program: You must select the actual "program" .exe inside the installed folder because the shortcut will not work.
When looking for the program path, we want the Actual Program \ ".exe\" and not the shortcuts. To distinguish them - LEFT: SHORTCUT \".EXE\" | RIGHT: ACTUAL \".EXE\"

Typical path example: C:\Program Files\Adobe\Adobe Photoshop 2026\Photoshop.exe (Find the proper path for the app you need.)
Action: Block Connection
Profile: All
Name: Name it whatever you want to know what's blocking.
⚠️ If the issue persists, you can create the same rules for Inbound.
You will lose internet access going out from the application, at the same time, the license also won't be able to check if good or bad.
Remove Old Listings in root\SecurityCenter2 namespace in Windows Management Instrumentation:
For those receiving GenP detection of a third-party antivirus firewall while only using Windows Defender:
If you previously had a third-party antivirus firewall installed and later uninstalled it, the listing may still remain in the root\SecurityCenter2 namespace within Windows Management Instrumentation (WMI).
The root\SecurityCenter2 namespace in WMI is specifically used to access information about security-related features on a Windows machine, such as antivirus and firewall status.
When using GenP, it checks this namespace, and for some users, it may detect outdated or unused third-party antivirus firewall listings, which can result in an error message.
If you are only using Windows Defender and GenP still detects a third-party antivirus firewall, you will need to remove the old listing as follows:
Open Command Prompt as Admin and run the command WMIC /Node:localhost /Namespace:\\root\SecurityCenter2 Path AntiVirusProduct get * /value.
This will return a list of your antivirus, including any previously installed third-party ones too, from the returned list find the instanceGuid that relates to your old third-party antivirus.
It is a unique identifier for each instance and should look like this as an example: instanceGuid={D68DDC3A-831F-4fae-9E44-DA132C1ACF46}.
You will now need to delete this third-party antivirus firewall listing from the root\SecurityCenter2 namespace in WMI using Windows Management Instrumentation Tester.
Open Command Prompt as Admin and run the command WBEMTEST which will open the Windows Management Instrumentation Tester window.
Click on the "Connect" button and in Namespace enter root/securitycenter2 and click on the "Connect" button.
Click on the "Enum Instances" button and in Enter superclass name enter AntivirusProduct and click on the "OK" button.
In the Query Result window, select the instanceGuid that relates to your old third-party antivirus firewall and click on the "Delete" button.
This should have now removed the selected antivirus firewall listing from the root\SecurityCenter2 namespace in WMI.
Click on the "Close" button and then click on the "Exit" button to close the Windows Management Instrumentation Tester window.
Open Command Prompt as Admin and run the command WMIC /Node:localhost /Namespace:\\root\SecurityCenter2 Path AntiVirusProduct get * /value.
Check the returned list to see if your old third-party antivirus firewall has now been removed and is not being shown.
If you have multiple old listings that are now not needed, you can delete them all using the same method, all apart from the one you are using currently.
🔄 3️⃣ RESTORE (Revert Options 1 and 2)
It's probably due to hosts file edits or firewall rules (including outdated ones) that either conflict with each other or block things that shouldn't be.
Reverse Hosts File Edit:
1. Open Notepad (as Admin), go to FILE > OPEN > C:\Windows\System32\drivers\etc <- Copy and paste this directory to the file explorer bar, press "Enter" and select the file "hosts".
⚠️ (If you do not see it, make sure you're looking for All file types (*.*) and NOT Text files (*.txt))
2. Remove all lines related to Adobe stuff, save the file and reboot your system
Remove all the lines related to "ADOBE" from there and replace with the default hosts lines from ☢️ Guide #4 - NOTHING IS WORKING / FULL CLEANING. Save the file and reboot your system.
Note that when saving your hosts file from Notepad, you need to change the Save as type to All file types (*.*) and NOT Text files (*.txt) or Notepad will always try to tack on a .txt extension.
If you are told that you don’t have permission to save the hosts file back into your etc folder because you didn’t follow the steps and open Notepad (as Admin), you will have to save it to your desktop instead.
There you should check it has been saved as file and NOT .txt by going to your Explorer window and View > Show > File Name Extensions. Check your hosts file name, if it says hosts.txt you need to remove the .txt and agree to the changes. You then cut and paste it back into your etc folder, saying yes to replace your existing hosts file.
This should fix the looping and restore CC to its default behaviour. However, it will also expose the system to the internet, which may cause issues with the apps you currently have installed.
If it happens, do Option 2 and create an Outbound rule for the programs .exe malfunctioning.
Reverse Firewall Rule:
Windows > Windows Firewall > Advanced Settings
Check both Inbound and Outbound.
Disable or remove any rules applied to ADOBE or other firewall rules you created or asked for in the guides.
If neither of these has fixed the issue,
Please uninstall everything thoroughly using ☢️ Guide #4 - NOTHING IS WORKING / FULL CLEANING and restart the respective guide you were following from the beginning. This should ensure a clean slate.
If it's still not working, let us know - but please be specific about:
-
Which method you're using (GenP or Monkrus).
-
Which fixes did not work.
-
What issue is still occurring.
🛠 GENP v4.2.1 - USING THE GOOD PATCH (ALTERNATIVE TO WINTRUST)
This guide explains how to enable and use the Good patch in GenP-v4.2.1.exe. This provides a fallback patching method for cases where WinTrust is unavailable or unsuitable and does not require reinstalling apps. It is also the recommended patching method for Acrobat Pro.
Thanks to Mean-Plantain-7909
Before You Patch:
-
If you previously used WinTrust, untrust any apps you plan to patch with GenP. If WinTrust was applied to all apps, it’s recommended to untrust everything.
-
GenP can be run safely over existing installations and will only modify files where the
Goodpatch is needed. -
Files that do not require this patch will be skipped automatically and may display the log message "No patterns were found or file already patched." This is expected and does not indicate a failure.
Patching Steps:
-
Open
GenP v4.2.1and go to the "Options" tab. -
Check the box for "Enable Good Patch", then save the changes.
-
Once enabled, GenP will display any additional files that require the
Goodpatch and apply it to both newly shown and existing files during patching. -
Run GenP and patch apps as you normally would.
-
To remove the
Goodpatch, uncheck "Enable Good Patch" and save your changes. GenP will no longer apply theGoodpatch when scanning or patching apps.
Gude Log Files:
When the Good patch is active, Adobe's GUDE component may create a dated log file (gude-YYYY-MM-DD.log) each time you open an app. This file can appear in Adobe-related folders across your system, typically in the app installation folder or your user data directories. These are a harmless side effect of the Good patch blocking GUDE's network calls and require no action, they will not affect your apps.
When you first enable the Good patch and click "Save Options", GenP will ask if you want to set up an automatic cleanup scheduled task ("GenP Gude Log Cleanup") that removes these log files every 3 hours. Clicking "Yes" opens a drive selector where you choose which drives to scan, "No" skips the setup and won't ask again, and "Cancel" will remind you next time. If you later disable the Good patch, GenP will ask whether to keep or remove the task.
If you skipped the prompt by clicking "No" and want to set it up later, open config.ini in your GenP folder, find the line GudeDismissed=1 under [Options] and change it to GudeDismissed=0, then save and re-enable the Good patch to trigger the prompt again.
Note:
-
⚠️
GenP-v4.2.1.exewithGoodenabled is an alternative to GenP with WinTrust, but it is not a direct, like-for-like replacement and may behave differently in some apps. -
⚠️ Removing WinTrust and applying the
Goodpatch may not block all popups. Some users may need to use the alternative methods already listed in the guides, such as modified hosts file with any additional domain found, the "Proxy" tab method, or firewall rules. -
This method simply reintroduces the previously used
Goodpatch, which was later replaced by WinTrust due to its improved effectiveness and overall reliability. -
Because these patching methods operate differently, GenP will not provide the same behaviour, stability, or benefits as using
GenP v4.2.1with WinTrust. -
It should be treated strictly as a fallback option, primarily for situations where WinTrust cannot be used (such as Acrobat Pro) or where WinTrust causes instability.
-
This method restores the ability to use the
Goodpatch; apart from this change, all other functionality remains consistent with the normalGenP v4.2.1usage.
Transparency:
- You can open and inspect the
config.inito review the adjustments. To understand the differences, compare it to the originalconfig.ini.
⚠️ Important Notice:
- Do not mix GenP releases. Keep each release in its own dedicated folder.
Version Compatibility:
- This method may be changed or removed at any time, as future updates or improvements could render it unnecessary.
🛠 BLOCK ADOBE POPUPS - PROXY TAB
Adobe popup blocking is now built directly into GenP via the "Proxy" tab. No third-party tools, manual scripts, or certificates are required.
Using the "Proxy" tab:
Open GenP and go to the "Proxy" tab. Follow these steps in order:
1. Setup
Click "Setup" to install the proxy components and certificates on your system. This only needs to be done once.
2. Targeting (optional)
Click "Targeting" if you want to choose which apps the proxy acts on. Leave it on Global (the default, recommended) to cover everything, or switch to Targeted to limit it to up to four apps. Most users can skip this step.
3. Start / Stop Proxy
Click "Start / Stop Proxy" to start the proxy and enable the Windows system proxy that routes Adobe traffic through it.
The proxy is now active. Adobe popup pages will be intercepted and blocked. Click "Start / Stop Proxy" again to turn it all back off.
Open Log:
Click "Open Log" at any time to view the proxy activity log and confirm it is intercepting Adobe traffic correctly.
Remove:
Click "Remove" to fully uninstall the proxy, removing all components, certificates, and system proxy settings when you no longer need it.
⚠️ Note: Disable any active VPN before using the "Proxy" tab. VPNs route traffic outside your local network stack, which can cause Adobe traffic to bypass the local proxy entirely.
⚠️ Note: During Setup, GenP installs mitmproxy and its dependencies (including Python and pip packages). Some antivirus software may briefly scan or flag pip.exe, mitmdump.exe, or Python packages during this process. This is expected behaviour and safe to allow. If anything is quarantined, mark it as trusted and run Setup again.
⚠️ Note: If Python is already installed on your system but Setup fails, open Windows Settings > Apps > Advanced App Settings > App Execution Aliases and toggle off any entries for python.exe or python3.exe mapped to the Microsoft Store app installer. These aliases redirect Python commands to the Store instead of your installed runtime, which can break the Setup process.
⚠️ Reminder: If you have previously trusted any apps via the "WinTrust" tab, untrust them before running the proxy. WinTrust-signed executables may not trigger the licensing check that the proxy is designed to intercept, so the popup may not appear for the proxy to block.
⚠️ Note: We do not offer help or support for mitmproxy beyond what is built into GenP. Questions about mitmproxy itself are outside scope and will be removed.
If the popup persists after setting up the Proxy, check the log via "Open Log" for errors, and ensure no VPN or other system proxy is interfering. If the proxy cannot resolve the issue on your system, use the "Hosts" tab or "Firewall" tab as alternative methods.
🔧 Proxy Troubleshooting
Proxy does not appear active in Windows Settings after starting the proxy:
- The Settings UI can be slow to reflect changes. Open PowerShell as Admin and run
netsh winhttp show proxy. If it shows127.0.0.1:8080the proxy is active. If it shows "no proxy", click "Start / Stop Proxy" on the "Proxy" tab again.
Error: getaddrinfo failed or connection errors in Open Log:
-
The proxy is not running or is being blocked by a firewall or VPN.
-
Click "Start / Stop Proxy" to turn it off, then on again.
Antivirus flagging mitmdump.exe, pip.exe, or Python components:
- This is a common false positive. Mark the flagged files as trusted in your antivirus. If Setup was interrupted, run it again once the exclusion is in place.
Certificate not trusted / HTTPS interception not working:
-
The mitmproxy root certificate must be in
Trusted Root Certification Authorities, not inPersonal. -
If it is missing or in the wrong store, click "Remove" on the "Proxy" tab, then run "Setup" again to reinstall everything cleanly.
Adobe popup still appears after proxy is active:
-
Confirm "Start / Stop Proxy" shows the proxy as running and the Windows system proxy as enabled (the status label reflects both).
-
Open "Open Log" and if no Adobe traffic is appearing, the app may not be routing through the proxy. Check that no VPN or other system proxy is overriding the local proxy setting.
-
If traffic is visible in the log but the popup still appears, the domain involved may not yet be in the blocklist. Use "Add Hosts" in the log window to inject any newly detected domains directly into your hosts file.
-
If the "Proxy" tab cannot resolve the popup on your system, use the "Hosts" tab or "Firewall" tab as alternative or combined methods.
❓ Why only *.adobestats.io and ic.adobe.io are targeted
These are the domains Adobe uses for licensing telemetry and to initiate popup flows. Blocking or intercepting them cuts off the callback channels Adobe relies on to report license status and trigger popups.
Why not block other Adobe domains?
-
adobe.io- powers Adobe I/O APIs, authentication, and cloud integrations. Not used for licensing popups. Blocking it breaks sign-in, syncing, and SDK integrations without stopping popups. -
hstatic.io- a CDN for static files such as JavaScript, CSS, and images. Not associated with licensing checks. Blocking it corrupts UI rendering without affecting popups.
Future-proofing: If Adobe shifts popup telemetry to a new domain, the blocklist may need extending. Only add a domain after confirming it is involved in licensing or popup traffic, the narrower the blocklist, the less risk of collateral breakage to other Adobe services.
🔄 Restore AppsPanel (vanilla)
Only if you want to restore from the previously made backup and move to official paid functionality, use the following command:
cp "C:\Program Files (x86)\Common Files\Adobe\Adobe Desktop Common\AppsPanel\AppsPanelBL.dll.bak" "C:\Program Files (x86)\Common Files\Adobe\Adobe Desktop Common\AppsPanel\AppsPanelBL.dll"
If no errors are printed to the console, restart your machine. Upon startup, Creative Cloud will be returned to normal functionality.
☠️ ❮ Return to GenP Wiki
🐭 ❮ Return to GenP Lemmy
🦦 ❮ Return to GenP Stoat
Last revised by Mean-Plantain-7909