Showing posts with label Tatting. Show all posts

Wednesday, June 17, 2020

Pouch For Cell Phone and Keys

This a craft from waste - sort of project from long aga.  My husband bought himself a lovely wine coloured kurta from Fab India. He wanted me to shorten the sleeves. I loved the colour and the texture of the material so much, that I did not want to throw away the 4" pieces. I put them into my scrap box and waited for something to happen.

Something did happen.  I was downloading some old tatting books from the Internet Archive (Public Domain Library) and found some lovely lace patterns. I decided to use one of them as an insertion. Here's the result.


Here's how I went about making this pouch.  Click on the picture to enlarge.

Once you are done with the sewing you can make a tatted lace and use it as an insertion. I am not done with this pouch yet. I've been going through some beading patterns I could use, to hang this pouch around my neck, and I plan to do some embroidery on what were the sleeves.

I haven't decided on a pattern yet. I want the whole thing to look elegant: with each of the design elements complementing the others rather than clamouring with each other for attention.

You'll find the instructions for the insertion in a previous post.

Sunday, March 31, 2013

Free Instructions for Split Ring Beaded Tatted Edging

I assume you are familiar with split ring tatting.

Since it's split ring tatting, we obviously need to wind two tatting shuttles. Load the thread of one shuttle with the required number of beads if you want beads only on one side of the edging, and both shuttles if you want the beads on both edges.


Step 1: With Shuttle 1, ring of 5 ds, 5 p sep by 5 ds,  5 ds close ring.
Step 2: With shuttle 1, ring of 5 ds, join to the last picot of the 1st ring, 5 ds, 3 p sep by 1 ds, 5 ds, p, 5 ds close ring. If you want beads in your picots, place the required number of beads in your ring.
Step 3: With shuttle 2, push 1 bead into the ring and 5 ds, join to the 1 st picot of the 1st ring, 5 ds, p,ds, beaded picot, ds, p, 5ds, p, 5ds close ring.
Step 4: Split ring of 5 ds, join to the last p of the 3rd ring, 5 ds, p, 5ds/ 5ds, join to the 3rd p of the 2nd ring, 5 ds, p, 5ds, close ring.
Step 5: Split ring of 5ds, 2 p sep by 5ds, 5ds/  5ds, 2 p sep by 5ds, 5ds, close ring.
Step 6 to end: Rep from step 2

Saturday, March 09, 2013

Instructions for Tatted Bookmark from Wedding Card


I find it difficult to throw away exorbitantly priced wedding invitations.


I have always wondered why some people think it is important to spend so much on such cards knowing that it's going to serve no purpose once the wedding is over

I have saved up quite a few such cards. Now, I am trying to find ways to use them up. I have come up with the idea of using them as embellished books marks (they are more exciting and definitely more personalized than simply cutting the cards into book mark sized strips). Besides, I have a lot of friends who will treasure such personalized book marks.

Here is one such book mark embellished with split ring tatting. It does make a cute book mark.
Here are the instructions:

Step 1: Ring of 5 ds, 3 p sep by 5 ds, 5 ds, close ring.

Step 2: Ring of 5 ds, join to the 3rd p of prev ring, 5 ds, 2 p sep by 5 ds, 5ds, close ring.

Step 3: Repeat step 2 more times.

Step 4 (Split ring): Ring of 5 ds, join to the 1st p of the 1st ring, 5 ds/ 5 ds, join to the 3rd p of the last ring, 5 ds close ring.

Step 5 (Split Ring): 5 ds, p 5 ds/ 5ds, p, 5ds, close ring.

Work 3 more split rings.

Tuesday, February 26, 2013

Tatted Insertion for a Mobile Pouch

Here are the tatting instructions for the mobiles and keys pouch I posted in my Needlecraft blog.

Row 1
Step 1: *Ring of 7ds, p, 7ds, close ring and reverse work.

Step 2: Ch of 7ds, p, 7ds. reverse work.

Step 3: Ring of 7ds, join to the picot of the previous ring, 7ds close ring.


Repeat from * until you've made the required length of lace to go around the pouch.

Finish with - Ring of 7ds join to the picot of prev. ring, 7ds, close ring.

Row 2: Start with the ring shown in the last pic.
Step 1: Ring of 7ds, join to the picot of the 1st ring of row 1, 7ds, close ring and reverse work.

The basic design is the same as row 1. But here, you join the rings picots to the corresponding ring picots of row 1. Finish neatly.

Tip:
A really neat trick I learnt is to neatly glue loose ends on the wrong side of work with clear nail 

Sunday, April 03, 2011

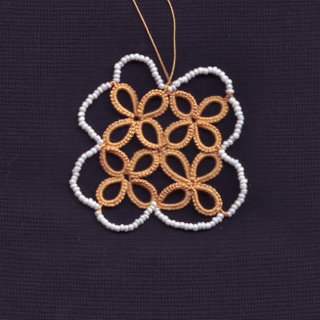
Motif #17 in Progress


I started this pattern about 6 months ago. I don't remember from where I took it. Probablyt from one of the antique tatting patterns on Public Domain. I have modifies it slightly. But as usually it is not what I wanted. The pattern sems to have ruffled. So I have to redo it.

Wind yarn in two shuttles using CTM.

The Central Ring
SR 1: 5-5-5-5-5/-5 (I think it will look better if I change the 5 to 7)

The next rnd:

{SR 2: 5-5-5/5 r.w.
Chain: 5-5 r.w.
*R1:5+5(join to the first picot of SR2)
Ch: 5-5
R1:5+5(join to the next picot of SR2)
ch:5-7 (using the core thread, lock join to the next picot pof SR2)r.w
Ch of 5 ds. r.w} 1st cluster.
R: 5 + (join to the next p of the 2nd p of the central ring) 5 - 5 -5.
Ch:7+5
Chain of 5ds, join to the free picot of the last chain in the prev cluster. Rep from *

Wednesday, July 08, 2009

Motif #16

Motif 16 was supposed to be a earring. Somewhere along the line it evolved into a flower and finally a book mark.


I made it a point this time to write down instructions as I went along.

I worked this motif with 2 shuttles using CTM.

50 beads (36 for the pattern + how many ever for the tail) in SHUTTLE 1.
36 beads (22 for the pattern + how many ever for the tail) in SHUTTLE 2.

RING 1: With SHUTTLE 1 form a ring sliding 3 beads in the ring thread (5ds, slide in a bead and make a picot) 3 times, 5ds close ring. Slide a bead close to the base of the ring just formed.

RING 2: With SHUTTLE 1 form a ring sliding 2 beads in the ring thread 5ds, join to the 3rd picot of the prev. ring, (5ds, 1 picot with a bead in it) 2 times, 5ds close ring. Slide a bead close to the base of the ring just formed.

RINGS 3-5: SAME AS RING 2

RING 6: is a split ring and also the 1st split ring in this design.

SR1 - With SHUTTLE 1, 5ds join to the 3rd picot of Ring 5. 5ds/ SHUTTLE 2 - slide 1 bead close to the base of Ring 1, 5ds, join to the 1st picot of Ring 1, 5ds, close ring.

SR2: With SHUTTLE 1, Slide 6 beads close to the base of SR1. Form a ring sliding 1 bead in the ring thread, 5ds, picot with a bead in it, 5ds / With SHUTTLE 2 Slide 6 beads close to the base of SR1, 5ds picot with a bead in it 5ds, close ring.

SR 3-9: Same as SR2 - slide just 1 bead close to the base of the prev SR instead of 6.

Slide all the remaining beads close to the last SR cut and tie.

NOTE: For each extra SR with beads you need 2 extra beads on each Shuttle. While you should have a bead in the ring thread for the first half of the SR, the bead remains in the shuttle thread itsel for the second half.

Motif #15 - Beaded Bookmark

Here is another beaded bookmark. 
I've always wondered how to get beads into rings - we usually see beads in picots.
I tried and the result is what you see here.

I got a few beads into the ring. I realised after sliding the beads from the ring thread close to the ds that a length of shuttle thread was bare. So I slid in the same number of beads from the shuttle thread before making the next ds.

Looking at the bookmark now, I wonder if maybe I should have used 1 bead less for the inner ring formed by the shuttle thread.


The pattern itself is very simple - just the basic rings and chains.


I have written down the instructions for working the basic ring and chain with beads - the rest, I am yet to write down.

Ring: 12 beads in ring thread and 12 beads in the shuttle thread.
[1ds, slide 3 beads from the ring thread and 3 beads from the shuttle thread close to the ds, 1ds, p] 3 times, 1 ds. slide 3 beads each from the ring and the shuttle threads close to the ds, p 1ds, close ring, rw - the extra p at the end is to join the chain to the base of the ring when working chains on the other side of the rings.

Chain: 8 beads each in ball and shuttle threads. * 1 ds slide 4 beads each from ball and shuttle threads close to the ds, 1 ds, * p, rep from * to * rw.

Bead Count:
- for 1 ring - 24 beads - 12 in the ring thread and 12 in the shuttle thread.
- for 1 chain - 16 beads - 8 in the ball thread and 8 in the shuttle thread.

Criical comments on this pattern, and any pointing out of mistakes will be apprec

Thursday, December 25, 2008

Motif # 14

Tatted Bookmark

Click on picture to enlarge.

Here is a bookmark I designed. Most of my projects start out as one thing and end up as something else. I started this as a heart in Teri Dusenbury's book Tatting Hearts. I made a mistake and thought I could convert it into an edging. It finally became a bookmark with split rings and beads. 

The beading has not turned out as well as I would have liked. I should have added fewer beads for the diamonds and a few more for the hearts. I do hope the hearts look like hearts. The picots to which the beads are attached should have been smaller.

BTW, Teri Dusenbury had a blog Lover's knots with some wonderfull beaded tatting. Does anybody know whether she has moved it or totally removed it from the web?

Motif #13

Here is motif 13. This mat looked plain. So I have embellished it with a feather stitch border and beads. The motif is from a needlework magazine "Needle And Thread" published by Coats India. This is the only Needlework magazine in India.

Motif #12

This motif is from the book "Forty Original Designs in Tatting By Nelli Hall Youngbery" downloaded from the Antique pattern library. This is pattern no:26 in the book.


It is obvious that I have to work on joining the various chains neatly to the base of the ring.

The chains in my motif look pretty twisted. Now that I have figured out the instructions, I'll try working the same pattern in a single colour.

Friday, October 31, 2008

Motif # 11- Hanky Edging


This edging is my motif #11.

Here are the instructions:

Using ball & shutle thread,
Insert a steel crochet hook through the edge of the hanky, pull the ball thread through the fabric. 
* Pass the shuttle thread through the loop and tighten the loop. Now work a ch of 4 ds, 3 p sep by 2 ds, 4 ds.

Insert the hook through the edge of the fabric at a distance of about 3/4 cm in such a way the chain forms a small acrh and pull the ball thread throughthe fabric using a crochet hook as before. Rep from * and work around the hanky.

Monday, May 26, 2008

Motif # 10

I have been trying to make a corner for the edging in Motif 7. I have come up with 2 possibilities.

Here is the first-


And here is the second.


I like the second one. I would like some input on this.

Monday, November 05, 2007

Motif # 9

I found an interesting tatting pattern with a needlewoven center here. 

I don't remmber which book. I completed this motif during the first week of August but I somehow never got around to posting it until now.

Motif #8


The flower and the leaf are my motif #8. They are actually pieces I discarded because of mistakes. I was going through all my tadded motif, the good pieces and the mistakes I just could not through away. I felt these two would look good tofether and here they are.

Sunday, June 17, 2007

Motif # 7

This pattern is from the book called "Old and New designs in Tatting - Book 11", Page 5, Pattern 1122.


The pattern looked like an interesting candidate for split ring tatting.

I am working a hanky edging using this pattern.

I have made a small mistake.
Wondering how to turn when I reach a corner. I'll figure it out by the time I actually reach a corner.
Here is the edging worked in shaded pink in thread size 40.


Tuesday, June 12, 2007

Motif # 6


So, here is motif # 6.

I wanted to do something simple and challenging. With so much going on about Celtic tatting, I decided to give the basic ring and chain a Celtic twist. This bookmark is the result.
I worked this pattern using 2 balls and 2 shuttles. Putting the balls threads into separate little bags and sealing the ends, leaving just enough space for the thread to pass through, saves time. ( No need to waste time constantly untangling threads.)

I thought placing it on red velvet will look very good. But it looks gaudy.

I am back to good old scanning. The scanned image is on the right.


Wednesday, January 10, 2007

Motif # 5


This particular pattern seemed to be jinxed. I tried it at least 5 times and kept making mistakes. I finally gave up and dedicated myself to some housework that was long overdue. I tried it again today and decided to include some beads.

The motif is a modified version from the book Tatted hearts.

I have to try the same motif adding a couple of more sts to the larger ring in the 2nd round and see what happens.

Saturday, November 25, 2006

Motif # 4


This is a yahoo Celtic tatting group. I tried it out and the result is motif # 4. I have also added beads here. 
I start out wanting to do one thing, get side-tracked and end up doing something else.

Tatting has reduced my reading time.
I want to try out some Irish crochet motifs. And all those pictures of Sharon B's class in progess has me itching to work some embroidery samples. Looks like I have to organise myself if I don't want to be overwhelmed.

Sunday, November 19, 2006

Motif # 3


I will use chains in motif #4. I realise that the extra chain will open out the groups at the base. I hope it will form a triangle so I can use it as a corner insertion for a hand towel.


This motif is a slightly modified version of a DMC pattern. I don't know the name of the book as I have only a couple of pages. The heading one of the pages says Motifs for applique. The page also has the DMC symbol.

I reduced the number of ds in the rings and the number of picots in the chain. As per the original instructions, the pattern is worked in 2 rounds. I used split rings to work this pattern.

Better write dOWN all the instructions before I forget.

The chain between rings 11 and 16 is another change I made. The original pattern has no chain.

I don't like the way the motif looks after I weaved in the ends. I is obvious I need lots more practice. I usually use the ends to sew the motif to fabric.

I want to try out the same motif increasing the number of picots in the rings. maybe that will be Number 4.

I was wondering how to use beads instead of chains in the drawing above.

Then I saw Sharon's comment. It never occurred to me that I could work the chain last. That meant I did not have to think too much. Just use the beads instead of chains and I could not resist trying it out immediately. So motif #3 turned out differently than intended.

Friday, November 17, 2006

Motif # 2

This is my first Celtic Motif. 

Here is my first attempt all wrong mainly because I did not take the time to read the instructions properly - as a result I did not cross over the long chain before joining the 2nd clover. I thought I could somehow adjust it and make it look right. But I could not.


I got it right the second time.