

Showing posts with label glitter. Show all posts
Showing posts with label glitter. Show all posts
Friday, May 25, 2012
Kawaii Nails for Fanime
Fanime is today and tomorrow in San Jose and my gf/hand model Chrissy asked me to do light purple rounded kawaii nails to match her Espeon costume! I did clear acrylics and just painted on French tips in a light lavender color, added some purple 3D acrylic bows, glitter, rhinestones and some metallic pearls. Ohhh la la.

Friday, March 16, 2012
St. Pattys Mani!!
I painted my nails just 2 coats of Mint Sorbet by Sally Hansen. And added green iridescent heart shaped glitters in the shape of a clover. Four hearts with their pointy parts together make the cutest little lucky clovers! I adhered them with brush on nail glue and layered a few coats of Seche Vite to seal them in.


Tuesday, February 21, 2012
Pink Glitter & White French Mani
Classic pink & whites with a twist! I accidentally grabbed my sparkly pink glitter vomit mix instead of my regular clear pink I use on my nail bed. There's all kinds of glitter in there: pink metallic tinsel, pink and purple dust glitter, iridescent hexagons and stars. Basically the kitchen sink. I placed the white cut out acrylic tips sort of lower on my nail bed than I usually would so it has room to grow out for a couple weeks. I used Krazy Glue to adhere my tips on and it was so bad! It took forever to dry! I only put my acrylics back on because I had found a fresh bottle of Krazy Glue in my craft box and I have been out of glue for over 2 months now! Well, that's all folks, and prolly for a little while unless I feel inspired to dress up these nails enough to post!


Thursday, February 2, 2012
Valentines Mani #2: Jungle Funky French
This wasn't what I had in mind when I sat down to do a second valentines mani- it just happened. It's a super sparkly animal print funky French that had tiny pops of pink (it looks purple but it's pink) inside the cheetah print. I used metallic pink hexagon glitter to and outlined it in black to make a cheetah print. Underneath this is a white French tip, covered in Metallica by Wet n Wild, with an unnamed silver glitter on top of the silver part. Then I added a black zebra. It's fun, sparkly and is definitely a contender for actual Valentines day nails.


Wednesday, February 1, 2012
Valentine's Day Mani #1!!
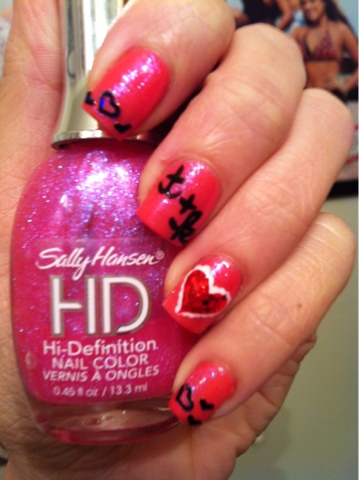
Ahhhh.... Valentines Day... One of my favorite holidays because I love pink and hearts! Hopefully, I'll get flowers for that vase I got for Christmas (wink, Kevin!! ;) so here is my first mani for Vday! I painte on 2 coats of Blazed by Wet N Wild, and a coat of LCD by Sally Hansen HD. I then used a dotting tool to make white dots that touch in the shape of a heart on my ring finger. I filled this in with red striper polish, and used clear coat and a dotting tool to cover the red part of the heart in 1mm red hexagons. I used a black polish to paint on the "T+K" carefully and added black heart cut out decals to match! The T+K stands for Tina plus Kevin! Tina plus Kevin Forever! ;)


Sunday, January 22, 2012
Deborah Lippmann Happy Birthday Dupe Franken
So I got a lil mad scientisty and tried to make a dupe franken of Deborahh Lippmann's Happy Birthday polish! I just dumped red,gold, silver, green, blue, pink, and purple metallic 1mm hexagon glitters and green, blue and purple fine glitters into a bottle of clear coat that I never use. I painted just one coat on top of Black Out by Sally Hansen. Its not perfect, as some of the green and blue color of the hex glitter washed away in the bottle; and my dupe franken has fine glitter and not tiny square glitter. Might fool the untrained eye, but hey, it's DIY or die!!!


Friday, January 20, 2012
Green Glitter Fishy Scales
Ya, it could be another kinda animal that has scales, but it's scales nonetheless. I used my bright neon green Franken as a base for my entire nails then slowly and painstakingly placed on iridescent neon green 1mm hexs down. Basically that's it. It's a fun and easy nail art to do that even looks good in the dark!


Monday, January 9, 2012
Pastels and Kawaii Totoro Nail Art!!
Last night, my girlfriend and dear hand model Chrissy came over with yet another kawaii nail idea: Totoro nails!! Unfortunately my boyfriend was blocking my nail area while he played Kinect on Xbox so we had to make due with the polishes that were in my train case from the morning's out of the house gig I did on my friend Jessica. I laid down two coats of the creamy minty green "mint sorbet" by Sally Hansen. Followed by black spiky balls with white eyes, a white bunny, and a grey bunny- I will repost this with the names of the characters- sorry, Totoro fans!
My pink with flowers nail art is "Raise Awareness" by Essie. Laden with a rainbow glitter my dad gave me for Christmas and topped with "Mint Sorbet" and white flowers. The centers of the flowers are these pastel shiny dots that are actually the eyes that pop out of my playboy glitter! They were loose floating around the bag the glitter box came in and I saved them for a rainy day. Not so rainy was last night, but I was glad to find use for them!

My pink with flowers nail art is "Raise Awareness" by Essie. Laden with a rainbow glitter my dad gave me for Christmas and topped with "Mint Sorbet" and white flowers. The centers of the flowers are these pastel shiny dots that are actually the eyes that pop out of my playboy glitter! They were loose floating around the bag the glitter box came in and I saved them for a rainy day. Not so rainy was last night, but I was glad to find use for them!


Thursday, December 29, 2011
Gold and brown new years mani
This is the sequel to yesterday's swatch of Bling Dyanasty by OPI. On top of the gold base color, I took the largest dotting tool I had to add random large chocolate brown (OPIs I Brake For Manicures) circles all over the nail. I filled in the empty spaces with the smaller end of the same dotting tool. I let this dry, and it looked cool by itself (sorry no pic!) then went over it with a thin coat of top coat to adhere tiny gold hexagons. I used a dotting tool dipped in top coat to individually place a single hexagon in the center of each large brown dot. On my accent ring nail, I placed a row of gold hexagons along the nail/cuticle line. It takes two coats of Seche Vite to encase the hexagons completely to a smooth finish, but shown is just with one coat. Hopefully I'll have time to squeeze in another new years inspired mani; this one is cute, but not blingy enough to ring in 2012!


Wednesday, December 21, 2011
Christmas / Winter Mani #2
So this is basically a redo of my Xmas mani #1 from yesterday. I just did the same design in different colors because my nail polish fell off in whole pieces!
I used Sinful Colors Snow Me White as a base, sponged on China Glaze For Audrey in the middle and Wet N Wild NERDS Need Love Too on the tips. Dotted on some silver and blue hex glitter, a coat of Sally Hansen Diamonds, a coat of Sally Hansen Strobelight glitter, and Seche Vite on top.


I used Sinful Colors Snow Me White as a base, sponged on China Glaze For Audrey in the middle and Wet N Wild NERDS Need Love Too on the tips. Dotted on some silver and blue hex glitter, a coat of Sally Hansen Diamonds, a coat of Sally Hansen Strobelight glitter, and Seche Vite on top.


Tuesday, December 20, 2011
Christmas Mani #1

I'm back you guys! Temporarily taking pictures with my iphone until I can find my computer-camera cord!
So I used Wet N Wild's Red Red for the base, the sponged on Snow Me White by Sinful Colors. I coated it once over the whole nail with Diamonds by Sally Hansen. Then used a dotting tool to add random 1mm red hexagons, and sprinkled Sterling fine glitter by Martha Stewart on top. Then 2 coats of Seche Vite to encase the gritty glitter feel!
I'm going to try to upload 2 more Christmas manis before Christmas so wish me luck!!
Missed you guys!!
Thursday, November 10, 2011
Fimo Fruits and Rhinestone Flowers (Pic Heavy!)

I finally got around to using my Fimo fruit slices! I've had them for a really long time and I've been dying to try them out! When I sat down to give me boring white French tips a fill, I had no idea what I was in for...

After my backfill, I drilled the tips super thin, but they were still white tips, so I had to cover them up with some color. I used a combination of blue, green, and pink iridescent hexagon glitters, lightly, just to add some color. The white remains as the base color. I topped with some fruit slices, mostly kiwi, strawberry, lemon, lime, Fuji apple, and watermelon. Then encased with a THICK layer of clear acrylic. (filed, shaped, and buffed, yadah yadah yadah...)

And added some colorful flowers made from rhinestones!

These are the things I used: the pink, green, and blue hex, Fimo fruit slice wheel, and 2 sizes of multi colored rhinestones: 1.5 mm and 2 mm, which I adhered at the very end with a lil top coat (after 3 coats of top coat on each nail dried)

Because I was just applying the fruits to the tips, there isn't much space to have a variety of the full shapes. I used a craft knife to slice some of the fruit in half.

(Carefully)! I did this to the limes, lemons, and the strawberries. It allowed for more fruit to be placed on each nail, and they laid a bit better on the nail too!

Here are all the fruits that came in my Fimo wheel (which I got for about $5 at Sally Beauty Supply). The ones I know for sure are lemon, strawberry, kiwi, 2 watermelons, lime, leaves, apple, and Fuji apple. The ones I'm not sure about are papaya, kumquat, and banana. But they are so weird looking that I'm not sure what they look like and I probably won't be using them. ><


Thursday, October 27, 2011
Gold and Black Glitter Tips + Cross

I, admittedly a little tipsy, decided last night at 2 am, I was going to drill out my blue green glitter tips off my left hand and replace them with any color combo of my twin bro's picking. He was staying over at our place and was watching TV as I did my nails. He said black and gold so I used my new black hexagons on top of an old acrylic mix from last year that was Martha Stewart's Copper fine glitter and clear acrylic. I dumped a bunch of black hexs into the mix and applied it to my tips.
After shaping and buffing, I applied the black hexs to my index finger in the form of a cross. The center is a small silver rhinestones, with larger black rhinestones on the edges of the lines. I really like this and will probably try again is different colors later on.


Tuesday, October 25, 2011
Nail Mail Haul + Reviews

So this is my most recent and final nail art haul from www.banggood.com . They're located out of China, and like I said in my last nail haul from them, you're getting the same stuff you get off Amazon but for dirt cheap + no shipping. This 12 color hexagon set on Amazon is trying to sell for $17!! I got it for $3.

The tiny jars ha twist on lids, as with most glitter pots, and there was only a small about of spillage. I wouldn't even call it spillage, it was just a few hexagons stuck to the larger container. I swept them off with a paper towel onto my glitter laden carpet and that was that. They are about 1mm (sorry I didn't have my ruler out to show you) and they are small enough to stick on to your nail with top coat and not have it be sticking out off the nail in one corner, also small enough to throw into a glitter acrylic mix (pic in my next post). But large enough to tell they are hexagons. The only problem I have with these is that some of them are straight metallic (red, black, silver, copper, pink/purple) and some are irridecent (pink, blue, purple, green, yellow, and clear/white). The only reason why I don't like that is because I was REALLY hoping the green would be a straight metallic green so I could do red/green/silver acrylic mix for Xmas! But I still have time before Xmas to figure it out or find a new green hexagon. LOL.....


These are 10 colors of striping tape that I also ordered... kind of an impulse buy because they were I think $1.50 for all ten colors? I just thought since I was ordering stuff, and everything takes so long to get here that I might as well stock up on stuff.

I'm not quite sure how I will use the stripe tape, but here you can see that it is very thin, but you can still clearly see it's pretty metallic blue color. As I was just testing the size of the tape on my nail and wasn't planning on leaving it there, I must report that it came off very easily and remained sticky, so if you place it in the wrong spot, it will be easy to pull off and move over.

The tape was so thin and hard to tell which color was which
, I thought while I had everything out during my nail mail photo shoot, I labeled all of the striping tape bags so it would be easy to grab the correct on quickly while doing nails.

And last but not least, a new set of double ended dotting tools (whose handles match my acrylic art brush set from my last haul) a wheel of flat backed pearls, and some 1.5mm and 2mm rhinestones, I thought I swore off rhinestones forever but these were too cheaply priced to pass up- I think each wheel was about $2 for about 24000 stones/wheel. And to answer the question you always ask: how do they hold up under top coat? They don't! Never do that! Rhinestones always look best if they are the very very last thing to apply! Even Swarovski crystals- you don't want to top coat those either! They lose their tiny facets under a layer of topcoat and therefore, lose their sparkle.

Here are my flat black pearls^^. Love them, haven't really seen them being sold before. I got these because my girlfriend Chrissy loves everything azn and cutesy so these are prolly going to only be used on her nails- maybe I'll take the red and blacks though.
Oh yeah and I also got a pair of tweezers for picking up tiny things like Fimo slices, glitter shapes, rhinestones, etc. They were 79 cents each and they work great!
I hope you guys check out www.banggood.com because they are cheap, good quality, and they have free shipping!! Only took about 2 1/2 weeks to get here, but hey, I didn't pay a penny for shipping :)
Saturday, October 22, 2011
Blue & Green Iridescent Glitter Star Acrylics (underside pic! yikes!)


I used a hot pink acrylic mixed with clear to make my nail bed color. I call it "Pinky Promise", I drilled out the area closest to the cuticle and only applied the pink there. It's really hard to see it in the pictures because of the lighting but the idea was to have it look REALLY pink at the very base of the nail. See picture below:

For the tips, I drilled out the smile line and filed off the thick layer of clear acrylic I'd been painting on during this whole challenge (ew it was sooo stained and gross). Filled the tips with a mix of the Martha Stewart Iridescent Collection fine glitter and glitter stars, encased in clear, and shaped and buffed smooth.
I'm going to eventually post this method for tip-fill and back-fill but most of my followers don't use acrylic (and if I'm wrong PLEASE correct me Where the acrylic girls at!)

This shot is just a "front"? view of my nails to show you how thick/thin they are with my actual nail + acrylic + glitter + stars + top acrylic + top coat.
WARNING WARNING WARNING WARNING WARNING WARNING
KINDA GROSS PICTURE COMING UP...
I'm only posting this shot because my twin bro and my boyfriend saw the undersides of my nails last night and were appalled to see that I'd had my acrylics on for SO LONG (Aug 30th - today) that the tips I originally glued on had grown out completely and all that was left was my natural nails underneath and you can see them EWWW!
Does this make sense? Look at this picture:

Ew! those are my hella long and gross natural nails! They just have acrylic on top-- And the middle one is still yellowish from when I attempted water marbling during the challenge and it got green under my nail....
For the record I am removing these acrylics, cutting my natural nails, and reapplying a fresh set in about a week. But I had to show you my dirty little secret :(
Subscribe to:
Posts (Atom)