React-Redux is a tool that helps you manage the state (data) of your React app in one central place. This makes your app easier to maintain and debug as it grows.
It is based on three fundamental principles:
- Single Source of Truth: All app data lives in the store.
- State is Read-Only: You can’t change data directly; you send an action to request a change.
- Changes with Pure Functions: Reducers take the current state and an action, and return the updated state.
Core Concepts of React-Redux
To effectively use React-Redux, you need to understand some key concepts:
1. Store
The store is a central place that holds all the app’s data. It’s the only place where the data can be changed.
2. Actions
An action is a simple JavaScript object that tells Redux what change to make. It must have a type and can optionally include a payload with extra information.
const incrementAction = {
    type: 'INCREMENT',
    payload: 1
};
3. Reducers
A reducer is a pure function that decides how the state changes when an action is received. It takes the current state and an action, and returns a new state.
const counterReducer = (state = 0, action) => {
    switch (action.type) {
        case 'INCREMENT':
            return state + action.payload;
        case 'DECREMENT':
            return state - action.payload;
        default:
            return state;
    }
};
4. Dispatch
Dispatch is used to send an action to the Redux store. This triggers the reducer to update the state.
store.dispatch(incrementAction);5. Selectors
A selector is a function that is used to get specific data from the Redux store.
const selectCount = (state) => state.count;6. Provider
The Provider component makes the Redux store available to all React components in the app.
import { Provider } from 'react-redux';

<Provider store={store}>
    <App />
</Provider>;
7. connect()
connect() is used to connect a React component to the Redux store so it can access state and dispatch actions.
import { connect } from 'react-redux';

const Counter = ({ count, increment }) => (
    <div>
        <h1>{count}</h1>
        <button onClick={increment}>Increment</button>
    </div>
);

const mapStateToProps = (state) => ({
    count: state.count
});

const mapDispatchToProps = (dispatch) => ({
    increment: () => dispatch({ type: 'INCREMENT', payload: 1 })
});

export default connect(mapStateToProps, mapDispatchToProps)(Counter);
Working of React-Redux
React-Redux connects React components to the Redux store, ensuring smooth state management across your app. Here’s a simplified breakdown of how it works:
1. Setting Up the Store
The Redux store holds the entire state of your application. It’s created using createStore() and initialized with a reducer to define how the state changes.
const store = createStore(counterReducer);2. Dispatching Actions
Actions are plain objects that describe changes in state. These actions are dispatched to inform Redux of a state change.
store.dispatch({ type: 'INCREMENT', payload: 1 });3. Reducers Update the State
A reducer is a function that updates the state based on the action type. It takes the current state and action, then returns a new state.
const counterReducer = (state = 0, action) => {
    switch (action.type) {
        case 'INCREMENT': return state + action.payload;
        default: return state;
    }
};
4. Connecting Components with connect()
React-Redux’s connect() function connects React components to the Redux store, allowing components to access state and dispatch actions.
const mapStateToProps = (state) => ({ count: state });
const mapDispatchToProps = (dispatch) => ({
    increment: () => dispatch({ type: 'INCREMENT', payload: 1 })
});
5. Using Provider to Make Store Accessible
The Provider component makes the store available to all components in the app.
<Provider store={store}><App /></Provider>6. Re-Renders and Reactivity
React-Redux ensures that only components dependent on updated state will re-render, optimizing performance.
Steps To Implement React-Redux
These are the steps to follow to use Redux in a React application.
Step 1: Setting Up the Project
First, create a new React app using create-react-app:
npx create-react-app react-redux-counter
cd react-redux-counter
Next, install redux and react-redux:
npm install redux react-reduxFolder Structure
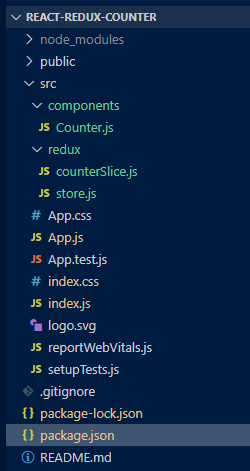
Dependencies
"dependencies": {
    "@testing-library/jest-dom": "^5.17.0",
    "@testing-library/react": "^13.4.0",
    "@testing-library/user-event": "^13.5.0",
    "react": "^18.3.1",
    "react-dom": "^18.3.1",
    "react-redux": "^9.1.2",
    "react-scripts": "5.0.1",
    "redux": "^5.0.1",
    "web-vitals": "^2.1.4"
}
Step 2: Define Action Types
You need to define action types, which represent the actions that will update the state.
// src/redux/actionTypes.js
export const INCREMENT = 'INCREMENT';
export const DECREMENT = 'DECREMENT';
Step 3: Action Creators
Action creators are functions that return action objects.
// src/redux/actions.js
import { INCREMENT, DECREMENT } from "./actionTypes";

export const increment = () => ({
    type: INCREMENT,
});

export const decrement = () => ({
    type: DECREMENT,
});
Step 4: Reducers
Reducers specify how the application's state changes in response to actions. The reducer function receives the current state and action, and returns the updated state.
// src/redux/reducer.js
import { INCREMENT, DECREMENT } from "./actionTypes";

const initialState = {
    count: 0,
};

const counterReducer = (state = initialState, action) => {
    switch (action.type) {
        case INCREMENT:
            return { ...state, count: state.count + 1 };
        case DECREMENT:
            return { ...state, count: state.count - 1 };
        default:
            return state;
    }
};

export default counterReducer;
Step 5: Create the Redux Store
Now, create the Redux store using the createStore function from Redux.
// src/redux/store.js
import { createStore } from 'redux';
import counterReducer from './reducer';

const store = createStore(counterReducer);

export default store;
Step 6: Wrap the App with the Redux Provider
Next, wrap your entire application with the Redux Provider to make the store accessible to all components in the app.
/* src/index.css */

body {
    font-family: Arial, sans-serif;
    text-align: center;
}

button {
    margin: 5px;
    padding: 10px;
    font-size: 16px;
}
import React from 'react';
import ReactDOM from 'react-dom';
import { Provider } from 'react-redux';
import store from './redux/store';
import App from './App';

ReactDOM.render(
    <Provider store={store}>
        <App />
    </Provider>,
    document.getElementById('root')
);
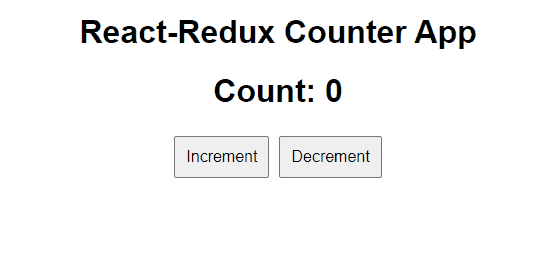
import React from "react";
import Counter from "./components/Counter";

function App() {
    return (
        <div className="App">
            <h1>React-Redux Counter App</h1>
            <Counter />
        </div>
    );
}

export default App;
import React from "react";
import { useSelector, useDispatch } from "react-redux";
import { increment, decrement } from "../redux/actions";

const Counter = () => {
    const count = useSelector((state) => state.count);
    const dispatch = useDispatch();

    return (
        <div>
            <p>Count: {count}</p>
            <button onClick={() => dispatch(increment())}>Increment</button>
            <button onClick={() => dispatch(decrement())}>Decrement</button>
        </div>
    );
};

export default Counter;
To start the application run the following command.
npm startOutput: