Automated testing plays role in building reliable applications. In Spring Boot, MockMvc allows us to test the web layer without starting the full HTTP server. With @AutoConfigureMockMvc, Spring Boot injects a MockMvc instance that we can use to simulate HTTP requests and verify responses.
What is MockMvc
- Part of Spring Test, MockMvc simulates HTTP requests to Spring MVC controllers.
- No real server is started; instead, it runs in-memory.
- Useful for controller layer tests with full Spring context.
Step-by-Step Implementation
Step 1. Create the project
Create a project using Spring Initializr and set the
- Project: Maven
- Language: Java
- Spring Boot: 3.x (e.g. 3.3.3)
- Packaging: Jar
- Java: 17
- Dependencies: Spring Web, Thymeleaf, Spring Boot DevTools (optional)
Download the generated zip and unzip/import it into your IDE as an existing Maven project.
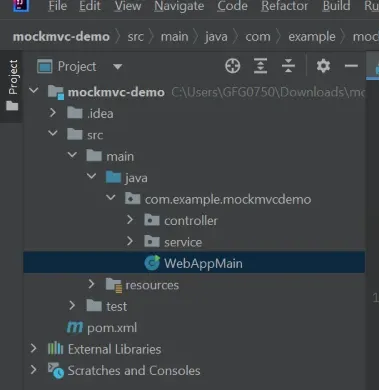
Project Structure:
pom.xml
<?xml version="1.0" encoding="UTF-8"?>
<project xmlns="https://maven.apache.org/POM/4.0.0"
         xmlns:xsi="https://www.w3.org/2001/XMLSchema-instance"
         xsi:schemaLocation="https://maven.apache.org/POM/4.0.0
                             https://maven.apache.org/xsd/maven-4.0.0.xsd">
  <modelVersion>4.0.0</modelVersion>

  <groupId>com.example</groupId>
  <artifactId>mockmvc-demo</artifactId>
  <version>0.0.1-SNAPSHOT</version>

  <parent>
    <groupId>org.springframework.boot</groupId>
    <artifactId>spring-boot-starter-parent</artifactId>
    <version>3.3.3</version>
    <relativePath/>
  </parent>

  <properties>
    <java.version>17</java.version>
  </properties>

  <dependencies>
    <!-- Web + Thymeleaf -->
    <dependency>
      <groupId>org.springframework.boot</groupId>
      <artifactId>spring-boot-starter-web</artifactId>
    </dependency>
    <dependency>
      <groupId>org.springframework.boot</groupId>
      <artifactId>spring-boot-starter-thymeleaf</artifactId>
    </dependency>

    <!-- Tests: JUnit 5, MockMvc, AssertJ, Mockito included -->
    <dependency>
      <groupId>org.springframework.boot</groupId>
      <artifactId>spring-boot-starter-test</artifactId>
      <scope>test</scope>
    </dependency>
  </dependencies>

  <build>
    <plugins>
      <plugin>
        <groupId>org.springframework.boot</groupId>
        <artifactId>spring-boot-maven-plugin</artifactId>
      </plugin>
    </plugins>
  </build>
</project>
Step 2. Main Class
- Create WebAppMain.java to bootstrap the Spring Boot application.
- src->main->java->com->example->mockmvcdemo->WebAppMain.java
package com.example.mockmvcdemo;

import org.springframework.boot.SpringApplication;
import org.springframework.boot.autoconfigure.SpringBootApplication;

@SpringBootApplication
public class WebAppMain {
    public static void main(String[] args) {
        SpringApplication.run(WebAppMain.class, args);
    }
}
Step 3. Create Service Class
- Implement WelcomeService to provide business logic for greetings.
- src->main->java->com->example->mockmvcdemo->service->WelcomeService.java
package com.example.mockmvcdemo.service;

import org.springframework.stereotype.Service;

@Service
public class WelcomeService {

    public String greetingMessage1(String name) {
        return String.format("Welcome, %s to the world of programming!!!", name);
    }

    public String greetingMessage2(String attendee) {
        return String.format("Welldone, %s You are selected to the contest!!!", attendee);
    }
}
Step 4. Create Controller
- Implement WelcomeMvcController with @GetMapping endpoints to render views and add model attributes.
- src->main->java->com->example->mockmvcdemo->controller->WelcomeMvcController.java
package com.example.mockmvcdemo.controller;

import com.example.mockmvcdemo.service.WelcomeService;
import org.springframework.stereotype.Controller;
import org.springframework.ui.Model;
import org.springframework.web.bind.annotation.GetMapping;

@Controller
public class WelcomeMvcController {

    private final WelcomeService welcomeService;

    public WelcomeMvcController(WelcomeService welcomeService) {
        this.welcomeService = welcomeService;
    }

    @GetMapping("/")
    public String greeting1(String name, Model model) {
        model.addAttribute("welcome", welcomeService.greetingMessage1(name));
        return "welcome-page";
    }

    @GetMapping("/event")
    public String greeting2(String name, Model model) {
        model.addAttribute("welcomeToEvent", welcomeService.greetingMessage2(name));
        return "event-page";
    }
}
Step 5. Crteate Thymeleaf template
- Create simple HTML pages (welcome-page.html, event-page.html) to display dynamic content.
- src->main->resources->templates->welcome->page.html
- src->main->resources->templates->event-page.html
page.html
<!doctype html>
<html lang="en">
<head><meta charset="UTF-8"/><title>Welcome</title></head>
<body>
  <h1 th:text="${welcome}">Default welcome</h1>
</body>
</html>
event-page.html
<!doctype html>
<html lang="en">
<head><meta charset="UTF-8"/><title>Event</title></head>
<body>
  <h1 th:text="${welcomeToEvent}">Default event text</h1>
</body>
</html>
Note: If you plan to use slice tests (@WebMvcTest) you can omit templates in that setup; full-context tests with @SpringBootTest + view resolution require templates.
Step 6. Integration-style MockMvc tests
- Write WelcomeWebAppTest.java using @SpringBootTest and @AutoConfigureMockMvc to test the full web layer
- src->test->java->com->example->mockmvcdemo->WelcomeWebAppTest.java
package com.example.mockmvcdemo;

import org.junit.jupiter.api.Test;
import org.springframework.beans.factory.annotation.Autowired;
import org.springframework.boot.test.autoconfigure.web.servlet.AutoConfigureMockMvc;
import org.springframework.boot.test.context.SpringBootTest;
import org.springframework.test.web.servlet.MockMvc;

import static org.springframework.test.web.servlet.request.MockMvcRequestBuilders.get;
import static org.springframework.test.web.servlet.result.MockMvcResultMatchers.*;
import static org.springframework.test.web.servlet.result.MockMvcResultHandlers.print;

@SpringBootTest
@AutoConfigureMockMvc
class WelcomeWebAppTest {

    @Autowired
    private MockMvc mockMvc;

    @Test
    void testWelcome() throws Exception {
        mockMvc.perform(get("/").param("name", "Geeks"))
                .andExpect(status().isOk())
                .andExpect(model().attribute("welcome",
                        "Welcome, Geeks to the world of programming!!!"))
                .andExpect(view().name("welcome-page"))
                .andDo(print());
    }

    @Test
    void testWelcomeToEvent() throws Exception {
        mockMvc.perform(get("/event").param("name", "Geeks"))
                .andExpect(status().isOk())
                .andExpect(model().attribute("welcomeToEvent",
                        "Welldone, Geeks You are selected to the contest!!!"))
                .andExpect(view().name("event-page"))
                .andDo(print());
    }
}
Step 7. Faster slice test with @WebMvcTest
- Write faster unit-style tests using @WebMvcTest and @MockBean for controller layer isolation.
- src->test->java->com->example->mockmvcdemo->WelcomeControllerSliceTest.java
package com.example.mockmvcdemo;
import com.example.mockmvcdemo.controller.WelcomeMvcController;
import com.example.mockmvcdemo.service.WelcomeService;
import org.junit.jupiter.api.Test;
import org.springframework.beans.factory.annotation.Autowired;
import org.springframework.boot.test.autoconfigure.web.servlet.WebMvcTest;
import org.springframework.boot.test.mock.mockito.MockBean;
import org.springframework.test.web.servlet.MockMvc;
import static org.mockito.Mockito.when;
import static org.springframework.test.web.servlet.request.MockMvcRequestBuilders.get;
import static org.springframework.test.web.servlet.result.MockMvcResultMatchers.*;

@WebMvcTest(controllers = WelcomeMvcController.class)
class WelcomeControllerSliceTest {
    @Autowired
    private MockMvc mockMvc;
    @MockBean
    private WelcomeService welcomeService;
    @Test
    void testWelcome_Slice() throws Exception {
        when(welcomeService.greetingMessage1("Geeks"))
                .thenReturn("Welcome, Geeks to the world of programming!!!");
        mockMvc.perform(get("/").param("name", "Geeks"))
                .andExpect(status().isOk())
                .andExpect(model().attribute("welcome",
                        "Welcome, Geeks to the world of programming!!!"))
                .andExpect(view().name("welcome-page"));
    }
}
Step 8. Run Application
Start the application with mvn spring-boot:run and execute tests with mvn test or IDE run option.
mvn spring-boot:run
Testing in the Browser
http://localhost:8080/?name=Geeks
- The / endpoint in WelcomeMvcController is called.
- WelcomeService generates the greeting:
Welcome, Geeks to the world of programming!!!

- welcome-page.html renders the greeting dynamically.
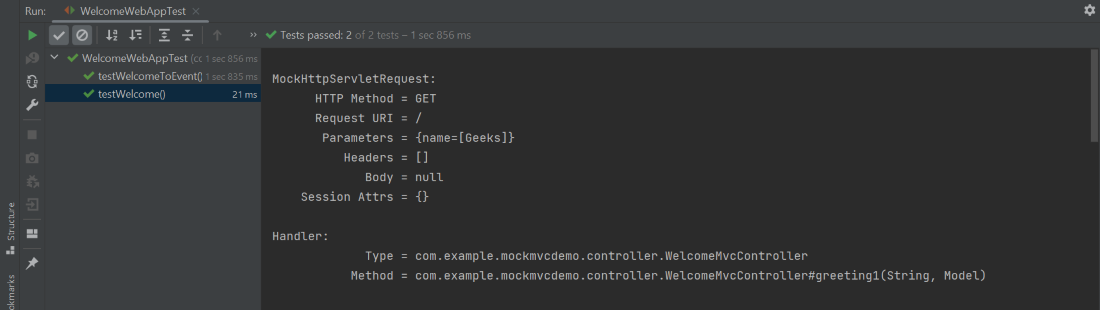
Running Tests Using Maven
- Runs both integration tests (@SpringBootTest) and slice tests (@WebMvcTest).
- MockMvc simulates HTTP requests to controller endpoints.
- Verifies HTTP status, model attributes and view names.
- Test results are printed in the console.
Execute all tests with:
mvn test