Next.js provides built-in image optimization using the next/image component to deliver responsive, efficient images and improve performance and Core Web Vitals.
- Supports lazy and eager loading for faster page loads.
- Uses caching and custom loaders for efficient delivery.
- Prevents layout shift by reserving image space.
- Enables priority loading and responsive layouts.
Note: <Image /> in Next.js is similar to the HTML <img> element as both accept src and alt, but <Image /> adds automatic optimization, lazy loading, and performance benefits.
Core Web Vitals
It is a set of standardized metrics that help to measure user experience on the web. These metrics score how quickly the page content loads.
There are three Core Web Vitals:
- Largest Contentful Paint (LCP)
- First Input Delay (FID)
- Cumulative Layout Shift (CLS)
1. Largest Contentful Paint (LCP)
It measures the time in seconds and how quickly the web page's primary content is loaded. Basically, it measures the time from when the page loads until the image is rendered. Lower the LCP better the result. We can improve the LCP by optimizing the rendering path, CSS, and images.

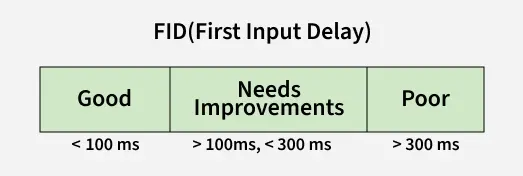
2. First Input Delay (FID)
It measures the time from when you click on the link to when they respond. We can improve FID by reducing JavaScript execution time and the impact of third-party code.
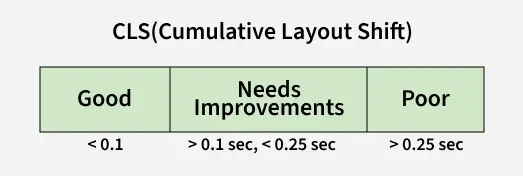
3. Cumulative Layout Shift (CLS)
CLS measures how many times a web page has shifted, basically, It is used to calculate the visual stability of a web page. We can improve CLS by including width and height attributes on your image.
Steps to run NextJS and its Image component
Step 1: NodeJS should be installed on your computer. To know how to install NodeJS click here.
Step 2: Create a new file and change the directory to the created file. Use the below command in the terminal:
cd file_nameStep 3: Create the Next app using the below command:
npx create-next-app app_name Project structure:

Step 4: Import the image component in pages/index.js
import Image from "next/image";Image Optimization
The Image component in nextjs automatically optimize the images added in the application. But it also provide some properties to specificly optimize the Images.
| Property | Type | Required | Description |
|---|---|---|---|
| src | string | Yes | The path or URL to the image. |
| alt | string | Yes | Descriptive text for the image, used for accessibility. |
| width | number | Yes | The width of the image in pixels. |
| height | number | Yes | The height of the image in pixels. |
| quality | number (1-100, default: 75) | No | The quality of the optimized image. |
| priority | boolean(default: false) | No | If true, the image will be considered high priority and preloaded. |
| placeholder | blur, empty | No | Specifies a placeholder while the image is loading. |
| blurDataURL | string | No | A base64-encoded image used as a placeholder if placeholder="blur". |
| unoptimized | boolean (default: false) | No | If true, the image will not be optimized. |
| loader | function | No | A custom function for loading the image, allowing integration with a third-party image provider. |
| onLoadingComplete | function | No | A callback function that is called when the image has finished loading. |
1. Image load:
We can specify the loading behavior of the image and when you scroll down the next image automatically loads. There are two types of loading:
- eager: Loads image immediately.
- lazy: By default in the image component. Loading until an image is visible.
Example:
import Image from "next/image";

const index = () => {
    return (
        <>
            <h1 style={{ color: 'green' }}>GeeksForGeeks</h1>
            <Image src="/gfgg.png" alt="Loading"
                width={500}
                height={550}
                loading="eager"
            />
        </>
    );
};
export default index;
Note: eager is not good for optimization use priority prop instead.
Step to run the application: Run your Next app using the following command:
npm run devOutput:

2. Priority pro
Sometimes we need to preload the crucial images in advance using priority = {true} which leads to a boost in LCP.
Example:
//Priority prop
import Image from "next/image";

const index = () => {
    return (
        <>
            <h1 style={{ color: 'green' }}>GeeksForGeeks</h1>
            <Image src="/gfgg.png" alt="Loading"
                width={500}
                height={550}
                priority={true}
            />
        </>
    );
};
export default index;
3. Image Sizing
As we have seen to improve CLS we need to include the width and height of the image. This allows the browser to preserve space for the image before it loads. If you don't know the image size, you can use layout = "fill".
layout = "fill" responds to its parent dimensions.
The layout provides four values:
- fill
- intrinsic
- responsive
- fixed
Example:
import Image from "next/image";

const index = () => {
    return (
        <>
            <h1 style={{ color: 'green' }}>GeeksForGeeks</h1>
            <Image src="/gfgg.png" alt="Loading"
                layout="fill"
            />
        </>
    );
};
export default index;
Output:

4. ObjectFit prop
It is used with layout = "fill". It sets how an image should resize to fit in the container.
Objectfit provides four values:
- contain
- cover
- fill
- none
Example:
//ObjectFit
import Image from "next/image";

const index = () => {
    return (
        <>
            <h1 style={{ color: 'green' }}>GeeksForGeeks</h1>
            <Image src="/gfgg.png" alt="Loading"

                layout="fill"
                objectFit="contain"

            />
        </>
    );
};
export default index;
Output:

5. Placeholder prop
It is used as a fallback image when an image is loading. It is also called a temporary alternative or loading indicator. The placeholder indicates that the image is being loaded.
Placeholder provides two values:
- blur
- empty
Example:
//Placeholder
import Image from "next/image";

const index = () => {
    return (
        <>
            <h1 style={{ color: 'green' }}>GeeksForGeeks</h1>
            <Image src="/gfgg.png" alt="Loading"
                width={600}
                height={450}

                placeholder="blur"
                blurDataURL="data:image/png;base64,[IMAGE_CODE_FROM_PNG_PIXEL]"

            />
        </>
    );
};
export default index;
Output:
6. Quality prop
We can define the quality of the image by providing values between 1 to 100. The default value is 75.

In the above image, we can see
"http://localhost:3000/_next/image?url=/gfgg.png&w=640&q=75"
q= 75 which is the default value of quality.
We can adjust the value of quality by using the command like this:
quality="100"Example:
//Quality of the image
import Image from "next/image";

const index = () => {
    return (
        <>
            <h1 style={{ color: 'green' }}>GeeksForGeeks</h1>
            <Image src="/gfgg.png" alt="Loading"
                width={500}
                height={550}
                quality="100"
            />
        </>
    );
};
export default index;
Output:
