Widgets are the UI elements provided by an application for accessing some of its features remotely either from Home Screens or Lock Screens. Widgets can be Static or Dynamic meaning that the display elements don't change (Static) or change (Dynamic) with time. Through this article, let's demonstrate the implementation of a Dynamic widget. In our case, we shall change the display with respect to time using a Thread.
Steps for Creating Dynamic Widget
Step 1: Create a New Project
To create a new project in Android Studio please refer to How to Create/Start a New Project in Android Studio.
Note: that Select Kotlin as the Programming Language.
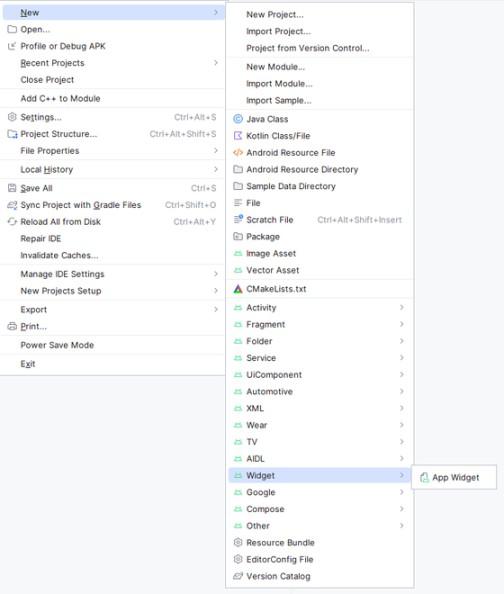
Step 2: Add the App Widget to the Project
- Right-Click on the app, move the cursor to new, find the "Widget" option at the end, select it.
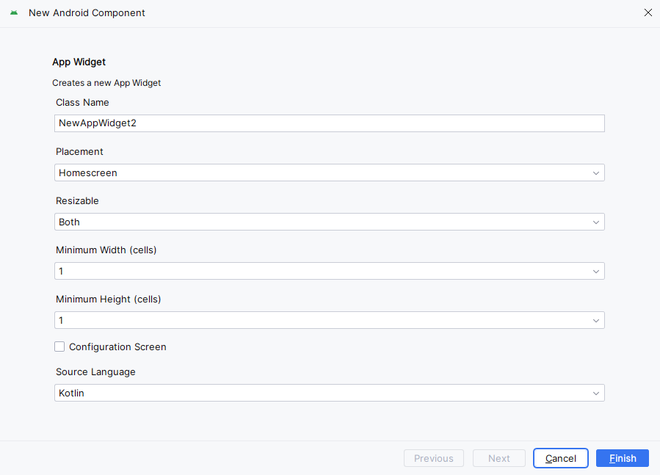
- Specify the required properties for the widget such as min.width and height, config file and preferred language, etc, and proceed. Files are automatically generated.
Step 3: What to program? Where to program?
In our application, since we wish to display two messages "Just do it" & "You are awesome" (the users may choose their own messages) one after the other simultaneously, we would be implementing a thread for generating a pause (of 1 second) in between.
The entire programming (back-end) is done in the newly created NewAppWidget.kt, Kotlin Class File in the Main Source Folder.
NewAppWidget.kt:
package org.geeksforgeeks.demo

import android.appwidget.AppWidgetManager
import android.appwidget.AppWidgetProvider
import android.content.Context
import android.widget.RemoteViews

class NewAppWidget : AppWidgetProvider() {
    override fun onUpdate(
        context: Context,
        appWidgetManager: AppWidgetManager,
        appWidgetIds: IntArray
    ) {

        // There may be multiple widgets active, so update all of them
        for (appWidgetId in appWidgetIds) {
            updateAppWidget(context, appWidgetManager, appWidgetId)
        }
    }

    override fun onEnabled(context: Context) {
        // functionality for when the first widget is created
    }

    override fun onDisabled(context: Context) {
        // functionality for when the last widget is disabled
    }
}

internal fun updateAppWidget(
    context: Context,
    appWidgetManager: AppWidgetManager,
    appWidgetId: Int
) {
    Thread {
        while (true) {

            // Construct the RemoteViews object
            val views = RemoteViews(context.packageName, R.layout.new_app_widget)
            views.setTextViewText(R.id.appwidget_text, "Just do it")

            // Instruct the widget manager to update the widget
            appWidgetManager.updateAppWidget(appWidgetId, views)
            Thread.sleep(1000)

            // Construct the RemoteViews object
            views.setTextViewText(R.id.appwidget_text, "You are awesome")

            // Instruct the widget manager to update the widget
            appWidgetManager.updateAppWidget(appWidgetId, views)
            Thread.sleep(1000)
        }
    }.start()
}
Step 4: Design the Widget
Navigate to app > res > layout > new_app_widget.xml and customise the widget as below
new_app_widget.xml:
<RelativeLayout xmlns:android="http://schemas.android.com/apk/res/android"
    style="@style/Widget.Demo.AppWidget.Container"
    android:layout_width="match_parent"
    android:layout_height="match_parent"
    android:theme="@style/Theme.Demo.AppWidgetContainer">

    <TextView
        android:id="@+id/appwidget_text"
        style="@style/Widget.Demo.AppWidget.InnerView"
        android:layout_width="wrap_content"
        android:layout_height="wrap_content"
        android:layout_centerHorizontal="true"
        android:layout_centerVertical="true"
        android:backgroundTint="@android:color/transparent"
        android:layout_margin="8dp"
        android:contentDescription="@string/appwidget_text"
        android:text="@string/appwidget_text"
        android:textSize="24sp"
        android:textStyle="bold|italic" />
</RelativeLayout>