Creating a server with TypeScript using Node.js and Express is a good alternative to using JavaScript because it makes it easier to manage complex applications. It also helps when you need to collaborate with a distributed team of developers.
TypeScript offers benefits like:
All of these benefits make TypeScript a great choice for a smoother development experience, especially in evolving projects.
In this article, we’ll explore a beginner-friendly way to configure TypeScript in an Express app, and gain an understanding of the fundamental constraints that accompany it. To follow along, you should have:
Check out the GitHub repository for the source code; the main branch has the TypeScript project, and the JavaScript branch has the JavaScript version.
Editor’s note: This article was updated by Muhammed Ali in March 2025 to expand coverage of linting with ESLint + Prettier, add information on watchers (e.g., tsc –watch, nodemon), and provide deeper sample code, including demonstrating a small CRUD API.
“Express TypeScript” refers to using the Express framework within a TypeScript project. It involves writing your Express server code in TypeScript, leveraging type definitions (often provided via @types/express) to enable type checking, auto-completion, and better documentation. Essentially, it’s about combining Express’s flexibility with TypeScript’s safety and developer tooling benefits.
TypeScript is a great companion for Express because it provides static typing, which can catch potential bugs during development. With TypeScript, you can define interfaces for requests, responses, and even middleware, making your Express code more predictable and maintainable. This leads to improved developer productivity and more robust applications.
The Replay is a weekly newsletter for dev and engineering leaders.
Delivered once a week, it's your curated guide to the most important conversations around frontend dev, emerging AI tools, and the state of modern software.
This article provides a comprehensive guide on setting up a Node.js and Express project with TypeScript, covering essential steps such as initializing the project, configuring TypeScript, structuring the project, and implementing typed environment variables.
It will also detail how to set up a basic CRUD API, including creating controllers, routes, and error handling middleware. Additionally, the guide includes instructions for linting with ESLint and Prettier, automating development with nodemon, and running the project in watch mode.
The goal is to demonstrate best practices for building a robust, type-safe Express application using TypeScript. Let’s get started:
Start with the following:
mkdir ts-node-express && cd ts-node-express
npm init -y
Then install dependencies:
npm install express dotenv npm install -D typescript ts-node @types/node @types/express nodemon eslint prettier
The DotEnv package is used to read environment variables from a .env file.
The -D, or --dev, flag directs the package manager to install these libraries as development dependencies.
ts-node — Enables running TypeScript files directly without pre-compiling to JavaScript@types/node — Provides TypeScript type definitions for Node.js core modules@types/express — Adds TypeScript type definitions for the Express frameworknodemon — Automatically restarts the server when file changes are detected during developmenteslint — Lints the code to catch errors and enforce coding standardsprettier — Formats the code to ensure consistent style across the projectInstalling these packages will add a new devDependencies object to the package.json file, featuring version details for each package, as shown below:
{
...
   "devDependencies": {
    "@types/express": "^5.0.1",
    "@types/node": "^22.13.11",
    "eslint": "^9.22.0",
    "nodemon": "^3.1.9",
    "prettier": "^3.5.3",
    "ts-node": "^10.9.2",
    "typescript": "^5.8.2"
  }
}
Every TypeScript project utilizes a configuration file to manage various project settings. The tsconfig.json file, which serves as the TypeScript configuration file, outlines these default options and offers the flexibility to modify or customize compiler settings to suit your needs.
The tsconfig.json file is usually placed at the project’s root. To generate this file, use the following tsc command, initiating the TypeScript compiler:
npx tsc --init
Once you execute this command, you’ll notice the tsconfig.json file is created at the root of your project directory. This file contains the default compiler options, as depicted in the image below:
{
  "compilerOptions": {
    "target": "ES2020",
    "module": "commonjs",
    "outDir": "./dist",
    "rootDir": "./src",
    "strict": true,
    "esModuleInterop": true,
    "skipLibCheck": true,
    "forceConsistentCasingInFileNames": true
  },
  "include": ["src/**/*"],
  "exclude": ["node_modules"]
}
Develop this project structure:
ts-node-express/
├── src/
│   ├── config/
│   │   └── config.ts        // Load and type environment variables
│   ├── controllers/
│   │   └── itemController.ts  // CRUD logic for "items"
│   ├── middlewares/
│   │   └── errorHandler.ts    // Global typed error handling middleware
│   ├── models/
│   │   └── item.ts          // Define item type and in-memory storage
│   ├── routes/
│   │   └── itemRoutes.ts    // Express routes for items
│   ├── app.ts               // Express app configuration (middlewares, routes)
│   └── server.ts            // Start the server
├── .env                     // Environment variables
├── package.json             // Project scripts, dependencies, etc.
├── tsconfig.json            // TypeScript configuration
├── .eslintrc.js             // ESLint configuration
└── .prettierrc              // Prettier configuration
File: src/config/config.ts:
import dotenv from 'dotenv';

dotenv.config();

interface Config {
  port: number;
  nodeEnv: string;
}

const config: Config = {
  port: Number(process.env.PORT) || 3000,
  nodeEnv: process.env.NODE_ENV || 'development',
};

export default config;
This file loads your environment variables from a .env file and provides type checking.
File: .env
PORT=3000
NODE_ENV=development
File: src/models/item.ts:
export interface Item {
  id: number;
  name: string;
}

export let items: Item[] = [];
We define a simple Item type and an in-memory array to store items.
File: src/controllers/itemController.ts:
import { Request, Response, NextFunction } from 'express';
import { items, Item } from '../models/item';

// Create an item
export const createItem = (req: Request, res: Response, next: NextFunction) => {
  try {
    const { name } = req.body;
    const newItem: Item = { id: Date.now(), name };
    items.push(newItem);
    res.status(201).json(newItem);
  } catch (error) {
    next(error);
  }
};

// Read all items
export const getItems = (req: Request, res: Response, next: NextFunction) => {
  try {
    res.json(items);
  } catch (error) {
    next(error);
  }
};

// Read single item
export const getItemById = (req: Request, res: Response, next: NextFunction) => {
  try {
    const id = parseInt(req.params.id, 10);
    const item = items.find((i) => i.id === id);
    if (!item) {
      res.status(404).json({ message: 'Item not found' });
      return;
    }
    res.json(item);
  } catch (error) {
    next(error);
  }
};

// Update an item
export const updateItem = (req: Request, res: Response, next: NextFunction) => {
  try {
    const id = parseInt(req.params.id, 10);
    const { name } = req.body;
    const itemIndex = items.findIndex((i) => i.id === id);
    if (itemIndex === -1) {
      res.status(404).json({ message: 'Item not found' });
      return;
    }
    items[itemIndex].name = name;
    res.json(items[itemIndex]);
  } catch (error) {
    next(error);
  }
};

// Delete an item
export const deleteItem = (req: Request, res: Response, next: NextFunction) => {
  try {
    const id = parseInt(req.params.id, 10);
    const itemIndex = items.findIndex((i) => i.id === id);
    if (itemIndex === -1) {
      res.status(404).json({ message: 'Item not found' });
      return;
    }
    const deletedItem = items.splice(itemIndex, 1)[0];
    res.json(deletedItem);
  } catch (error) {
    next(error);
  }
};
Each controller function includes basic error handling using a try/catch block, passing errors to the Next middleware.
File: src/routes/itemRoutes.ts:
import { Router } from 'express';
import {
  createItem,
  getItems,
  getItemById,
  updateItem,
  deleteItem,
} from '../controllers/itemController';

const router = Router();

router.get('/', getItems);
router.get('/:id', getItemById);
router.post('/', createItem);
router.put('/:id', updateItem);
router.delete('/:id', deleteItem);

export default router;
This file defines the RESTful routes for your CRUD operations.
File: src/middlewares/errorHandler.ts:
import { Request, Response, NextFunction } from 'express';

export interface AppError extends Error {
  status?: number;
}

export const errorHandler = (
  err: AppError,
  req: Request,
  res: Response,
  next: NextFunction
) => {
  console.error(err);
  res.status(err.status || 500).json({
    message: err.message || 'Internal Server Error',
  });
};
This middleware catches errors thrown in your routes/controllers and sends a consistent, type-safe JSON error response.
File: src/app.ts:
import express from 'express';
import itemRoutes from './routes/itemRoutes';
import { errorHandler } from './middlewares/errorHandler';

const app = express();

app.use(express.json());

// Routes
app.use('/api/items', itemRoutes);

// Global error handler (should be after routes)
app.use(errorHandler);

export default app;
File: src/server.ts:
import app from './app';
import config from './config/config';

app.listen(config.port, () => {
  console.log(`Server running on port ${config.port}`);
});
ESLint and Prettier are essential tools for maintaining code quality and consistency in a TypeScript project. ESLint is a linter that analyzes code for potential errors, stylistic issues, and adherence to best practices, while Prettier is a code formatter that ensures a consistent code style across the entire codebase.
In the .eslintrc.js paste in the following code:
module.exports = {
  parser: '@typescript-eslint/parser',
  plugins: ['@typescript-eslint'],
  extends: [
    'eslint:recommended',
    'plugin:@typescript-eslint/recommended',
    'prettier',
  ],
  env: {
    node: true,
    es6: true,
  },
};
In .prettierrc put the following:
{
  "semi": true,
  "singleQuote": true,
  "trailingComma": "all"
}
In your package.json, add scripts for TypeScript compilation and automatic server restart. For example:
{
  "scripts": {
    "build": "tsc",
    "start": "node dist/server.js",
    "dev": "nodemon --watch 'src/**/*.ts' --exec 'ts-node' src/server.ts",
    "lint": "eslint 'src/**/*.ts'"
  },
  ...
}
tsc --watch — For continuous compilation in development.nodemon — To automatically restart your server when files change.Start the server:
npm run dev
Your Express API is now running with TypeScript: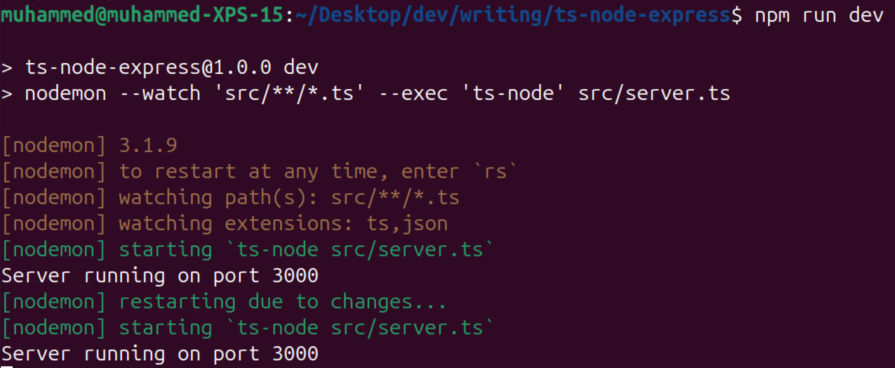
Create an item to send a POST request with a JSON payload to the /api/items endpoint:
curl -X POST http://localhost:3000/api/items \
  -H "Content-Type: application/json" \
  -d '{"name": "Sample Item"}'
Update an item:
curl -X PUT http://localhost:3000/api/items/1234567890 \
  -H "Content-Type: application/json" \
  -d '{"name": "Updated Item Name"}'
These commands assume your server is running on port 3000 and the routes are defined as described in the project setup. Adjust the item ID and JSON data as needed.
Below is an article that explains how to set up testing with Jest in your TypeScript Node.js Express project. This guide builds on the CRUD API project structure we discussed earlier.
Testing is a significant part of the software development lifecycle. It helps ensure that your application behaves as expected and makes your code more maintainable. In this section, we’ll walk through setting up testing using Jest in a TypeScript-based Node.js Express project.
Jest is a popular testing framework maintained by Facebook. It offers several benefits:
ts-jestFirst, you’ll need to install Jest along with the TypeScript preprocessor ts-jest and type definitions for Jest. Run the following command:
npm install --save-dev jest ts-jest @types/jest
This command adds Jest as a development dependency along with everything needed to run tests written in TypeScript.
Next, configure Jest for your project. Create a jest.config.js file in the root directory of your project:
module.exports = {
  preset: 'ts-jest',
  testEnvironment: 'node',
  moduleFileExtensions: ['ts', 'js'],
  testMatch: ['**/tests/**/*.test.(ts|js)'],
  globals: {
    'ts-jest': {
      tsconfig: 'tsconfig.json',
    },
  },
};
This configuration tells Jest to:
ts-jest to process TypeScript filestests folder with names ending in .test.ts or .test.jsA common approach for organizing your test files is to create a separate folder for tests:
project/
├── src/
│   ├── controllers/
│   │   └── itemController.ts
│   ├── middlewares/
│   │   └── errorHandler.ts
│   └── ...
├── tests/
│   └── itemController.test.ts
└── ...
This organization keeps your tests separate from your production code.
Let’s create a simple test for our CRUD API. For demonstration purposes, we’ll write a test for the controller that fetches all items. Assume we have a basic controller function in src/controllers/itemController.ts that looks like this:
import { Request, Response, NextFunction } from 'express';
import { items } from '../models/item';

export const getItems = (req: Request, res: Response, next: NextFunction) => {
  try {
    res.json(items);
  } catch (error) {
    next(error);
  }
};
Now, create a test file at tests/itemController.test.ts:
import { Request, Response } from 'express';
import { getItems } from '../src/controllers/itemController';
import { items } from '../src/models/item';

describe('Item Controller', () => {
  it('should return an empty array when no items exist', () => {
    // Create mock objects for Request, Response, and NextFunction
    const req = {} as Request;
    const res = {
      json: jest.fn(),
    } as unknown as Response;

    // Ensure that our in-memory store is empty
    items.length = 0;

    // Execute our controller function
    getItems(req, res, jest.fn());

    // Expect that res.json was called with an empty array
    expect(res.json).toHaveBeenCalledWith([]);
  });
});
In this test:
Request and Response objectsgetItems controller and assert that it responds with an empty arrayTo run your tests easily, add a script to your package.json:
{
  "scripts": {
    "test": "jest",
    "test:watch": "jest --watch"
  }
}
Now, you can run npm test to execute your tests. The --watch flag is helpful during development as it reruns tests when files change.
For a smoother development experience, use Jest’s --watch mode or integrate it with your existing development watchers like nodemon to run tests automatically as you code.
Below is an improved and expanded section on how to deploy a TypeScript + Express application using Docker.
Deploying your TypeScript + Express application with Docker streamlines the setup process and ensures consistency across environments. Below, we detail the necessary steps, including creating a Dockerfile, setting up a .dockerignore file, and building and running the Docker container.
Place a Dockerfile in the root of your project. This file defines your container’s environment and instructions to build your app:
# Use an official lightweight Node.js image.
FROM node:18-alpine

# Set the working directory in the container.
WORKDIR /usr/src/app

# Copy package.json and package-lock.json (if available)
COPY package*.json ./

# Install dependencies.
RUN npm install

# Copy the rest of the source code.
COPY . .

# Build the project (assuming tsc is configured to output to the 'dist' folder)
RUN npm run build

# Expose the port (make sure this matches your config; here we assume 3000)
EXPOSE 3000

# Start the application.
CMD ["npm", "start"]
To optimize your Docker image and avoid copying unnecessary files, create a .dockerignore file in your project root:
node_modules
npm-debug.log
dist
.env
This file tells Docker which files and directories to ignore when building the container image, reducing build context size.
Once your Dockerfile and .dockerignore are set up, you can build and run your Docker container using the following commands:
Build the Docker image:
docker build -t ts-express-app .
This command builds an image tagged ts-express-app from the current directory.
Run the Docker container:
docker run -p 3000:3000 ts-express-app
The -p 3000:3000 flag maps port 3000 of your container to port 3000 on your host machine, allowing you to access your application via http://localhost:3000.
In a TypeScript project, transpiling or building involves the TypeScript Compiler (TSC) interpreting the tsconfig.json file to determine how to convert TypeScript files into valid JavaScript.
To compile the code, you must execute the command npm run build. A new dist directory is created in the project root after successfully executing this command for the first time. Within this directory, you will find the compiled versions of our TypeScript files in the form of valid JavaScript. This compiled JavaScript is essentially what is used in the production environment.
If you designate any other directory as the value for the outDir field in the tsconfig.json file, that specified directory would be reflected here instead of dist.
To improve this process further, set up TypeScript for reliability with strict type checking and configurations that adapt to your needs. Make the most of the tsconfig.json file by specifying the best-suited production settings for your project. Improve performance with code splitting by utilizing tools like webpack for efficiency and shrinking file sizes with tools like Terser.
As the project expands, ensure code stability through automated testing with tools like Jest and streamline the workflow from development to production with CI/CD pipelines.
In this guide, we explored how to set up TypeScript with Node.js and Express, focusing on configuring key elements for a smooth development experience. We created a server, configured ts-node, and used nodemon for hot reloading to streamline the workflow. We also saw how to handle unit testing on the API endpoints then we finally deployed on Docker.
Using TypeScript has its benefits, but it does come with a bit of a learning curve. You have to carefully analyze whether using TypeScript in your Node.js and Express backend projects is beneficial or not, which may depend on the requirements of your project.

LogRocket lets you replay user sessions, eliminating guesswork by showing exactly what users experienced. It captures console logs, errors, network requests, and pixel-perfect DOM recordings — compatible with all frameworks, and with plugins to log additional context from Redux, Vuex, and @ngrx/store.
With Galileo AI, you can instantly identify and explain user struggles with automated monitoring of your entire product experience.
Modernize how you understand your web and mobile apps — start monitoring for free.

Learn how to use Gemini CLI subagents to delegate frontend, backend, testing, and docs tasks to specialized agents with guardrails and clear ownership.

Learn how next-browser gives AI agents runtime context for debugging Next.js apps, including React props, hydration, PPR, forms, and performance.

Build dynamic LLM routing in Next.js with OpenRouter, TanStack AI, task classification, model fallbacks, and cost-aware routing.

TSRX adds first-class control flow, conditional hooks, and scoped styles to React via a TypeScript compiler extension — no new framework required.
Would you be interested in joining LogRocket's developer community?
Join LogRocket’s Content Advisory Board. You’ll help inform the type of content we create and get access to exclusive meetups, social accreditation, and swag.
Sign up now

