

PTSD and Sock Roundup
Tuesday, 28 July 2026
As part of my People Tech Support Duties (PTSD), I have come across all sorts of users. Usually they have at least a little computer literacy. For example, if I tell them over the phone to turn the computer off or press the power button, they usually don't need to be told where the button is located. (I say "usually", because there has been the rare case where I had to tell the person which box under the desk was the computer and where the power button was located.)
Ironically, I find the people who have some tech knowledge to be harder to help. They eagerly click things, open new windows, and wander off on tangents instead of following directions. (One of my repeated PTSD users often fights me for control of the mouse when I'm logged in and remotely controlling the desktop. When helping that user, I've learned to not use any remote desktop software. That kind of "Type A+" personality must remain in control.)
In her defense, I will point out that her husband always used the computer, so she didn't have to. And her prior computer experience was from the 1960s, where pressing the wrong button would require a technician two hours away to come on site and fix the computer. You absolutely didn't want to make a mistake.
Given this background, the user was very timid about moving the mouse, while trying to be overly precise when clicking. The entire concept of drag-and-drop was difficult. Basic instructions, like "Grab the window by the address bar and drag it to the left, so the entire window is on the screen" required defining 'window', 'address bar', 'drag', and explaining that you don't have to be very precise: clicking and holding the mouse button down anywhere on the address bar would work.
This wasn't the first user I've encountered who really didn't understand basic mouse concepts. Things like moving the mouse, clicking on something, and dragging it to a location are not always intuitive. These actions seem instinctive to experienced users, but they're actually built on several learned concepts: the desktop metaphor, the idea that the mouse controls an on-screen pointer rather than the computer itself, and enough hand-eye coordination to connect physical movement with what appears on the display.
When moving the mouse, there are also the occasional "avoidance" issues, like "do not mouse over that object, or it will automatically open a huge popup, preventing you from navigating to where you want to go." Even experienced users sometimes need to "steer around" poor interface designs.

(On the Vertiv/Liebert UPS web site, I accidentally moused over their "Products & Services" menu. This popped up a massive menu that covers the entire page of products and requires scrolling to get below the menu. If your mouse is at the top of the screen, then do not move it straight down to the product listing. Instead, navigate the mouse around the menu so you can get to the product listing.)
Using games as a teaching tool goes back centuries. Scientific studies have repeatedly shown that people retained the material better when it is presented in a game. The game doesn't even need to be very good; Richard Mayer is a pioneer in computer game-based learning, who found that the mechanics are more important than the storyline or visual design. (The Mayer method: immediate feedback, scaffolded difficulty, and spatial integration.) Other researchers found that high quality graphics do not enhance learning and "seductive details" can hinder learning. In other words, a polished, commercial-quality game isn't necessary. A simple activity that repeatedly exercises the right skills is often just as effective.
I wanted a simple game that teaches four basic mouse skills:
For anyone interested, here is the game. It is designed for a desktop system with a mouse, not a laptop with a trackpad or tablet with a touch screen. https://hackerfactor.com/games/sock_roundup.html
For full disclosure: The entire game is in JavaScript. The initial version was created using Claude based on a detailed description that I provided. I then edited to code and made some modifications to the gameplay.
If this game helps even one new computer user become comfortable with a mouse, then the project was worth an evening or two of JavaScript. If anyone has thoughts on how to make this game more engaging or entertaining, or have other suggestions to help inexperienced computer users learn how to use the mouse, then I'm open to suggestions!
Ironically, I find the people who have some tech knowledge to be harder to help. They eagerly click things, open new windows, and wander off on tangents instead of following directions. (One of my repeated PTSD users often fights me for control of the mouse when I'm logged in and remotely controlling the desktop. When helping that user, I've learned to not use any remote desktop software. That kind of "Type A+" personality must remain in control.)
Less Than Technical
I recently came across a user who was far less computer literate and had difficulty with things like navigating with the mouse.In her defense, I will point out that her husband always used the computer, so she didn't have to. And her prior computer experience was from the 1960s, where pressing the wrong button would require a technician two hours away to come on site and fix the computer. You absolutely didn't want to make a mistake.
Given this background, the user was very timid about moving the mouse, while trying to be overly precise when clicking. The entire concept of drag-and-drop was difficult. Basic instructions, like "Grab the window by the address bar and drag it to the left, so the entire window is on the screen" required defining 'window', 'address bar', 'drag', and explaining that you don't have to be very precise: clicking and holding the mouse button down anywhere on the address bar would work.
This wasn't the first user I've encountered who really didn't understand basic mouse concepts. Things like moving the mouse, clicking on something, and dragging it to a location are not always intuitive. These actions seem instinctive to experienced users, but they're actually built on several learned concepts: the desktop metaphor, the idea that the mouse controls an on-screen pointer rather than the computer itself, and enough hand-eye coordination to connect physical movement with what appears on the display.
When moving the mouse, there are also the occasional "avoidance" issues, like "do not mouse over that object, or it will automatically open a huge popup, preventing you from navigating to where you want to go." Even experienced users sometimes need to "steer around" poor interface designs.
(On the Vertiv/Liebert UPS web site, I accidentally moused over their "Products & Services" menu. This popped up a massive menu that covers the entire page of products and requires scrolling to get below the menu. If your mouse is at the top of the screen, then do not move it straight down to the product listing. Instead, navigate the mouse around the menu so you can get to the product listing.)
Socks Don't Suck
I decided to approach this problem a little differently than I normally would. I've spent the last few evenings creating a JavaScript game that requires moving the mouse, dragging objects, and navigating around obstacles.Using games as a teaching tool goes back centuries. Scientific studies have repeatedly shown that people retained the material better when it is presented in a game. The game doesn't even need to be very good; Richard Mayer is a pioneer in computer game-based learning, who found that the mechanics are more important than the storyline or visual design. (The Mayer method: immediate feedback, scaffolded difficulty, and spatial integration.) Other researchers found that high quality graphics do not enhance learning and "seductive details" can hinder learning. In other words, a polished, commercial-quality game isn't necessary. A simple activity that repeatedly exercises the right skills is often just as effective.
I wanted a simple game that teaches four basic mouse skills:
- Moving to a target,
- Clicking accurately enough, but not requiring extreme precision,
- Dragging objects, and
- Navigation around hazards.
- The goal: You have a messy bedroom with socks strewn around the floor. Use the mouse to drag each sock to the washing machine. This requires identifying small items on the screen, clicking on them, and dragging them to the washing machine.
- Avoidances: Dogs and cats are in the room and chasing your mouse. If they touch it, then they bite or scratch the pointer, and you lose the round. Each level adds more socks, dogs, and cats.
- Bonuses: If you make it to level 5, then there's a red button. Clicking it will either drop dog biscuits around the room (diverting the dogs away from your mouse), or a red laser pointer that holds the interest of the cats.
- Safe zones: Sometimes you just need to rest for a moment. There is furniture in the room. Hover the mouse over the furniture and the animals can't reach you. At least, for a short rest before they figure out how to jump onto the bed, desk, etc. (You can also drag the furniture to make barricades.)
For anyone interested, here is the game. It is designed for a desktop system with a mouse, not a laptop with a trackpad or tablet with a touch screen. https://hackerfactor.com/games/sock_roundup.html
For full disclosure: The entire game is in JavaScript. The initial version was created using Claude based on a detailed description that I provided. I then edited to code and made some modifications to the gameplay.
If this game helps even one new computer user become comfortable with a mouse, then the project was worth an evening or two of JavaScript. If anyone has thoughts on how to make this game more engaging or entertaining, or have other suggestions to help inexperienced computer users learn how to use the mouse, then I'm open to suggestions!
On a Power Trip
Monday, 20 July 2026
My laptop is one of my most important tools. While my servers and office systems have all of my configured software and documents, I can't take them with me on customer trips, or even to the living room for some late-night catching up while watching TV. The laptop is basically my portable window into my office.
I don't need a powerful laptop. I'm not a gamer and I rarely develop software directly on it. The biggest applications I use are Impress for presentations and VLC for watching movies on airplanes. Most of the time, I'm simply accessing websites, running diagnostics, or remotely logging into my office. (If someone were to steal my laptop, they won't get much. They can't access the office without my passwords and biometrics. If it ever were stolen, I can immediately lock down all network access to my office with a single unpublished URL.)
This OS switch came with a few pleasant surprises:
Under Windows, I found a few other people with the same problem, but "reboot Windows" was the cure for everything. With Linux, there are enough tools for a real diagnosis and easy fix.
The laptop communicates with the touchpad using a two-wire protocol called I2C. When the laptop suspends and restores, the I2C drivers can get into an inconsistent state, causing the buttons to fail. The solution? I created a system restore script that restarts the I2C drivers when it wakes up. With Ubuntu, create the executable file "
The same goes with laptops. For someone who has been in the computer field for over 40 years, I've only ever owned four laptops. My first one was an Apple. (Never again.) It lost OS support after 2 years. However, I didn't move off of the laptop until the browser providers (Chrome and Firefox) stopped supporting it. I needed a modern browser, so that meant a modern laptop.
My Asus EeePC was my favorite because it was tiny and lightweight. However, after a decade most OS's dropped support for the Atom processor, so I had to update again.
These days, I'm using a Dell XPS that I purchased in 2017. The hardware is designed to last, the only issue was the touchpad -- and that's fixed now. That just left the battery.
Lithium-ion batteries typically last seven to ten years, although heavy cycling, deep discharges, and heat can shorten that lifespan. My laptop was from 2017, putting it well into the "old battery" range. When it was new, it could hold a charge for 8-10 hours while running Windows. After eight years, Windows was lasting 4-6 hours before I switched to Linux. Linux lightened the power requirements, bringing it back to a 10 hour battery. That doesn't mean that the battery is fresh; it just means that the new OS was more power efficient.
Over the last year, it had entered the fast decline that is typical for lithium batteries. Last month, a full charge was lasting 2.5 - 3.5 hours (still under Linux). If I can't last an entire airplane flight, then that's effectively a dead battery. While I'm thrilled to have had nearly 9.5 years out of this battery, I had to make a choice:
The huge price range really bothered me. As far as I can tell, all of the sub-$75 batteries were from pop-up providers. Vendors who were here today and gone tomorrow. Each had reviews that ranged from "5 stars: It works!" to "1 star" with long paragraphs about all of the problems and non-responsive vendors. Even though the batteries were all marketed as "new", they were probably "newly rebuilt" and not really "new".
Dell no longer makes this battery, but a few companies still have good reputations for selling genuinely new batteries rather than rebuilt packs. I had never purchased from iFixIt before. And now that I have, I highly recommend them. (I am not a paid spokesperson, I'm just a very happy customer. As an aside, I often blog about problems with vendors. This time, I only have positive things to say.)
The battery was affordable (under $100 and with free shipping). It arrived on time. It arrived well-packaged and undamaged. (This is always a concern with lithium batteries.) It said that the package included a small toolbox, but that wasn't part of my decision process. Now that I've used it, this is one of the nicest toolboxes I've ever had for repairing equipment. It includes:
Here's the toolbox:
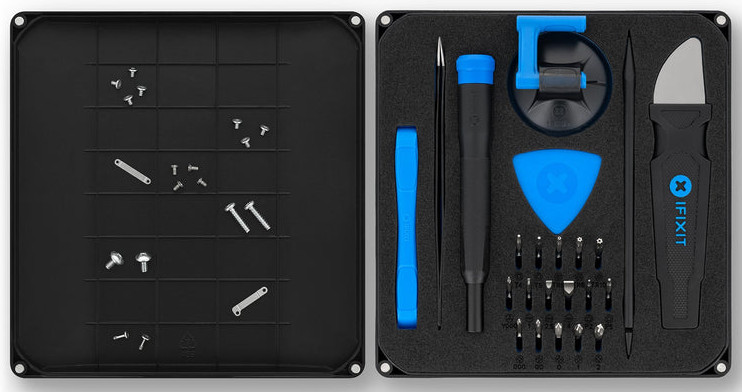
(Be careful pushing on the blue plastic triangular shims in the middle. There are a bunch of them and they will all suddenly pop out!)
And here's the laptop mid-replacement:
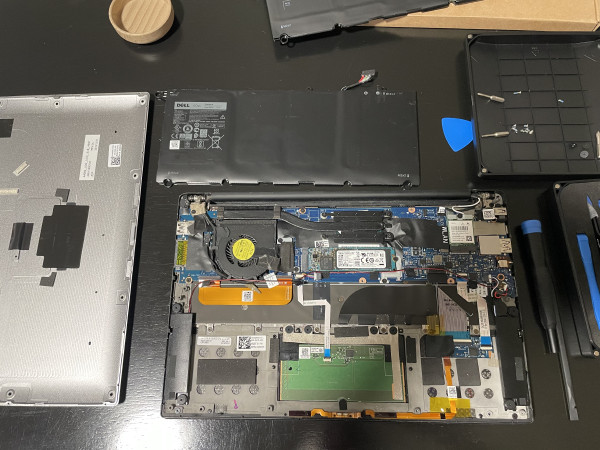
(The old battery is off the top of the photo. The new battery is the black rectangle in the top center. It goes over the touchpad, which is the green board at the bottom of the screen.)
A few years ago, I tried to replace the battery in my Samsung tablet. I had a hodgepodge collection of tools and ended up destroying the tablet. I was worried about doing the same thing to the laptop. But with the right tools, going slowly, and taking photos, I managed to replace the battery without any problems in under 30 minutes. (Now that I know what I'm doing, I could probably do it in 10 minutes without feeling rushed.) It was truly painless.
The next step is to calibrate the battery. This isn't for the battery's health; it calibrates the software that reports how much power remains.
To calibrate with Linux, you should remove the power history. This forces it to learn based on the new battery.
The full discharge step is kind of a challenge, since the OS wants to be as efficient as possible. Turn off power-saving mode, turn off the screen saver, turn off suspend, etc. I gave it something to do: play the movie "The Bourne Identity" over and over until the battery was fully drained. (The computer will warn about low voltage, and then shutdown automatically. That's the full discharge.) With this new battery? I expected it to last for 12 or 14 hours. Instead, it ran for 30 hours! (I suspect that it was using a hardware-based video decoder which is very power-efficient, and letting the CPU itself effectively rest and consume flea power.)
The final full charge cycle probably only needed a few hours, but I let it go overnight.
With the new battery installed and calibrated, Linux reports "15 hours remaining". After five hours of use, I still have "14 hours remaining", and if I start compiling code, it drops to "10 hours remaining." I'm not too worried about the calibration's accuracy since it may take the OS time to learn. I might not be able to tell the time remaining with extreme accuracy, but I'm sure it will last an entire plane flight on travel days.
In my home town of Fort Collins, they are building a new library. This one will include an "innovation maker-space". They recently had an open house to discuss wants and needs with the community. People wanted everything from a 3D printer and laser cutter to sewing machines, button makers, and classes on gardening. One of the things that was repeatedly mentioned by attendees was a repair station. Whether it's a team of volunteers, one-time hands-on classes, or something in between, people have a strong desire to repair electronics before buying a replacement.
My successful weekend project is exactly why community maker-spaces are so vital. When manufacturers design hardware to be opened, and companies like iFixIt provide the exact toolkits to do it safely, fixing our own tech transitions from a stressful gamble to a rewarding afternoon project. We don't need to throw away perfectly good silicon just because a battery gets old. Keeping this laptop out of a landfill isn't just a win for my wallet, it's a small victory for a more sustainable, fix-it-first mindset.
The combination of a lightweight Linux OS, a fresh battery, and the right tools completely resurrected a piece of hardware that most people would have recycled years ago. It may not be the latest or greatest, but it's perfect for the next time I leave the office.
I don't need a powerful laptop. I'm not a gamer and I rarely develop software directly on it. The biggest applications I use are Impress for presentations and VLC for watching movies on airplanes. Most of the time, I'm simply accessing websites, running diagnostics, or remotely logging into my office. (If someone were to steal my laptop, they won't get much. They can't access the office without my passwords and biometrics. If it ever were stolen, I can immediately lock down all network access to my office with a single unpublished URL.)
More Laptop
Last year, I wrote about my laptop. Back then, the Windows 10 operating system was hitting end-of-life and needed to be replaced. The final straw was the "Patch Tuesday" where the laptop sat at "Restarting" forever. Since the laptop is only used for remote access, there was nothing that needed keeping. I ended up reinstalling it with Ubuntu Linux.This OS switch came with a few pleasant surprises:
- The laptop was significantly faster. (Windows is a resource hog!)
- The hard drive had a lot more room. (Linux is smaller than Windows.)
- Restoring the network from suspend worked perfectly. This had been a problem under Windows.
- The original battery lasted 8-9 hours under Windows, but had aged to lasting 4-6 hours from a full charge. With Linux, I was getting 10-12 hours of use from the same hardware.
- I had some touchpad issues under Windows. Switching to Linux made those issues mostly go away.
Touchpad
While the touchpad issues were mostly resolved, they weren't completely gone. The mouse cursor would move correctly, but sometimes the mouse buttons would become non-responsive or require multiple presses before they worked. A reboot would fix the problem temporarily, so I didn't think it was the hardware wearing out.Under Windows, I found a few other people with the same problem, but "reboot Windows" was the cure for everything. With Linux, there are enough tools for a real diagnosis and easy fix.
The laptop communicates with the touchpad using a two-wire protocol called I2C. When the laptop suspends and restores, the I2C drivers can get into an inconsistent state, causing the buttons to fail. The solution? I created a system restore script that restarts the I2C drivers when it wakes up. With Ubuntu, create the executable file "
/lib/systemd/system-sleep/restart-touchpad":That's it. You don't need to restart anything. Now the touchpad works properly all of the time.#!/bin/sh
case "$1" in
post)
# Unload the ACPI and I2C drivers
rmmod i2c_hid_acpi
rmmod i2c_hid
# Reload them for a clean reset
modprobe i2c_hid
modprobe i2c_hid_acpi
;;
esac
Old Hardware
I usually keep hardware until it stops working. For example, I had an old Pentium computer with a 120MB hard drive that I used as my mail server for over 20 years. OS patches? Ha! It was still running Redhat 5.1! (Old hacker security tip: nobody looks for 20-year-old vulnerabilities, and newer vulnerabilities didn't work on old systems.) In my opinion, as long as the system is stable, why risk replacing it? The only reason I retired that old mail server was that everyone was moving to TLS for secure email transfers and some of the OpenSSL dependencies were too complicated to port to the old system. The 30+ year old hardware itself still worked fine.The same goes with laptops. For someone who has been in the computer field for over 40 years, I've only ever owned four laptops. My first one was an Apple. (Never again.) It lost OS support after 2 years. However, I didn't move off of the laptop until the browser providers (Chrome and Firefox) stopped supporting it. I needed a modern browser, so that meant a modern laptop.
My Asus EeePC was my favorite because it was tiny and lightweight. However, after a decade most OS's dropped support for the Atom processor, so I had to update again.
These days, I'm using a Dell XPS that I purchased in 2017. The hardware is designed to last, the only issue was the touchpad -- and that's fixed now. That just left the battery.
Battery
No laptop batteries last forever. With lithium-ion, they start with a long lifespan and then slowly degrade over time. However "slowly" isn't linear. After a few years, you'll start seeing the battery runtime decline, and as time passes it will decline very rapidly. When it's completely dead, it might hold a charge for five minutes.Lithium-ion batteries typically last seven to ten years, although heavy cycling, deep discharges, and heat can shorten that lifespan. My laptop was from 2017, putting it well into the "old battery" range. When it was new, it could hold a charge for 8-10 hours while running Windows. After eight years, Windows was lasting 4-6 hours before I switched to Linux. Linux lightened the power requirements, bringing it back to a 10 hour battery. That doesn't mean that the battery is fresh; it just means that the new OS was more power efficient.
Over the last year, it had entered the fast decline that is typical for lithium batteries. Last month, a full charge was lasting 2.5 - 3.5 hours (still under Linux). If I can't last an entire airplane flight, then that's effectively a dead battery. While I'm thrilled to have had nearly 9.5 years out of this battery, I had to make a choice:
- (A) Get a new laptop. These days, that would cost me $900 - $1500.
- (B) Get a new battery. I saw prices that varied from $25 to $100.
The huge price range really bothered me. As far as I can tell, all of the sub-$75 batteries were from pop-up providers. Vendors who were here today and gone tomorrow. Each had reviews that ranged from "5 stars: It works!" to "1 star" with long paragraphs about all of the problems and non-responsive vendors. Even though the batteries were all marketed as "new", they were probably "newly rebuilt" and not really "new".
Dell no longer makes this battery, but a few companies still have good reputations for selling genuinely new batteries rather than rebuilt packs. I had never purchased from iFixIt before. And now that I have, I highly recommend them. (I am not a paid spokesperson, I'm just a very happy customer. As an aside, I often blog about problems with vendors. This time, I only have positive things to say.)
The battery was affordable (under $100 and with free shipping). It arrived on time. It arrived well-packaged and undamaged. (This is always a concern with lithium batteries.) It said that the package included a small toolbox, but that wasn't part of my decision process. Now that I've used it, this is one of the nicest toolboxes I've ever had for repairing equipment. It includes:
- A metal shim, for prying open lids without cracking the tabs.
- A bunch of plastic shims, so the lid doesn't close while sliding the metal shim around the seams.
- Every screw driver bit size you might need.
- High quality tweezers.
- A plastic tool that is great for helping peel up tape.
- A suction cup, in case you're repairing a cellphone screen.
- Even the toolbox lid is well-designed, with grids for holding screws. I populated it with the screws I pulled out (each type and location went in a different holder) and put the screwdriver bit next to it as I went.
Here's the toolbox:
(Be careful pushing on the blue plastic triangular shims in the middle. There are a bunch of them and they will all suddenly pop out!)
And here's the laptop mid-replacement:
(The old battery is off the top of the photo. The new battery is the black rectangle in the top center. It goes over the touchpad, which is the green board at the bottom of the screen.)
A few years ago, I tried to replace the battery in my Samsung tablet. I had a hodgepodge collection of tools and ended up destroying the tablet. I was worried about doing the same thing to the laptop. But with the right tools, going slowly, and taking photos, I managed to replace the battery without any problems in under 30 minutes. (Now that I know what I'm doing, I could probably do it in 10 minutes without feeling rushed.) It was truly painless.
Calibration
After swapping the battery, the laptop wouldn't turn on. That's fine -- the new battery shipped without a charge. After 10 minutes of charging, I could turn the laptop on. (Good! I didn't break anything.)The next step is to calibrate the battery. This isn't for the battery's health; it calibrates the software that reports how much power remains.
- Typical batteries: With regular lead-acid and alkaline batteries, the output voltage is pretty linear. You can measure the voltage to determine the battery's remaining capacity.
- Lithium-ion batteries: Lithium-ion batteries have a long, flat discharge rate. You can't just look at the voltage and determine how much battery time is left. During the flat discharge rate, the micro-voltage differences can be too small for the hardware to detect; there may be no measurable difference between 30% and 70% capacity. To estimate the remaining time, the OS uses a combination of measured voltage and a timer for how long it took to drain. For the calibration, you put it through a full charging cycle, full discharge, and full charge again. This helps the software guestimate the capacity during the flat discharge rate.
To calibrate with Linux, you should remove the power history. This forces it to learn based on the new battery.
sudo systemctl stop upowerNext, fully charge the battery. Let it charge for at least two hours beyond "fully charged".
sudo rm /var/lib/upower/history-*
sudo systemctl start upower
The full discharge step is kind of a challenge, since the OS wants to be as efficient as possible. Turn off power-saving mode, turn off the screen saver, turn off suspend, etc. I gave it something to do: play the movie "The Bourne Identity" over and over until the battery was fully drained. (The computer will warn about low voltage, and then shutdown automatically. That's the full discharge.) With this new battery? I expected it to last for 12 or 14 hours. Instead, it ran for 30 hours! (I suspect that it was using a hardware-based video decoder which is very power-efficient, and letting the CPU itself effectively rest and consume flea power.)
The final full charge cycle probably only needed a few hours, but I let it go overnight.
With the new battery installed and calibrated, Linux reports "15 hours remaining". After five hours of use, I still have "14 hours remaining", and if I start compiling code, it drops to "10 hours remaining." I'm not too worried about the calibration's accuracy since it may take the OS time to learn. I might not be able to tell the time remaining with extreme accuracy, but I'm sure it will last an entire plane flight on travel days.
Right to Repair
There's an entire movement centered around the right to repair equipment. Being able to change a battery in a working device is one of those basic tenets. My Samsung tablet appeared designed to self-destruct when opened. My Dell laptop was built to be repaired, and the tools from iFixIt simplified this process. I'm sure my laptop is good for at least another seven years.In my home town of Fort Collins, they are building a new library. This one will include an "innovation maker-space". They recently had an open house to discuss wants and needs with the community. People wanted everything from a 3D printer and laser cutter to sewing machines, button makers, and classes on gardening. One of the things that was repeatedly mentioned by attendees was a repair station. Whether it's a team of volunteers, one-time hands-on classes, or something in between, people have a strong desire to repair electronics before buying a replacement.
My successful weekend project is exactly why community maker-spaces are so vital. When manufacturers design hardware to be opened, and companies like iFixIt provide the exact toolkits to do it safely, fixing our own tech transitions from a stressful gamble to a rewarding afternoon project. We don't need to throw away perfectly good silicon just because a battery gets old. Keeping this laptop out of a landfill isn't just a win for my wallet, it's a small victory for a more sustainable, fix-it-first mindset.
The combination of a lightweight Linux OS, a fresh battery, and the right tools completely resurrected a piece of hardware that most people would have recycled years ago. It may not be the latest or greatest, but it's perfect for the next time I leave the office.
Meta's Un-Stable Signature
Tuesday, 30 June 2026
I'm wrapping up my investigation into invisible watermark algorithms and I am extremely disappointed. Not only do none of the modern AI-based algorithms work as they claim, it turns out that they are all making the same fundamental mistake.
I previously evaluated Google's SynthID and Adobe's TrustMark algorithms. Both of them claim to have incredibly accurate results.
WARNING: This blog entry leans heavily into math and statistics to prove that Stable Signature, TrustMark, and SynthID are nowhere near as reliable as their developers claim.
However, there is a problem with the traditional approaches: injecting hidden data in the image could create visible distortions. The modern approach uses an AI system to better hide the data with less added distortion.
As with SynthID and TrustMark, Stable Signature encodes binary data and uses an AI-model to decide where to hide it in the image. The AI is tuned to minimize visible distortions when embedding the data. Later, an AI-based decoder looks at the image and identifies the likely location where bits are stored, then it extracts the data.
There is always the case that the data may be mixed with noise. Different AI-based watermarking systems rely on different techniques for reducing the noise. For example:
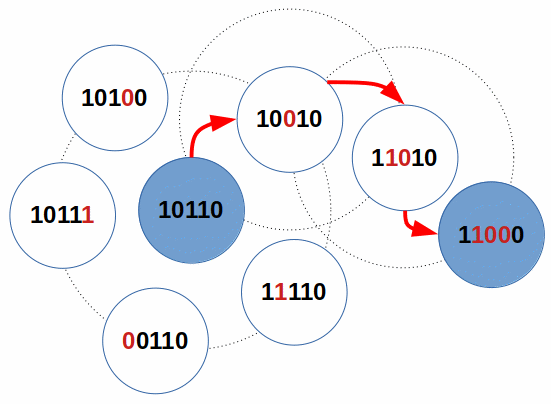
The Hamming distance measures the number of bits that need to be swapped in order to correct the code. In effect, it defines a set of stable states (e.g., 10110 and 11000) and places a ring around each state that represents the single bit changes. If you change enough bits, then you will reach a different stable state.
According to Meta's Stable Signature research paper, the 48-bits should be uniformly distributed and cites a "false positive rate below 10-6", or 1 in one million. This means you can choose a 48-bit sequence to use as your signature. Every picture will generate a 48-bit sequence, and the sequence can vary a little based on noise in the picture. However, if you find a code that is within a short Hamming distance of your code (e.g., within 6 bits difference), then you can determine that it is the same code with a high reliability.
At least, that's the theory.
Fortunately, this is something I can test! I grabbed an uncurated sample of pictures from FotoForensics: the first 10,000 unique images uploaded last month (May 2026). If the bit sequences are uniformly distributed with a "1 in 1 million" collision rate, then I should see a huge number of unique bit sequences and a few small clusters around pictures from Meta (Meta AI, Facebook, Instagram, etc.). Those clusters will represent the invisible watermarks used by Meta.
The results from my empirical test were definitely not what I expected. I found:
Their paper assumes a binomial distribution. That is, given an arbitrary image, the 48-bits represent a random coin flip. The math becomes:
This computes the probability of 48 random bits being within a Hamming distance (T). The probabilities table becomes:
Meta's paper says that they use a Hamming distance of 7 bits (requiring 41 of 48 bits), which matches their claim of a "false positive rate below 10−6". However, I'm seeing problems at a Hamming distance of 6 (should be 1 in 20 million) and even collisions at 0 (1 in 281 trillion)!
According to Meta's paper, each of the 48-bits are independent. In a perfectly independent 48-bit hypercube, un-watermarked images should scatter uniformly across all 248 possible values. However, neural networks map a non-linear manifold (a multi-dimensional wavy surface) through this hypercube. This mathematical landscape is warped with its own peaks, ravines, and valleys. It has attractors that form clusters, and repulsers that form voids where stable values can never exist; this is a feature of a neural network. And most importantly, the output bits are explicitly not independent.
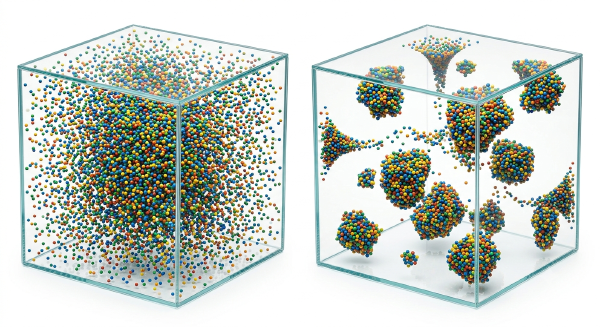
The left diagram illustrates an expected uniform distribution if all of the bits were independent. The right diagram are the types of theoretical clusters that form when the bits are dependent. There should be clusters around attractors and voids (areas with no dots) from the repelling regions.
Moving from theoretical to empirical, I graphed the data. The 48 bits can be represented as bytes. I took the first 24 bits and converted them into 8-bit red, green, and blue pixel colors. If the data is truly random, then the colored dots should be distributed across the RGB cube. However, if the bits are dependent, then there should be very clear clusters, structures, and voids. Here's the graph:
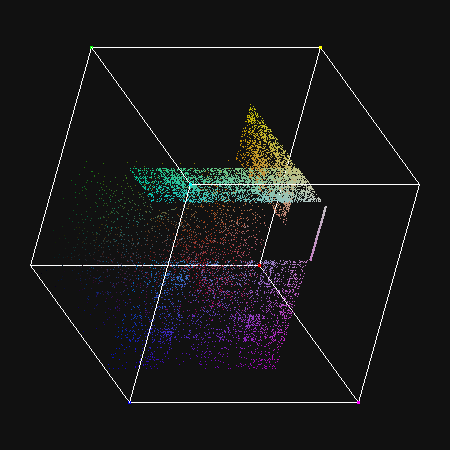
Yes, there are very clear structures that look like planes and lines. Within the planes are clusters, and outside the planes are very large voids -- areas where there are no dots at all. The data generated by Meta's Stable Signature implementation fails this basic test for independence.
The biggest cluster that I found represents a Zero Signal Bias (ZSB). When their neural network doesn't find a watermark, it moves the 48 bits toward a strong attractor, like a massive gravitational well. At 6 bits error, it should have a collision of around 1 in 20 Million. But in reality, my 10,000 pictures had a cluster of 450 images within 6 bits due to the ZSB. That's an error rate of around 1 in 22 with the ZSB alone. If we add in all of the other clusters that contain at least 10 pictures, then 2327 pictures are in various clusters; we're looking at an error rate around 1 in 4 -- and that's at a Hamming distance of 6, which is more conservative than their paper's Hamming distance of 7. (In AI terms, this is a representation collapse or structural bias that is typical for deep neural networks.)
(As an aside: Given their "1 in 1 million" claim, I could look for any clusters of 2 or more pictures. At clusters of 2 or larger, 5,237 of the 10,000 test images were in clusters, or 52%. If you show their algorithm 10,000 pictures, then there is a better-than 50% chance of a false positive match.)
I fed Meta's code the first 10,000 images from May 2026. A few of the images were in unsupported formats (HEIC, WebP, and a few corrupted JPEG files), resulting in 9,847 viable pictures. I evaluated this data with elements from the NIST Statistical Test Suite (SP 800-22) for randomness, including a monobit test and Chi-Squared (χ2) test for independence.
The monobit test determines if the baseline frequency of adjacent bits seems independent.
The second test is the Chi-Square (χ2) Test for Serial Independence. If the bits were independent, the transition probability between adjacent bits would just be the product of their individual probabilities. This table shows the occurrence rate of the transition pairs across all of the observed 10,000 (well, 9,847) pictures:
For the TL;DR crowd:
Meta's researchers made a fundamental mistake when computing their accuracy rates. It's not a "1 in 1 million" chance of a false match, it's closer to 1 in 4 -- because the 48 bit values per signature are not independent.
As I re-read Meta's research paper, I realized that the statistical error wasn't an oversight; Meta's researchers explicitly acknowledged the problem. In their paper (Section 4.1), they wrote:
It's also worth noting that, shortly after releasing Stable Signature, Meta developed another algorithm: Pixel Seal. (Not to be confused with my own Secure Evidence Attribution Label / SEAL technology.) Pixel Seal moves to a 256-bit payload to increase the capacity, and their related model, Chunky Seal, pushes up to 1024 bits. While Meta's approach focuses heavily on addressing the invisibility side using an adversarial-only discriminator, the underlying approach still uses a neural network mapping. Using more bits only exacerbates this flaw.
However, that same usage does not work with legal cases. For example, consider an insurance company. Most insurance claims today include photographic evidence. The company wants camera-original photos, but have to use whatever the customer submits. The problem is that there is a lot of insurance fraud. In theory, seeing a watermark from an AI system like Meta, Google, or Adobe, should be great for identifying and ruling out fraud. Unfortunately, Stable Signature, SynthID, and TrustMark are so inaccurate that none of them can be trusted; it's not even worth testing to see if customer photos contain these invisible watermarks.
For these watermarking systems, I'm talking about very high error rates: roughly 1-in-4 for Meta, 1-in-5 for Adobe, and 1-in-20 for Google. But let's pretend that they work much better, like a 1-in-20,000 false positive rate. An insurer processing 100,000 claims per month would expect to accuse around 5 completely honest customers of fraud each month. Falsely denying 5 out of 100,000 claims? That creates a toxic customer service nightmare, severe legal liability, and fines from regulatory bodies for bad-faith claim denials. This could even become a class-action lawsuit that they couldn't win.
As bad as it is for insurance and financial institutions, there are much higher stakes at play. The EU AI Act (Article 50(2)), China's GB 45438-2025, California SB 942, and similar legislation are moving toward mandating AI content watermarking.
The failure of these three leading systems, from three Fortune-500 companies, to meet their own claimed accuracy rates is not just an academic curiosity. Regulators and courts will employ these systems for attribution and fraud detection. Reliable AI-based watermarking technology is not ready.
Three companies. Three algorithms. Three different research teams. The same fundamental error. The false positives won't go on trial. People will.
I previously evaluated Google's SynthID and Adobe's TrustMark algorithms. Both of them claim to have incredibly accurate results.
- According to Google's peer-reviewed and published paper, they claim to have a true positive rate (TPR) above 99.97% -- meaning that they will miss their own watermarks no more than 3 in 10,000 times. However, my own empirical testing found that is it much closer to 1 in 20. Moreover, SynthID is proprietary and only accessible through Google's "Gemini" AI system. Gemini has been observed hallucinating results and providing contradictory conclusions depending on how the question is phrased.
- According to Adobe's Content Authenticity Initiative, their TrustMark "can exceed 96% bit accuracy at around 42-45dB PSNR quality under severe noise degradations". However, that statistic focuses on resilience and not accuracy. In my empirical tests, I found that TrustMark has a 10%-20% false positive rate, effectively making it useless. (If you see a TrustMark signature, then it is very likely random noise and not an actual signature.)
WARNING: This blog entry leans heavily into math and statistics to prove that Stable Signature, TrustMark, and SynthID are nowhere near as reliable as their developers claim.
The Basic Algorithm
Traditional (non-AI) invisible watermarks typically hide in subtle locations, such as the least significant bits, changes in brightness (e.g., Digimarc) or the frequency spectrum (DCT or FFT). There is always the risk that image encoding could corrupt the hidden data, so these algorithms typically rely on repetition over the image to help identify the true signal. In addition, they may include error correction code (extra bits in the data) to fix any minor data errors.However, there is a problem with the traditional approaches: injecting hidden data in the image could create visible distortions. The modern approach uses an AI system to better hide the data with less added distortion.
As with SynthID and TrustMark, Stable Signature encodes binary data and uses an AI-model to decide where to hide it in the image. The AI is tuned to minimize visible distortions when embedding the data. Later, an AI-based decoder looks at the image and identifies the likely location where bits are stored, then it extracts the data.
There is always the case that the data may be mixed with noise. Different AI-based watermarking systems rely on different techniques for reducing the noise. For example:
- Google's SynthID only stores a few bits of data (effectively a flag or version number). This allows them to use a lot of data as repetition and to increase the accuracy rate.
- Adobe's TrustMark uses the Bose-Chaudhuri-Hocquenghem (BCH) algorithm. This acts as a combination of checksum and error correcting code that should reduce the number of errors.
The Hamming distance measures the number of bits that need to be swapped in order to correct the code. In effect, it defines a set of stable states (e.g., 10110 and 11000) and places a ring around each state that represents the single bit changes. If you change enough bits, then you will reach a different stable state.
According to Meta's Stable Signature research paper, the 48-bits should be uniformly distributed and cites a "false positive rate below 10-6", or 1 in one million. This means you can choose a 48-bit sequence to use as your signature. Every picture will generate a 48-bit sequence, and the sequence can vary a little based on noise in the picture. However, if you find a code that is within a short Hamming distance of your code (e.g., within 6 bits difference), then you can determine that it is the same code with a high reliability.
At least, that's the theory.
Empirical Testing
I went into this experiment assuming that everything works like they claim. I want to be able to reliably identify invisible watermarks associated with Meta. What I don't know is what sequence they use, or whether they use multiple codes depending on whether it comes from Meta's AI system, Facebook, Instagram, WhatsApp, etc.Fortunately, this is something I can test! I grabbed an uncurated sample of pictures from FotoForensics: the first 10,000 unique images uploaded last month (May 2026). If the bit sequences are uniformly distributed with a "1 in 1 million" collision rate, then I should see a huge number of unique bit sequences and a few small clusters around pictures from Meta (Meta AI, Facebook, Instagram, etc.). Those clusters will represent the invisible watermarks used by Meta.
The results from my empirical test were definitely not what I expected. I found:
- No clusters associated with any Meta images. This suggests that Meta does not use their own Stable Signature watermarking software found on GitHub.
- With a random distribution, there should be no clusters. However, I had 25 different pictures that had the exact same bit sequence: 110110100111111011101001111000100111011000011101. With a 1 in a million collision rate, this should not happen! These pictures came from very different sources. Here's four of the 25 pictures (ranging from planets to light bulbs to text with a transparent (black) background):
All of these pictures have dark/black backgrounds and something bright in the middle. This suggests that Stable Signature operates more like a perceptual hash than an invisible watermark. - Stable Signature uses a Hamming distance to identify a cluster. If I assume the 25 pictures are the center (centroid) of the cluster and use a 6-bit Hamming distance, then there are 356 pictures that are similar. And if I assume that the 25 pictures are not the center but part of a cluster, then a Hamming distance of 6 has a cluster of 450 pictures centered 3 bits away, at 110110000111111011101011111000100111001000011101. This cluster represents 4.5% of the uncurated image data set! Here are a few samples from this larger cluster:
(I'm explicitly not sharing pictures with personal information, like invoices, recognizable people, and GPS information.)
Independent Analysis
I went back to Meta's research paper to see if I could find the discrepancy. And there it was, in section 3.1: They tested their system against the hypothesis that the 48-bits are each independent and uniformly distributed. The problem is, they use one neural network to generate the bits. That explicitly means that the bits are dependent, not independent.Their paper assumes a binomial distribution. That is, given an arbitrary image, the 48-bits represent a random coin flip. The math becomes:
This computes the probability of 48 random bits being within a Hamming distance (T). The probabilities table becomes:
| Hamming Distance Threshold (T) | Bit Error Rate (BER) | Probability of a Random Image Matching by Chance |
|---|---|---|
| 14 bits or fewer | ≤ 29.17% | 1 in 362.63 |
| 13 bits or fewer | ≤ 27.08% | 1 in 957.81 |
| 12 bits or fewer | ≤ 25.00% | 1 in 2,788.35 |
| 11 bits or fewer | ≤ 22.92% | 1 in 8,999.08 |
| 10 bits or fewer | ≤ 20.83% | 1 in 32,416.80 |
| 9 bits or fewer | ≤ 18.75% | 1 in 131,390.28 |
| 8 bits or fewer | ≤ 16.67% | 1 in 605,094.89 |
| 7 bits or fewer | ≤ 14.58% | 1 in 3.20 Million |
| 6 bits or fewer | ≤ 12.50% | 1 in 19.83 Million |
| 5 bits or fewer | ≤ 10.42% | 1 in 146.19 Million |
| 4 bits or fewer | ≤ 8.33% | 1 in 1.32 Billion |
| 3 bits or fewer | ≤ 6.25% | 1 in 15.24 Billion |
| 2 bits or fewer | ≤ 4.17% | 1 in 239.15 Billion |
| 1 bit or fewer | ≤ 2.08% | 1 in 5.74 Trillion |
| 0 bits (perfect match) | = 0.00% | 1 in 281.47 Trillion |
Meta's paper says that they use a Hamming distance of 7 bits (requiring 41 of 48 bits), which matches their claim of a "false positive rate below 10−6". However, I'm seeing problems at a Hamming distance of 6 (should be 1 in 20 million) and even collisions at 0 (1 in 281 trillion)!
The Core Problem
There is clearly a discrepancy between the theoretical probabilities and the empirical testing. When I looked back over Meta's research paper, I saw the problem:According to Meta's paper, each of the 48-bits are independent. In a perfectly independent 48-bit hypercube, un-watermarked images should scatter uniformly across all 248 possible values. However, neural networks map a non-linear manifold (a multi-dimensional wavy surface) through this hypercube. This mathematical landscape is warped with its own peaks, ravines, and valleys. It has attractors that form clusters, and repulsers that form voids where stable values can never exist; this is a feature of a neural network. And most importantly, the output bits are explicitly not independent.
The left diagram illustrates an expected uniform distribution if all of the bits were independent. The right diagram are the types of theoretical clusters that form when the bits are dependent. There should be clusters around attractors and voids (areas with no dots) from the repelling regions.
Moving from theoretical to empirical, I graphed the data. The 48 bits can be represented as bytes. I took the first 24 bits and converted them into 8-bit red, green, and blue pixel colors. If the data is truly random, then the colored dots should be distributed across the RGB cube. However, if the bits are dependent, then there should be very clear clusters, structures, and voids. Here's the graph:
Yes, there are very clear structures that look like planes and lines. Within the planes are clusters, and outside the planes are very large voids -- areas where there are no dots at all. The data generated by Meta's Stable Signature implementation fails this basic test for independence.
The biggest cluster that I found represents a Zero Signal Bias (ZSB). When their neural network doesn't find a watermark, it moves the 48 bits toward a strong attractor, like a massive gravitational well. At 6 bits error, it should have a collision of around 1 in 20 Million. But in reality, my 10,000 pictures had a cluster of 450 images within 6 bits due to the ZSB. That's an error rate of around 1 in 22 with the ZSB alone. If we add in all of the other clusters that contain at least 10 pictures, then 2327 pictures are in various clusters; we're looking at an error rate around 1 in 4 -- and that's at a Hamming distance of 6, which is more conservative than their paper's Hamming distance of 7. (In AI terms, this is a representation collapse or structural bias that is typical for deep neural networks.)
(As an aside: Given their "1 in 1 million" claim, I could look for any clusters of 2 or more pictures. At clusters of 2 or larger, 5,237 of the 10,000 test images were in clusters, or 52%. If you show their algorithm 10,000 pictures, then there is a better-than 50% chance of a false positive match.)
Less Than Random
It's one thing for me to claim that there are visible clusters and to show pictures of clusters, but another to prove it mathematically. (Time to dust off my college textbooks from "Introduction to Statistics"...)I fed Meta's code the first 10,000 images from May 2026. A few of the images were in unsupported formats (HEIC, WebP, and a few corrupted JPEG files), resulting in 9,847 viable pictures. I evaluated this data with elements from the NIST Statistical Test Suite (SP 800-22) for randomness, including a monobit test and Chi-Squared (χ2) test for independence.
The monobit test determines if the baseline frequency of adjacent bits seems independent.
- Total Bits Processed: 9,847 pictures × 48 bits per signature = 472,656 bits
- Observed Count of Ones ('1'): 266,419
- Observed Count of Zeros ('0'): 206,237
- Expected Count (E): 236,328 for each.
- In mathemat-ese: with 1 degree of freedom, a χ2 statistic of 7,662.81 yields a p-value infinitely close to 0.0 (p ⋘ 10-100). (As an aside, most Chi-square tables usually evaluate the 1 degree of freedom up to around χ2=10. This χ2 value is so astronomically high that the probability p effectively becomes zero.)
- In English: That's definitely not random or independent.
The second test is the Chi-Square (χ2) Test for Serial Independence. If the bits were independent, the transition probability between adjacent bits would just be the product of their individual probabilities. This table shows the occurrence rate of the transition pairs across all of the observed 10,000 (well, 9,847) pictures:
| Transition Pair | Observed Count (O) | Expected Count under Independence (E) |
|---|---|---|
| 0 to 0 | 106,750 | 90,051 |
| 0 to 1 | 95,296 | 116,186 |
| 1 to 0 | 95,302 | 116,186 |
| 1 to 1 | 165,461 | 149,976 |
- In mathemat-ese: With 1 degree of freedom for the transition contingency table (accounting for fixed margins), a χ2 value of 12,205.9 gives a p-value of 0.0.
- In English: Ain't no way this is random or independent.
- Static Tail Patterns: Looking closely at the end of the 48-bit sequences, a massive cluster of strings end explicitly in ...111101 or ...00111101. Additionally, bit position 46 is nearly always "1" (228 zeros vs 9619 ones, or 97.7% of the time it is "1"), position 47 is "0" (8958 of 9847 images, or 90.97%), and position 48 is "1" (found with 9696 images, or 98.5%) across thousands of uncurated, real-world images.
- Structural Clustering: Certain bit columns share an extraordinarily high Mutual Information score (I(X;Y)). For example, knowing the output of bit position 12 gives you better than an 80% accuracy in predicting bit position 28.
For the TL;DR crowd:
Meta's researchers made a fundamental mistake when computing their accuracy rates. It's not a "1 in 1 million" chance of a false match, it's closer to 1 in 4 -- because the 48 bit values per signature are not independent.
As I re-read Meta's research paper, I realized that the statistical error wasn't an oversight; Meta's researchers explicitly acknowledged the problem. In their paper (Section 4.1), they wrote:
Second, we observed that W’s output bits for vanilla images are correlated and highly biased, which violates the assumptions of Sec. 3.1 [the section about independent statistical test methods].In other words, they recognized that the extracted bits are not independent. Despite this, their published false-positive analysis still relies on the assumption that the bits are independent.
Widespread Problems
Knowing that Meta's accuracy rate is grossly inflated due to assuming bit-wise independence when there is none, I looked back over Google's and Adobe's papers for their own watermarks. Did Google's and Adobe's researchers make this same mistake?- Google's SynthID research paper talks in terms of True Positive Rates (TPR). They do make this same "bit-wise independent" mistake, but it's obfuscated in the paper. You can see the error in their Equation 3 (PDF page 8), where they assume there is a uniform (independent) distribution. Their paper hyperfocuses on the true positive rate and never addresses the false positive distribution. (Either they didn't know to look, or they knew and decided to not report it because it would expose a serious weakness in their solution.)
- Adobe's TrustMark research paper also makes assumptions of independence. You can see this in their PDF with the binary cross-entropy loss in Section 3.1.4. This mathematically treats each bit position as an independent Bernoulli trial. (By definition, a Bernoulli process strictly requires independence.) In their experiments (Section 4.1), they wrote "At test time, every image is associated with a random watermark", but they never tested if the random watermarks were similar to each other.
It's also worth noting that, shortly after releasing Stable Signature, Meta developed another algorithm: Pixel Seal. (Not to be confused with my own Secure Evidence Attribution Label / SEAL technology.) Pixel Seal moves to a 256-bit payload to increase the capacity, and their related model, Chunky Seal, pushes up to 1024 bits. While Meta's approach focuses heavily on addressing the invisibility side using an adversarial-only discriminator, the underlying approach still uses a neural network mapping. Using more bits only exacerbates this flaw.
Potential Uses
Algorithms can have uses. For example, Meta, Google, and Adobe are training their own AI models on images that they encounter. To prevent poisoning their training sets, they want to exclude images generated by their own systems. In this regard, watermarking does help them. For example, if Meta excludes an extra 25% of images (from false positives), then they still have a lot of images that they can train on.However, that same usage does not work with legal cases. For example, consider an insurance company. Most insurance claims today include photographic evidence. The company wants camera-original photos, but have to use whatever the customer submits. The problem is that there is a lot of insurance fraud. In theory, seeing a watermark from an AI system like Meta, Google, or Adobe, should be great for identifying and ruling out fraud. Unfortunately, Stable Signature, SynthID, and TrustMark are so inaccurate that none of them can be trusted; it's not even worth testing to see if customer photos contain these invisible watermarks.
For these watermarking systems, I'm talking about very high error rates: roughly 1-in-4 for Meta, 1-in-5 for Adobe, and 1-in-20 for Google. But let's pretend that they work much better, like a 1-in-20,000 false positive rate. An insurer processing 100,000 claims per month would expect to accuse around 5 completely honest customers of fraud each month. Falsely denying 5 out of 100,000 claims? That creates a toxic customer service nightmare, severe legal liability, and fines from regulatory bodies for bad-faith claim denials. This could even become a class-action lawsuit that they couldn't win.
As bad as it is for insurance and financial institutions, there are much higher stakes at play. The EU AI Act (Article 50(2)), China's GB 45438-2025, California SB 942, and similar legislation are moving toward mandating AI content watermarking.
The failure of these three leading systems, from three Fortune-500 companies, to meet their own claimed accuracy rates is not just an academic curiosity. Regulators and courts will employ these systems for attribution and fraud detection. Reliable AI-based watermarking technology is not ready.
Three companies. Three algorithms. Three different research teams. The same fundamental error. The false positives won't go on trial. People will.
TrustMark's False Positive Problem
Thursday, 18 June 2026
One of my projects for this year was to create an invisible watermark detector for FotoForensics. The idea was to reliably identify if an invisible watermark existed in the uploaded media. However, I've been hitting some roadblocks. Specifically: existing invisible watermark technology is unreliable.
For example, when I evaluated SynthID two months ago, I demonstrated how it (1) fails to detect its own watermark, (2) permits removal and forging, and (3) uses an AI-based evaluation system (Google Gemini) that can hallucinate the evaluation. Depending on how you ask Gemini, it may report that the media is or is not watermarked.
For the last few weeks I have been taking a closer look at Adobe's TrustMark. Calling it a disappointment is an understatement. It is so unreliable as to be completely inappropriate for media watermarking.
Note: For this blog entry, I am only using example images from the public FotoForensics service that exclude images of regular people and personal information (PII).
The user selects the model, ECC level, and the data to encode into the image. The ECC is applied to the data, creating the 100 bits to encode, and the AI model decides where to hide it in the image.
For decoding, the decoder is told what model to use (because different models use different neural networks) and then evaluates the image. Data identified by the AI is passed through an ECC test. Any data that passes the ECC test is considered valid. The decoder returns whether the watermark is present, the detected ECC level, and the raw data bits. BCH operates like both an error correction code and a checksum, reducing false positives.
For my own code, I used Adobe's instructions, their Python library (pip install trustmark), and a short script that tests all four models:
Using the Python code, I tested a wide range of images at FotoForensics against each of the four TrustMark models. For the first test, I checked all of October 2025 (72,424 unique pictures). I was honestly surprised to see 7,358 matches. This includes nearly every combination of model and ECC:
The distribution seemed odd to me; the more lenient the ECC algorithm, the more matches it had. This immediately made me wonder if there was a problem with false-positive matches.
As a test for false positives, I repeated the same experiment using all pictures uploaded to FotoForensics in January 2021 -- more than 2 years before TrustMark was released. In January 2021, FotoForensics received 68,336 unique pictures. According to Adobe's library, there were 7,046 (10.3%) pictures with TrustMark. That's an impossibility (because TrustMark didn't exist in 2021). Depending on the data set I tested, I repeatedly saw between 10% and 20% false positives from real-world pictures.
As an example, consider this viral meme picture of Putin riding a bear:

Adobe's documentation suggests using Q1 as the default. However, Q1 is not immune to false positives. An analyst seeing a result cannot assume that a Q3 match is false or a Q1 match is legitimate.
The results? 1,224 files survived the re-encoding. However, that's a little misleading. For example:
I don't know how many of these images contain real TrustMark watermarks. I do know that it is a very tiny fraction and they are indistinguishable from the overwhelmingly large number of false positives.

I have hundreds of other examples, using B0, B2, C0, Q3, etc. They include photos of text on graph paper, pictures of computer monitors showing BIOS menus, images of spreadsheets and columned data, etc. The one common aspect? There are edges that align in a grid. This appears to represent a special type of false-positive, where a grid causes an apparent attraction to a zero state.
If TrustMark detection were reliable, then different implementations would largely agree on which images contain marks. Instead, the Python and Rust implementations produce substantially different results, suggesting that decoder decisions are highly sensitive to numerical differences. In particular, the Rust code uses different AI and image handling libraries; small numerical differences in these libraries can cascade into a large disparities in detection results.
The Rust code appears to be more sensitive to the JPEG resave test. Applying the resave to the 7009 false positives generated zero retained matches. However, don't assume that this is a good thing; as noted in the next section, the Rust code also failed to match legitimate watermarks after a resave.
The problem is not the detection of these known positives. The problem is the inability to distinguish known positives from the vastly larger population of false positives. Only evaluating known positives results in a selection bias, where it is shown to only work reliably in known controlled experiments.
I also tried the resave and crop tests with these images. The Python implementation successfully recovered the known watermark after each transformation, while the Rust implementation failed to detect the watermark after re-encoding each image as a JPEG. However, because both implementations produce a large volume of false positives, it is impossible to distinguish genuine detections from spurious ones.
There are a few takeaways here:
The idea behind using a watermark is that the C2PA manifest can be trivially removed. If it's removed then you can still detect the watermark and conclude something* about the image. However, without the C2PA manifest, there is absolutely no way to reliably tell if the detected TrustMark is real or one of the 10%-20% false positives.
If a valid C2PA signature is present, the signature already covers the content and associated assertions; the watermark contributes no additional assurance beyond redundancy. If the C2PA signature is absent, the watermark detector alone is too unreliable to provide meaningful assurance.
* What does a TrustMark watermark indicate? As far as I can tell, it doesn't identify a vendor and is not distinctive to a company. It shows that something injected the watermark, but not who, what, or when.
TrustMark appears to solve the wrong problem. In controlled environments with known-positive samples, the Python implementation can successfully recover embedded marks after common transformations such as recompression and cropping. However, in real-world datasets, the detector generates a significant number of false-positive matches on images that could not possibly contain TrustMarks. The resulting error rate makes it impossible to determine whether a detected watermark represents a genuine embedded mark or a decoder artifact.
In my blog entries, I have repeatedly demonstrated how C2PA fails to provide reliable provenance information and enables the generation of authenticated forgeries. TrustMark is intended to provide assurance when the C2PA manifest is missing. Unfortunately, the high false-positive rate undermines that role. Without a reliable way to distinguish genuine marks from spurious detections, the presence of a TrustMark carries no reliable forensic value on its own.
For example, when I evaluated SynthID two months ago, I demonstrated how it (1) fails to detect its own watermark, (2) permits removal and forging, and (3) uses an AI-based evaluation system (Google Gemini) that can hallucinate the evaluation. Depending on how you ask Gemini, it may report that the media is or is not watermarked.
For the last few weeks I have been taking a closer look at Adobe's TrustMark. Calling it a disappointment is an understatement. It is so unreliable as to be completely inappropriate for media watermarking.
Note: For this blog entry, I am only using example images from the public FotoForensics service that exclude images of regular people and personal information (PII).
TrustMark's Watermarks
Adobe's TrustMark uses a combination of error correction code (ECC) to define the watermark's data and an AI-based encoding/decoding system to inject and detect the watermark. They have four different AI models:- Model B: "Beta" represents the baseline model variant matching the initial research implementation. It is based on ResNet-50 (a 46MB AI network)
- Model C: "Compact" is designed to be lightweight and resource-efficient. It's based on ResNet-18 (a 22MB AI network).
- Model P: While each model modifies the pixels and may create visual distortions, the "Perceptual" model is designed to minimize the visual impact. Like B, it's based on ResNet-50.
- Model Q: The default "Quality" model is intended to provide a balance between robustness and imperceptibility. It is also based on ResNet-50.
- Level 0: BCH_SUPER, maximum error correction. This uses 60 of the 100 bits for redundancy, leaving 40 bits (5 bytes) for data. This is the most robust option, but it limits the information that can be stored.
- Level 1: BCH_5, high error correction, up to 5 bit errors and 61 bits of data.
- Level 2: BCH_4, medium error correction, up to 4 bit errors and 68 bits of data.
- Level 3: BCH_3, low error correction, up to 3 bit errors and 75 bits of data.
The user selects the model, ECC level, and the data to encode into the image. The ECC is applied to the data, creating the 100 bits to encode, and the AI model decides where to hide it in the image.
For decoding, the decoder is told what model to use (because different models use different neural networks) and then evaluates the image. Data identified by the AI is passed through an ECC test. Any data that passes the ECC test is considered valid. The decoder returns whether the watermark is present, the detected ECC level, and the raw data bits. BCH operates like both an error correction code and a checksum, reducing false positives.
For my own code, I used Adobe's instructions, their Python library (pip install trustmark), and a short script that tests all four models:
This program (tm-cli.py) reads a list of files from stdin and tests it against all four models. Any errors, such as an unsupported file format, are prefaced with an "e". The output lists the matched encoding method, filename, and data bits. For example:import sys
import os
import gc
import torch
from PIL import Image
from trustmark import TrustMark
def check_image_pixels(image_path, models):
image_path = image_path.strip()
if not image_path or not os.path.exists(image_path):
return
# Using print directly to standard out so you can easily pipe/redirect log output
#print(f"START_FILE: {image_path}")
img = None
try:
# Load image
img = Image.open(image_path).convert('RGB')
print(f"Testing {os.path.basename(image_path)}", file=sys.stderr)
for v, tm in models.items():
try:
# Force binary extraction mode to get the raw bit sequence
secret, present, schema = tm.decode(img, MODE='binary')
# decode can return a list of bits, or a string of bits
if present:
if isinstance(secret, list):
bit_string = "".join(str(b) for b in secret)
else:
bit_string = str(secret)
print(f"{v}{schema} {os.path.basename(image_path)} : {bit_string}")
except Exception as e:
# Error can happen if the decoder fails
print(f"e {os.path.basename(image_path)} {str(e)}")
except Exception as e:
# Error can happen if the format is unsupported (e.g., heic)
print(f"e {os.path.basename(image_path)}")
finally:
# Crucial for NFS streaming: explicitly close file handle and free memory
if img is not None:
img.close()
if __name__ == "__main__":
# Pre-load variants once at startup
print(f"INFO: Preloading modules (please wait)", file=sys.stderr)
variants = ['B', 'C', 'P', 'Q']
loaded_models = {}
for v in variants:
try:
loaded_models[v] = TrustMark(verbose=False, model_type=v)
except Exception as e:
print(f"Initialization Error for variant {v}: {e}", file=sys.stderr)
print(f"INFO: Modules loaded; ready to start processing", file=sys.stderr)
# Counter for periodic Python garbage collection
count = 0
# Stream file paths from stdin line-by-line
try:
for line in sys.stdin:
check_image_pixels(line, loaded_models)
count += 1
if count % 1000 == 0:
gc.collect() # Force free memory every 1000 files
except KeyboardInterrupt:
print("\nINFO: Batch test aborted by user.", file=sys.stderr)
Q3 IMG_1234.jpg : 010110110000100010101110010010101110100101011000011100101100000111010011100

C2 IMG_1235.png : 10011100111100100110001011111110000011100100011111111111110101110101

P2 IMG_1236.jpeg : 01100100100000111101110010000110011110100011011101101101001011111101

e IMG_1237.heic
Testing the Waters
FotoForensics is explicitly provided as a research service. When testing new algorithms, I often test against a month or more of pictures collected at FotoForensics. All data sets have some kind of bias. FotoForensics is biased toward "random people all over the world thought this picture should be evaluated at FotoForensics" -- it could be due to an alteration or forgery, curiosity, or just testing. This is a different bias from other researchers who intentionally harvest pictures from the internet or who manually curate collections. FotoForensics provides a good real-world example of what people would consider evaluating.Using the Python code, I tested a wide range of images at FotoForensics against each of the four TrustMark models. For the first test, I checked all of October 2025 (72,424 unique pictures). I was honestly surprised to see 7,358 matches. This includes nearly every combination of model and ECC:
      5 B0  # B0 was seen 5 times

     34 B1  # B1 was seen 34 times

    286 B2

   1873 B3

      3 C0

     28 C1

    387 C2

   1338 C3

      0 P0  # No instances of P0

     32 P1

    334 P2

   1167 P3

      0 Q0  # No instances of Q0

     34 Q1

    272 Q2

   1565 Q3

   1429 e   # unsupported; mostly HEIC and corrupt JPEGs, not part of the 7,358 matches
The distribution seemed odd to me; the more lenient the ECC algorithm, the more matches it had. This immediately made me wonder if there was a problem with false-positive matches.
As a test for false positives, I repeated the same experiment using all pictures uploaded to FotoForensics in January 2021 -- more than 2 years before TrustMark was released. In January 2021, FotoForensics received 68,336 unique pictures. According to Adobe's library, there were 7,046 (10.3%) pictures with TrustMark. That's an impossibility (because TrustMark didn't exist in 2021). Depending on the data set I tested, I repeatedly saw between 10% and 20% false positives from real-world pictures.
As an example, consider this viral meme picture of Putin riding a bear:
- FotoForensics received this picture on 2021-01-26.
- The uploaded file came from Twitter (pre-Musk): https://pbs.twimg.com/media/DX56ysaX0AAvGpG.jpg:orig. It's still there today.
- The Twitter filename "DX56ysaX0AAvGpG" is in a format called 'Snowflake'. It encodes the date and time it was uploaded to Twitter. In this case, it decodes as 2018-03-10 05:53:00 GMT. (2018 is definitely long before TrustMark existed.)
Adobe's documentation suggests using Q1 as the default. However, Q1 is not immune to false positives. An analyst seeing a result cannot assume that a Q3 match is false or a Q1 match is legitimate.
Pressure Washing
According to Adobe's own description (PDF research paper), TrustMark is designed to survive both re-encoding and cropping. I tested this by re-encoding each of the October 2025 matches (7,358 images) as a JPEG at 90% quality (convert inputfile -quality 90 jpg:out.jpg). A true match should survive this high-quality recompression, while a false-positive should drop out.The results? 1,224 files survived the re-encoding. However, that's a little misleading. For example:
- Of the 7,358 initial matches, 1,224 (16.6%) had a TrustMark after re-encoding. This indicates that at least 83.4% of the initial matches were not robust enough to survive recompression.
- Of the 1,224 that had a TrustMark after re-encoding, 230 (18.8%) had the same decoded TrustMark. The TrustMark data should not change after re-encoding! This indicates that the very high false-positive rate (in this case, 81.2%) carries through even after re-encoding the same pictures.
- I manually checked the remaining images. Of the 230 matches, they all seem to be false-positives. Many are camera originals or screenshots from devices that do not include TrustMark.
This is a two-color (black/0x00 and white/0xff) PNG. The filename is "Blue_bit_2.png", suggesting that it is a bit-wise extraction of one bit from one color channel in some unknown picture. According to TrustMark, it was encoded using C2 and contains: 01010111011001100110101111100111010101110110111101001010110101101111 |
This iPhone screenshot claims to have a TrustMark using P1 and contains: 1101100111100011010110110011010111000000011011001100000100100 |
The lower-right corner has a visible watermark from Google AI, and the metadata that says "Edited with Google AI". Google does not use TrustMark; they use SynthID. According to Gemini, "This image contains a SynthID watermark, indicating that most or all of it was generated or edited using Google AI." My own forensic tools indicate that this came directly from Google AI. According to TrustMark, the original picture contains two TrustMarks! B3: 001001101001110110011101100010010101011110100001111111111100010110100101110 C2: 11001001111111010000111101110110001011111000110111101011111001101010 After a single resave, only the C2 mark remained. In this case, both B3 and C2 TrustMarks are false-positives, but only C2 was strong enough to be retained after a resave. |
I don't know how many of these images contain real TrustMark watermarks. I do know that it is a very tiny fraction and they are indistinguishable from the overwhelmingly large number of false positives.
Cutting Corners
TrustMark is supposed to survive cropping. I tried three different crop methods:- Center: Remove 2% off of all edges. (
convert in.jpg -shave 2x2% -quality 90 jpg:out.jpg) - Top-Left: Remove 4% from the top and left edges. This causes the entire image to shift and moves any JPEG-grid artifacts. (
convert in.jpg -gravity SouthEast -crop 96x96%+0+0 +repage -quality 90 jpg:out.jpg) - Bottom-right: Remove 4% off the bottom and right edges. This retains the JPEG grid alignment. (
convert in.jpg -gravity NorthWest -crop 96x96%+0+0 +repage -quality 90 jpg:out.jpg)
- Resave as JPEG: Reduced 7,358 to 1,224.
- Resave as JPEG with center cropping: Reduced 7,358 to 887.
- Resave as JPEG with upper-left: Reduced 7,358 to 816.
- Resave as JPEG with lower-right: Reduced 7,358 to 883.
- The unaltered original picture tests positive for a TrustMark: C2 11110110110101001110101010011111001100011111101101001101101101100010
- After re-encoding it as a JPEG, it still had a TrustMark, but the value changed: B3 100010100000011100011111111101011111101011111100011101110110111011100100001
- Taking the original, cropping off 4% from the bottom and right edges, and saving as a JPEG still had a TrustMark, but the value changed again: Q2 01001010011001010000110001010101101000100010000011011111011100100011
- Cropping 2% from all edges has a different TrustMark: B3 100000000010001110011111100111011111101111111100011111110110100011001010110
- Cropping from the upper-left resulted in no detectable TrustMarks.
Absolute Zero
In my data sets (both Oct 2025 and Jan 2021), one set of pictures consistently turned up in every test as having an embedded TrustMark. The TrustMark data was all zeros. For example:This used "B0" (0 meaning the strongest error correction and least likely to have a false-positive). The data is "0000000000000000000000000000000000000000" |
B0: 0000000000000000000000000000000000000000 |
B0: 0000000000000000000000000000000000000000 |
C0: 0000000000000000000000000000000000000000 |
B0: 0000000000000000000000000000000000000000 |
I have hundreds of other examples, using B0, B2, C0, Q3, etc. They include photos of text on graph paper, pictures of computer monitors showing BIOS menus, images of spreadsheets and columned data, etc. The one common aspect? There are edges that align in a grid. This appears to represent a special type of false-positive, where a grid causes an apparent attraction to a zero state.
The Rust Bucket
All of the previous tests were performed using TrustMark's Python code. I also tested their Rust implementation. The Oct 2025 data set had 7009 false positives (a similar error rate to the Python code). However, there was only about a 10% overlap (747 instances) between the Python and Rust implementations.If TrustMark detection were reliable, then different implementations would largely agree on which images contain marks. Instead, the Python and Rust implementations produce substantially different results, suggesting that decoder decisions are highly sensitive to numerical differences. In particular, the Rust code uses different AI and image handling libraries; small numerical differences in these libraries can cascade into a large disparities in detection results.
The Rust code appears to be more sensitive to the JPEG resave test. Applying the resave to the 7009 false positives generated zero retained matches. However, don't assume that this is a good thing; as noted in the next section, the Rust code also failed to match legitimate watermarks after a resave.
A Drop in the Ocean
I scoured the entire FotoForensics dataset (over 2,800,000 unique pictures since TrustMark was released in 2023) for any real pictures with TrustMark. I ended up finding 3 confirmed instances. Each instance had C2PA metadata that explicitly said there was a TrustMark present. The images:The C2PA manifest embedded in this PNG says there is a Q2 "00011011110000110001000111100011011100011101001000101100010001101111" and the decoder finds it. |
According to the C2PA manifest in this JPEG, there are two TrustMark signatures. The first is P2 "00100011101011000110101000010000001111001101111101100001001001001101" and the second is P2 "00101011100110111011111001010001101011100001111101110110010110001110". However the decoder only found the second TrustMark. |
With this PNG, the C2PA manifest and decoder both identify Q2 01100101110100111110000100110010101010111000110111001111101110011011 |
The problem is not the detection of these known positives. The problem is the inability to distinguish known positives from the vastly larger population of false positives. Only evaluating known positives results in a selection bias, where it is shown to only work reliably in known controlled experiments.
I also tried the resave and crop tests with these images. The Python implementation successfully recovered the known watermark after each transformation, while the Rust implementation failed to detect the watermark after re-encoding each image as a JPEG. However, because both implementations produce a large volume of false positives, it is impossible to distinguish genuine detections from spurious ones.
There are a few takeaways here:
- TrustMark's Rust code is unreliable on pictures with known TrustMarks and generates a high percentage of false-positives. This makes it completely unreliable. The Rust implementation should not be used in a production environment.
- While TrustMark's Python code works in controlled environments, the high degree of false-positive results means that you cannot assume that a match is a real match.
- While the Python decoder matched all three of these known-watermarked images, even after transformation, "three" is a very small sample size. This is too small of a sample to conclude that the Python decoder provides any kind of reliability on genuine watermarks in general.
Going Down with the Ship
C2PA promotes TrustMark as one of their foundational pillars: "watermarking". Detecting a TrustMark, and seeing the C2PA manifest say that there should be a TrustMark, does not provide any additional assurances. In particular, a user cannot change the visual content to add/alter/remove the invisible watermark without invalidating the C2PA cryptographic signature. (Ignoring all of C2PA's other significant limitations, the cryptographic signature is a stronger assurance and more informative than the watermark.)The idea behind using a watermark is that the C2PA manifest can be trivially removed. If it's removed then you can still detect the watermark and conclude something* about the image. However, without the C2PA manifest, there is absolutely no way to reliably tell if the detected TrustMark is real or one of the 10%-20% false positives.
If a valid C2PA signature is present, the signature already covers the content and associated assertions; the watermark contributes no additional assurance beyond redundancy. If the C2PA signature is absent, the watermark detector alone is too unreliable to provide meaningful assurance.
* What does a TrustMark watermark indicate? As far as I can tell, it doesn't identify a vendor and is not distinctive to a company. It shows that something injected the watermark, but not who, what, or when.
Water Damage
In previous blog entries, I've covered some of the problems with watermarking technologies. In particular, you don't know if there is a watermark (the Watermarking Paradox), and even if you detect a watermark, you don't know if it's the only watermark (the Corollary). Moreover, if you know how the watermark works, you can remove it, clone it to another image, or forge it. Even having a proprietary watermarking solution, like Google's SynthID, is not immune; there is github software that can detect, add, and remove SynthID. AI imagery can be de-watermarked to appear real, and real pictures can be watermarked to cast doubt on the source.TrustMark appears to solve the wrong problem. In controlled environments with known-positive samples, the Python implementation can successfully recover embedded marks after common transformations such as recompression and cropping. However, in real-world datasets, the detector generates a significant number of false-positive matches on images that could not possibly contain TrustMarks. The resulting error rate makes it impossible to determine whether a detected watermark represents a genuine embedded mark or a decoder artifact.
In my blog entries, I have repeatedly demonstrated how C2PA fails to provide reliable provenance information and enables the generation of authenticated forgeries. TrustMark is intended to provide assurance when the C2PA manifest is missing. Unfortunately, the high false-positive rate undermines that role. Without a reliable way to distinguish genuine marks from spurious detections, the presence of a TrustMark carries no reliable forensic value on its own.